
Happy crafting, fellow DIY enthusiasts!
DIY Metal Ribbon Photo Frame: A Budget-Friendly and Stylish Home Decor Project
Are you looking for an easy, affordable, and incredibly stylish way to elevate your home decor? Today, we’re diving into a project that combines rustic charm with a modern metallic edge: a DIY photo frame crafted with gorgeous metal ribbon. This unique approach transforms a simple wood panel into a captivating display for your cherished memories. Get ready to add a personalized touch to your living space!
Like many crafters, I often walk into a store for one item and leave with a bag full of unexpected treasures. My latest discovery at Hobby Lobby was this fantastic metal ribbon, which instantly sparked an idea for a creative project. I knew immediately it would make an eye-catching addition to my DIY shelves in my bedroom. The result? A stunning, personalized photo frame that looks far more expensive than it actually was to make!
This project is surprisingly simple, even for beginner DIYers. In just a few easy steps, you can create a beautiful piece of wall art that perfectly complements your personal style. Let’s gather our materials and get started on this fun and rewarding craft!
Essential Materials and Tools for Your Metal Ribbon Frame
Before we begin, it’s always a good idea to lay out all your materials and tools. This ensures a smooth crafting process and prevents interruptions. Here’s everything you’ll need for this DIY metal ribbon photo frame project:
- Wood Project Panel: A cheap, readily available option from any hardware store. Look for dimensions that suit your desired frame size.
- Metal Ribbon: The star of our project! Found at craft stores like Hobby Lobby. Choose a style and width that appeals to you.
- Wood Stain or Paint: To finish your wood panel. I used Varathane Stain+Poly in Dark Walnut for efficiency and protection.
- Applicator for Stain/Paint: A brush, rag, or foam applicator.
- Measuring Tape or Ruler: For accurate measurements.
- Black Permanent Marker: For marking cuts on the metal ribbon.
- Sharp Scissors: Essential for cleanly cutting the metal ribbon.
- Safety Gloves: Highly recommended when handling metal ribbon to protect your hands from sharp edges.
- Fastening Tool:
- Option A (Recommended): Ryobi AirStrike Nailer (or similar cordless brad nailer) with 3/4″ nails.
- Option B: Hammer and small finish nails (e.g., 3/4″ or 1″).
- Metal Clips (Optional but Recommended): Small silver metal clips, often found at craft stores.
- Strong Adhesive: Gorilla Glue Super Glue Gel (or another quick-drying, strong craft adhesive).
- Saw (Optional, for cutting wood):
- Option A: Miter saw for precise cuts.
- Option B: Simple hand saw for smaller projects.
- Alternative: Most hardware stores offer wood cutting services.
Step-by-Step Guide: Crafting Your Unique Photo Frame
Step 1: Preparing Your Wood Panel
The foundation of our photo frame is a simple wood panel. I opted for an inexpensive project panel from a local hardware store. These panels are fantastic because they come in various sizes, are budget-friendly, and perfect for small DIY projects. My panel was 16 inches wide and long enough to yield at least three frames, all for just around $10! This makes the project incredibly economical.
First, you’ll need to cut your wood panel to the desired size for your frame. Consider the dimensions of the photo you plan to display and how much border you’d like around it. If you have a miter saw, it’s perfect for making clean, precise cuts. However, don’t worry if you don’t own one! Many hardware stores, like Home Depot, offer cutting services, so you can have your wood cut to size right in the store. Alternatively, a simple hand saw works wonderfully for smaller projects like this, providing a rustic, handmade touch.
Step 2: Staining Your Wood for a Rich Finish
Once your wood panel is cut, it’s time to add character with stain or paint. I recently discovered a new favorite stain: Varathane Stain+Poly in Dark Walnut. This product is a game-changer because it combines stain and polyurethane in one application, saving a significant amount of time and effort! It provides a beautiful, rich color while simultaneously sealing and protecting the wood, eliminating the need for a separate topcoat.
Varathane Stain+Poly in Dark Walnut
Apply the stain evenly across all surfaces of your wood panel, following the grain. Use a brush, foam applicator, or clean rag. Allow it to penetrate for a few minutes before wiping off any excess. Always refer to the product’s instructions for specific drying times and reapplication recommendations. If you prefer a painted look, go for it! Just ensure the paint is suitable for wood and allow proper drying between coats. This step truly transforms the raw wood into a refined base for your frame.
Step 3: Preparing Your Metal Ribbon
Now for the star of the show – the metal ribbon! This material is incredibly versatile and adds a unique, industrial-chic aesthetic to your frame.
Take your metal ribbon and lay it out on your stained wood panel. Carefully position it to create the desired frame outline. Using a black permanent marker, make small, precise marks on the ribbon where each corner will be. This will guide your cuts. Once marked, use a pair of sharp scissors to cut the ribbon. It’s surprisingly easy to cut, but remember to wear safety gloves! The edges can be quite sharp, and protecting your hands is crucial for this step. Ensure your cuts are clean and straight for a polished final look.
Step 4: Attaching the Metal Ribbon to Your Frame
With your ribbon pieces cut, it’s time to secure them to the wood panel. While you can certainly use a hammer and small finish nails for this, I highly recommend investing in a cordless brad nailer if you plan on doing more DIY projects. I used my Ryobi AirStrike Nailer, and it made the process incredibly quick and effortless. This tool is a true gem – it’s cordless, which means complete freedom of movement, and it uses the same 18V battery as many other Ryobi tools, making it very convenient. I used 3/4-inch nails, which were perfectly suited for the thin metal ribbon and wood panel.
Carefully place your first piece of metal ribbon onto the wood panel. Using your nailer or hammer, secure it with nails, spacing them evenly along the length of the ribbon. I typically put several nails in each piece until it feels completely secure. The nails are so small that they blend almost seamlessly into the metal ribbon, so there’s no need to worry about covering them. You can barely see them in this photo:
Once you’ve attached three sides, take a moment to inspect your work. If there are any sharp edges at the corners from cutting the ribbon, you can carefully trim them with your sharp scissors. Again, always wear gloves during this process. The ribbon is thin and easy to manipulate, but safety first!
Finally, attach your fourth and final piece of metal ribbon, completing the frame border. Ensure all corners meet neatly for a professional look.
Step 5: Adding the Finishing Touch – Metal Clips
To give your frame a functional and charming detail, add a small silver metal clip. These clips are perfect for holding photos, postcards, or even small notes, allowing you to easily change your display whenever you like. I found these delightful clips at Hobby Lobby, and of course, they were half-off – a true crafter’s delight!
To attach the clip, I used Gorilla Glue Super Glue Gel. This adhesive is fantastic for its quick-drying properties – it sets in about 30 seconds, which means less waiting and more crafting! Apply a small dot of glue to the back of the clip and firmly press it onto your desired spot on the frame, holding it in place for the recommended drying time. The gel consistency prevents excessive dripping and ensures a strong bond.
Your New Custom Photo Frame is Complete!
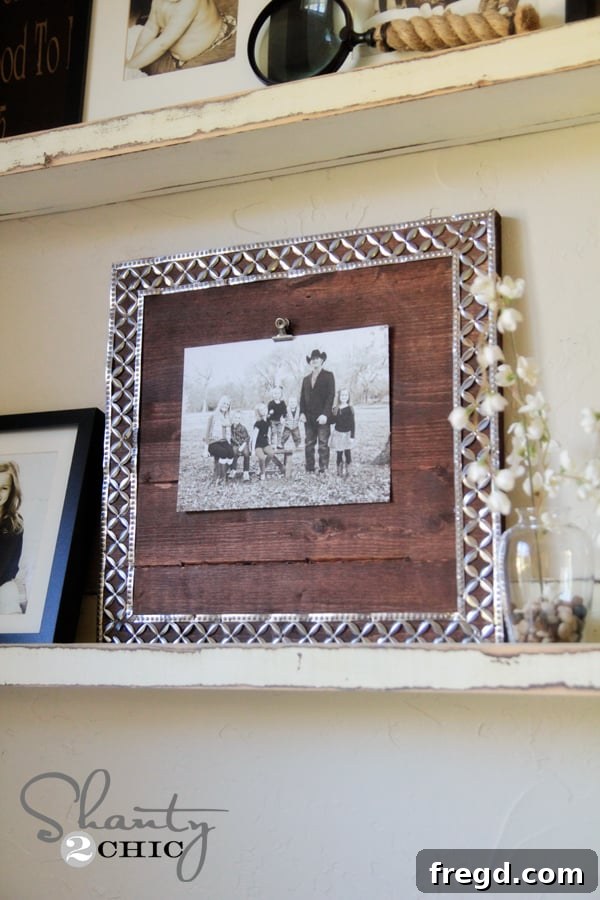
And just like that, your unique metal ribbon photo frame is ready to display! I simply printed out a favorite family photo on photo paper and clipped it onto my new frame. The contrast of the dark stained wood, the metallic ribbon, and the bright photo creates a beautiful focal point. What do you think?
This frame looks fantastic on my bedroom shelves, adding a touch of industrial farmhouse charm. But its versatility means it would be equally at home in a living room, entryway, or even a nursery. The possibilities for customization are endless!
Customization Ideas & Cost-Effectiveness
One of the best aspects of this DIY project is its incredible affordability. With the extra supplies I have, I estimate that each frame costs around $8 to make. Compared to store-bought frames of similar style and quality, this is an absolute steal! The low cost allows you to experiment with different sizes, finishes, and metal ribbon styles without breaking the bank.
Don’t be afraid to unleash your creativity! Here are a few ideas to customize your metal ribbon frame:
- Vary the Finish: Instead of dark walnut stain, try a light distressed paint, a vibrant pop of color, or even a whitewash for a shabby chic look.
- Different Metal Ribbons: Explore different widths, textures, or even colored metal ribbons (if available) to match your decor.
- Embellishments: Add small decorative tacks, fabric flowers, or even mini succulents for a touch of greenery.
- Multi-Photo Display: Create a larger frame and attach multiple clips to display a collage of photos or artwork.
- Gift Idea: These frames make thoughtful, handmade gifts for birthdays, holidays, or housewarmings.
Now that you have a new skill under your belt, I’m sure you’ll start looking around your home, wondering what else could benefit from a touch of that fabulous metal ribbon!
Thank you so much for stopping by and checking out this fun DIY tutorial. I hope you feel inspired to create your own unique photo frame!
If you loved this project, I would be absolutely thrilled if you would pin it to your Pinterest boards and share it with your friends and fellow DIY enthusiasts below. Let’s spread the joy of crafting!
Have an awesome week filled with creativity and beautiful moments!
~Whitney