
Craft Your Own Rustic Clip Frame: A Timeless DIY Gift & Home Decor Project
Welcome, fellow DIY enthusiasts! There’s something uniquely rewarding about creating beautiful, functional items with your own hands. If you’re searching for that perfect blend of rustic charm and personal touch in your home decor, or perhaps a thoughtful, custom gift idea, look no further. This comprehensive guide will walk you through crafting a stunning and versatile rustic clip frame. It’s an easy, budget-friendly project that yields impressive results, making it an ideal choice for crafters of all skill levels. Get ready to transform a simple piece of wood into a cherished display for photos, recipes, or inspiring notes!
Why a DIY Rustic Clip Frame?
In a world of mass-produced items, handmade gifts and decor stand out. A rustic clip frame offers:
- Personalization: Easily swap out photos, artwork, or notes to match moods, seasons, or recipients.
- Affordability: Most materials are inexpensive and readily available at local hardware or craft stores.
- Unique Charm: The distressed finish and decorative finial add a cozy, farmhouse-inspired aesthetic to any space.
- Versatility: Perfect for bedrooms, living rooms, kitchens, or even as an office desk accessory.
- Thoughtful Gifting: A handmade frame with a special memory clipped inside makes an unforgettable present for birthdays, holidays, housewarmings, and more.
This project is not just about making a frame; it’s about crafting a piece that tells a story, holds memories, and adds warmth to any environment. Let’s dive in!
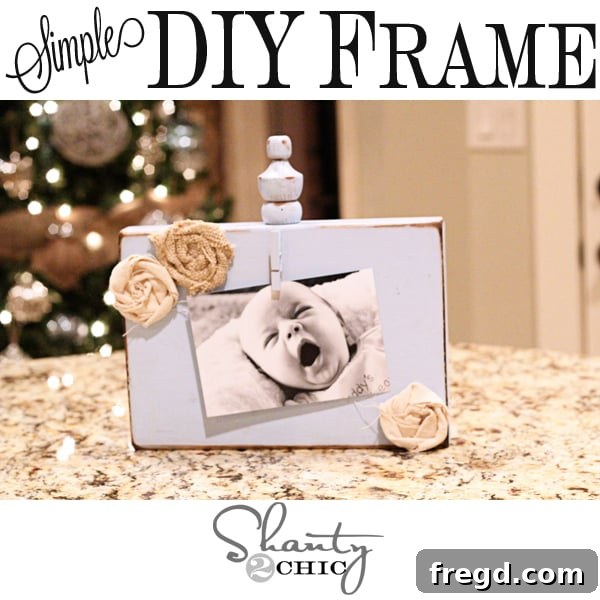
Your Vision: The Finished Rustic Clip Frame
Before we begin, take a moment to visualize the beautiful piece you’re about to create. This final design, featuring a distressed blue finish and delicate fabric flowers, is truly one of my favorites. It’s simple, elegant, and radiates a welcoming charm.
Materials You’ll Need:
Gathering your supplies is the first step to a smooth crafting experience. Here’s what you’ll need for this project:
- Wood Board: One 2x8x8 common board (e.g., pine or spruce). You’ll be cutting an 11-inch piece from this.
- Decorative Finial: A small wooden finial, often found in hardware stores near dowel rods or furniture feet.
- Mini Clothespin: One small wooden clothespin (available at craft stores like Hobby Lobby).
- Paint: A can of spray paint in your desired color (e.g., Rust-Oleum Blue Sky for a similar look).
- Sanding Block/Paper: 80-grit sandpaper or a sanding block for distressing.
- Wood Stain: Dark walnut wood stain (or a comparable color to enhance distressing).
- Fabric Scraps: Small pieces of canvas and burlap for crafting fabric flowers.
- Hot Glue Sticks: For your hot glue gun.
- Optional: Wood glue for added finial stability, primer for paint adhesion, clear topcoat for protection.
Tools for the Job:
- Measuring Tape and Pencil: For accurate marking.
- Saw: A miter saw for precise cuts, or a hand saw with a miter box.
- Drill: With a drill bit sized slightly smaller than your finial’s screw.
- Hot Glue Gun: For quick and secure attachment of the clothespin and flowers.
- Foam Brush or Rag: For applying wood stain.
- Old T-shirt or Clean Rag: For wiping off excess stain.
- Scissors: For cutting fabric.
- Safety Glasses: Always wear eye protection when cutting wood or using power tools.
Step-by-Step Guide to Your Rustic Clip Frame:
Step 1: Prepare Your Wood Base
The foundation of your frame is a sturdy piece of wood. I started with a 2x8x8 common board, which is a versatile and affordable option from places like Lowe’s. This dimension provides a good depth and surface area for your decorative elements. Using your measuring tape and pencil, mark an 11-inch section on your board. For clean, straight cuts, a miter saw is ideal. If you’re using a hand saw, a miter box will help you achieve precision. Remember to always prioritize safety by securing your wood and wearing safety glasses. Once cut, you can lightly sand all edges with a finer grit sandpaper (120-220 grit) to smooth any rough spots before moving on.
Step 2: Finding and Attaching Your Finial
This step often generates the most questions: “Where do you find those finials?!” These decorative accents, usually found on curtain rods or furniture, add a touch of elegance to your frame. I’ve found them at Lowe’s, typically located near the dowel rods and furniture feet. However, stock can vary by store, so if your local Lowe’s doesn’t carry them, try other hardware stores, specialty woodcraft shops, or even online retailers. Look for smaller, wooden finials that complement the scale of your 11-inch board.
Once you have your finial, locate the exact center of your wooden board and mark it with a pencil. Using a drill bit slightly smaller than the finial’s screw, pre-drill a pilot hole. This prevents the wood from splitting and ensures the finial sits straight and secure. Carefully screw the finial into the pre-drilled hole. For extra durability, you can apply a small amount of wood glue to the finial’s base before screwing it in.
Step 3: Attaching the Clothespin
The mini clothespin is the functional heart of your frame, designed to hold your chosen display items. Position it roughly 1-2 inches below the finial, centered on your wooden board. Using a hot glue gun, apply a generous amount of hot glue to the back of the clothespin and firmly press it onto the wood. Hold it in place for several seconds until the glue cools and sets, ensuring a strong bond. Make sure it’s secure enough to hold a photo or card without slipping.
Step 4: Prepare for Painting and Paint Your Frame
Now, it’s time to add some color! Before painting, give your entire piece a quick wipe down to remove any dust or debris. For a vibrant and lasting finish, especially with lighter colors, consider applying a coat of wood primer first. This ensures better paint adhesion and a more even color. Once any primer is dry, you’re ready for paint.
For this project, I used Rust-Oleum Blue Sky, which gives a beautiful, cheerful hue. Spray paint is excellent for achieving a smooth, even coat quickly. Apply several thin coats, allowing each to dry completely according to the manufacturer’s instructions, rather than one thick coat. This prevents drips and ensures a professional-looking finish. Remember to paint in a well-ventilated area.
Step 5: Achieve the Perfect Distressed Look
Once your paint is completely dry – and I mean completely, to prevent smudging – it’s time to add that beloved rustic character. Take an 80-grit sanding block or coarse sandpaper and gently sand the edges, corners, and any raised areas of your frame. The goal is to reveal some of the natural wood underneath, creating a beautifully worn and aged appearance. Don’t be afraid to experiment with how much wood you expose; the beauty of distressing is its imperfect nature.
After sanding, take a foam brush or a clean rag and apply a dark walnut wood stain (or a similar deep brown) over the sanded spots. The stain will seep into the exposed wood, highlighting the distressing and adding incredible depth and warmth. Immediately wipe off any excess stain with an old t-shirt or a clean rag. This technique gives your frame that authentic “shabby chic” or farmhouse feel, making it look like a treasured antique.
Step 6: Embellish with Fabric Flowers (or Your Choice of Decor)
The frame is cute as is, but adding fabric flowers truly elevates it! I adore fabric flowers on almost everything, and they bring a wonderful textural contrast to the distressed wood. I crafted mine from canvas and burlap using this simple no-sew method for flat-rolled rosettes, opting to omit buttons for a more minimalist look. You can create a variety of sizes and layer them for added dimension.
Once your fabric flowers are ready, arrange them artistically around the clothespin or finial, or both, as desired. Use a hot glue gun to securely attach them to your wooden display. If fabric flowers aren’t quite your style, feel free to get creative with other embellishments! Consider decorative buttons, small artificial greenery, twine bows, or even stenciled designs to personalize your frame further.
Step 7: Personalize and Display!
Your beautiful rustic clip frame is now complete! The most exciting part is personalizing it. Clip in a cherished photograph – perhaps a sweet picture of my new niece yawning, as I did – or a favorite family memory. This frame is also perfect for displaying inspiring quotes, your favorite recipe cards in the kitchen, a child’s latest artwork, or even a heartfelt handwritten note. The ability to easily change what’s displayed makes this frame incredibly versatile and a dynamic piece of decor.
The Beautiful Results: Inspiration for Your Frame
Here are some detailed shots of the finished product. Notice how the distressed blue, the dark stain, and the fabric flowers come together to create a cohesive and charming piece. This is just one example of the many looks you can achieve with this versatile DIY project!
Thoughtful Gift Ideas with Your Handmade Frame
The beauty of these clip frames extends far beyond just personal decor; they make exceptionally thoughtful and versatile gifts for almost any occasion. Consider these ideas:
- New Parents: Present it with a precious photo of their newborn, a meaningful quote about parenthood, or a scan of their baby’s footprint.
- Weddings & Anniversaries: A photo from the couple’s special day or a quote about love makes for a truly sentimental present.
- Birthdays: Customize it with a funny childhood photo, a treasured memory with the recipient, or a list of things you love about them.
- Housewarmings: A beautifully crafted frame adds instant character to a new home. Clip in a welcoming message or a local landmark photo.
- Teacher Appreciation: A sweet note from a student, a drawing, or a class photo can make a teacher’s day.
- Cooks & Bakers: Clip in a favorite family recipe to create a charming, functional kitchen display.
- Graduations: A photo from the ceremony or an inspiring quote about their future path.
The ability to easily change the clipped item means your gift will continue to be cherished and adapted over time, making it a gift that truly keeps on giving.
Caring for Your Rustic Creation
To ensure your handmade rustic clip frame remains beautiful for years to come, a little care goes a long way. Simply dust it regularly with a soft, dry cloth. Avoid using abrasive cleaners or excessive moisture, as these can damage the distressed paint finish and the wood. If desired, you can apply a clear matte or satin topcoat (like a polyurethane or wax finish) after the paint and stain have fully cured to offer an extra layer of protection against minor scratches and moisture.
Conclusion: Your Next Favorite DIY Project
Creating this rustic clip frame is a fulfilling project that allows you to infuse your home with personality or craft a deeply meaningful gift. We hope this detailed guide has inspired and equipped you to start your own DIY journey. Remember, the beauty of crafting lies in your ability to customize every element, from paint color to embellishments, making each piece uniquely yours. Don’t hesitate to experiment and let your creativity shine through!
If you have any questions during your crafting process, please don’t hesitate to ask in the comments below. We love hearing from you and seeing your finished projects! Share your rustic clip frames with us on social media and tag your creations.
Thanks so much for joining this creative adventure! Have a wonderful and inspired week!
~ Whitney
John 21:25: “Jesus did many other things as well. If every one of them were written down, I suppose that even the whole world would not have room for the books that would be written.”