
Ultimate DIY Garage & Shop Shelving: Easy, Inexpensive, and Built to Last
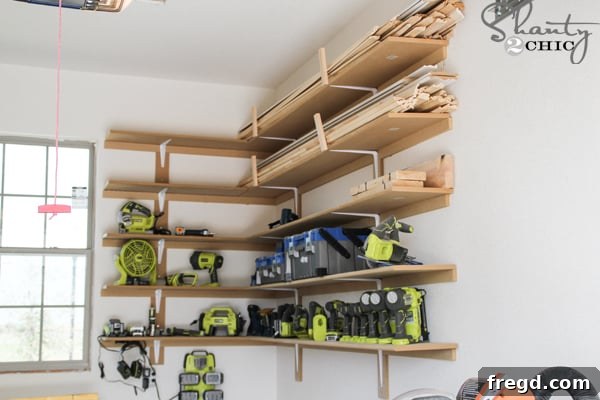
Hello fellow DIY enthusiasts! After a brief hiatus from major house projects, I recently dedicated some much-needed time to whip my workshop into shape. While it’s still an evolving space, I’m thrilled to share an incredibly simple yet highly effective solution that has already made a huge difference: these easy-to-build, inexpensive shelves. Whether you’re tackling a cluttered garage, a messy workshop, or even an overflowing closet, this project is perfectly timed for that much-anticipated spring cleaning push and will revolutionize your storage capabilities.
You might notice some lumber precariously stacked on the top shelf in the initial photos – rest assured, that’s just a temporary holding spot! My ultimate goal is to craft a more permanent and aesthetically pleasing storage solution for it, perhaps something as brilliant and practical as Whit’s fantastic rolling lumber cart. But for now, let’s dive into the core of this project: building robust and efficient wall-mounted shelves that are both budget-friendly and straightforward to construct.
Why Choose DIY Shelving for Your Garage or Workshop?
Opting for DIY shelving offers a multitude of advantages over store-bought alternatives. Firstly, customization is key. You can tailor the length, depth, and spacing of your shelves to perfectly fit your specific space and storage needs, ensuring no valuable vertical real estate goes to waste. Secondly, the cost savings are substantial. By selecting readily available and affordable materials like MDF, you can achieve a professional-looking and highly functional storage system without breaking the bank. Furthermore, there’s an immense sense of satisfaction that comes with building something with your own hands, knowing you’ve created a durable solution that will serve you for years to come. These shelves are designed for utility, offering a sturdy home for everything from paint cans and tools to seasonal decor and bulk supplies.
Materials and Tools You’ll Need for This Project
Before you begin, gather all your materials and tools to ensure a smooth and efficient building process. This project is designed to be accessible for most DIYers, requiring only basic carpentry skills and common household tools.
Materials:
- 1×2 MDF Boards: Used for the wall cleats that support the shelves. MDF is inexpensive and easy to work with.
- 1×4 MDF Boards: Used as backer boards for attaching the shelf brackets, providing extra stability.
- 1×12 MDF Boards (with bullnose recommended): These will form the main shelf surfaces. The bullnose edge offers a slightly finished look and softer aesthetic. You can also opt for standard edge if preferred.
- Liquid Nails (or similar construction adhesive): For a strong initial bond between cleats and the wall, before screws are driven.
- Wood Screws (approx. 2-2.5 inches): To securely fasten cleats and backer boards into wall studs.
- Wood Glue: To reinforce the bond between the shelves and the cleats.
- 1 1/4″ Nails: For attaching the shelf boards to the cleats.
- Shelf Brackets: To provide additional support and ensure the shelves can handle heavier loads. Choose sturdy metal brackets for durability.
Tools:
- Stud Finder: Absolutely essential for locating wall studs, which are critical for secure installation.
- Tape Measure: For accurate measurements of shelf lengths and spacing.
- Level: To ensure all cleats and shelves are perfectly horizontal.
- Pencil: For marking stud locations and cut lines.
- Power Drill/Driver: For driving screws.
- Miter Saw or Circular Saw: For cutting MDF boards to size.
- Nail Gun (e.g., Ryobi Airstrike Nailer): Makes attaching shelves quick and efficient. A hammer and finishing nails can work as an alternative, but a nail gun speeds up the process considerably.
- Safety Glasses: Always protect your eyes when working with power tools.
- Hearing Protection: Recommended when using saws and nail guns.
Step-by-Step Guide to Building Your Easy DIY Shelves
Let’s get started on transforming your space. Follow these steps carefully for a sturdy and long-lasting storage solution.
Step 1: Install the Wall Cleats
The foundation of your shelves lies in securely attaching the cleats to the wall. Start by deciding on the vertical spacing of your shelves. I found that approximately 14 inches between shelves offers a good balance for storing various items without wasting too much space. Cut your 1×2 MDF boards to the desired length of your shelves. Using a stud finder, mark the locations of the wall studs where your cleats will be installed. Apply a generous bead of liquid nails along the back of each 1×2 MDF cleat. Press the cleat firmly against the wall, ensuring it’s level, then drive wood screws through the cleat and into the marked studs. Aim for at least two screws per stud for maximum holding power. This combination of adhesive and screws creates an incredibly strong attachment.
Step 2: Locate Wall Studs and Attach Backer Boards
Once your cleats are in place, it’s time to reinforce the structure for the shelf brackets. While the cleats provide excellent support along the back, the brackets offer forward support and prevent sagging. You’ll need to locate at least two studs for each shelf, ideally in a position where your shelf brackets will eventually be installed. Cut pieces of 1×4 MDF to a length sufficient to span at least two studs and allow for bracket attachment. These 1x4s will serve as sturdy backer boards for your shelf brackets. Sink wood screws into each stud through these 1×4 pieces, ensuring they are perfectly level. These backer boards distribute the weight evenly and provide a solid anchor for your brackets, making your shelves capable of holding heavier items.
Step 3: Cut and Prepare the Shelf Boards
Now for the main event: your shelves! I opted for 1×12 MDF with a bullnose edge for a clean, finished look. The bullnose also adds a touch of safety by eliminating sharp corners. Carefully measure the exact length of your installed cleats. This measurement is crucial to ensure your shelf boards fit snugly against the wall. Using a miter saw or circular saw, cut your 1×12 MDF boards to these precise lengths. Remember the golden rule of carpentry: measure twice, cut once! This step determines the overall appearance and fit of your finished shelves, so take your time and ensure all cuts are straight and accurate.
Step 4: Attach Shelves to the Cleats
With your shelf boards cut, it’s time to secure them to the wall. For an incredibly strong bond, start by applying a continuous line of wood glue along the entire top edge of each installed cleat. This glue acts as an additional adhesive, preventing any movement and increasing the overall strength of the shelf. Carefully place your cut shelf board directly on top of the glued cleat, aligning it perfectly with the front edge. Using a nail gun, such as the Ryobi Airstrike Nailer, drive 1 1/4-inch nails down through the shelf board and into the cleat. Space your nails every 6-8 inches for optimal hold. The combination of wood glue and nails creates a robust, semi-permanent attachment that will withstand years of heavy use.
Step 5: Install Shelf Brackets
The final step in securing your shelves is to install the shelf brackets. These brackets provide essential forward support, especially for deeper shelves or those intended to hold substantial weight. Align each bracket with the 1×4 MDF backer board you previously installed. Use appropriate screws (typically included with the brackets, or choose robust wood screws) to fasten the brackets firmly to the backer board and the underside of the shelf. Ensure the brackets are evenly spaced and level for maximum support and visual appeal. Once all brackets are in place, give your newly installed shelves a gentle test to confirm their stability. You’ll be amazed at how solid they feel!
Customization and Additional Ideas
This shelving system is incredibly versatile and can be adapted to various spaces and needs. While I used 1×12 shelves for the main, longer sections of my workshop – perfect for larger tools, storage bins, and equipment – I also incorporated narrower shelves. For example, I utilized 1×4 MDF pieces to create smaller ledges on a different wall.
These compact ledges are ideal for organizing smaller items like paint cans, stain bottles, and jars of screws or nails, keeping them accessible yet neatly off your workbench. You can easily adjust the depth of your shelves by choosing wider or narrower MDF boards (e.g., 1×8, 1×10) to suit specific storage requirements. Consider painting your shelves to match your garage or workshop’s color scheme, or simply apply a clear coat to protect the MDF. For heavier duty applications, you might consider using plywood instead of MDF for the shelves, though MDF offers a smoother finish and is generally more cost-effective.
Maximizing Your New Organized Space
And just like that, the core of this project is complete! It’s truly amazing how a few simple boards and a little effort can completely transform a chaotic space into a highly functional and organized area. The feeling of having everything in its place is incredibly rewarding, and it makes every future project so much more enjoyable. Now that you have these fantastic new shelves, consider investing in some clear storage bins or containers to keep smaller items neatly contained and easily identifiable. Labeling your bins can also save you a lot of time searching for specific tools or materials. Think about grouping similar items together, placing frequently used items at an easily accessible height, and heavier items on lower, more reinforced shelves.
Conclusion: Embrace the Organized Life!
This project proves that effective garage or workshop organization doesn’t have to be complicated or expensive. With this straightforward DIY shelving system, you can easily create custom storage that meets your exact needs, all while staying within budget. It’s an ideal project for anyone looking to declutter, streamline their workspace, and reclaim valuable floor space. The difference these simple shelves have made in my shop is profound, and I encourage you to tackle this project yourself!
What areas of your home or workshop are you planning to organize this spring? Share your ideas and projects in the comments below!
Thanks so much for stopping by and happy building!
~Ashley