
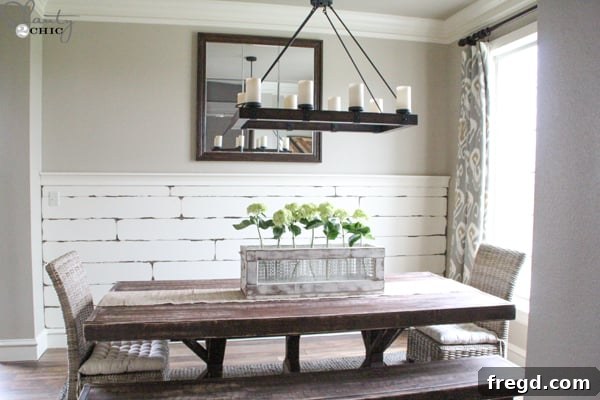
Transform Your Dining Room: An Easy & Affordable DIY Distressed Plank Wall
Are you looking to infuse your dining room with character, warmth, and a touch of rustic charm without breaking the bank? Look no further! This comprehensive guide will walk you through creating a stunning DIY distressed plank wall, a project that is not only incredibly easy but also remarkably inexpensive. I recently paused my larger furniture building endeavors to tackle this impactful wall treatment, and the results speak for themselves. This simple addition has profoundly elevated the room’s aesthetic, proving that significant style can come with a modest budget.
The wall featured in this project spans approximately 12 ½ feet long, with the paneling extending upward about 4 ½ feet. This manageable scale contributed to the total project cost, which came in at around an astonishing $100! This makes it an ideal choice for anyone seeking a high-impact design update on a tight budget. Let’s dive into the details of how this beautiful, distressed wood wall was brought to life, transforming a plain dining space into a cozy, inviting haven.
Why Choose a DIY Plank Wall?
A plank wall is more than just a decorative element; it’s a statement. It adds an immediate sense of history, texture, and architectural interest to any room. For the dining room, it creates a welcoming backdrop for meals and gatherings, lending an artisanal, farmhouse-inspired feel. Beyond its aesthetic appeal, a DIY plank wall offers several practical advantages:
- Budget-Friendly: As demonstrated by this project, you can achieve a high-end look without the high-end price tag, especially when using cost-effective materials like plywood.
- Versatility: Whether you prefer a rustic, modern farmhouse, industrial, or even a coastal vibe, the finish of your plank wall can be customized to suit your existing decor. The distressed look, in particular, adds depth and character that is hard to replicate with paint alone.
- Relatively Easy Installation: While it requires some basic DIY skills and tools, the process is straightforward and can often be completed in a single weekend.
- Temporary or Permanent: Depending on your choice of adhesive and fasteners, a plank wall can be installed in a way that allows for easier removal, making it a great option for renters or those who like to frequently change their decor.
Essential Planning for Your Plank Wall Project
Thorough planning is the cornerstone of any successful DIY project. Before you even think about cutting wood, take the time to properly assess your space and gather your materials.
Measuring Your Space
Begin by accurately measuring the wall you intend to plank. Measure the length and the desired height of your plank treatment. For this project, the wall was 12 ½ feet long and the planks extended 4 ½ feet high. These measurements will help you calculate how much plywood you’ll need. It’s always a good idea to add a small percentage (e.g., 10-15%) for waste or miscuts.
Selecting Your Materials: Plywood vs. Pine
The choice of wood is critical, impacting both the cost and the final look. For this project, two sheets of ½-inch Purebond Birch Plywood were selected. Here’s why plywood is often a superior choice for DIY plank walls:
- Cost-Effectiveness: Plywood is significantly more affordable than purchasing individual solid wood planks, like 1×8 pine boards. This is a major factor in keeping the project cost around $100.
- Consistency and Straightness: Plywood sheets are manufactured to be consistently flat and straight, which is crucial for a smooth and even wall treatment. Individual pine boards can sometimes warp or have inconsistencies, leading to a more challenging installation.
- Ease of Ripping: Hardware stores like Home Depot often offer a cutting service. Having them rip your full plywood sheets into the desired plank widths (in this case, 7 ½-inch boards, essentially creating six 1×8 boards per sheet) saves you time, effort, and ensures precise, uniform cuts. This ‘win, win’ scenario is a huge advantage.
- Thickness Options: While ½-inch plywood was chosen here because its thickness blended perfectly with the existing baseboards, you have the flexibility to choose ¼-inch for a lighter, thinner profile, or ¾-inch for a more substantial look, depending on your preferences and existing trim.
Tools and Supplies Checklist
Before you begin, gather all your necessary tools and materials:
- Two sheets of ½-inch Purebond Birch Plywood (ripped into 7 ½-inch planks)
- 2-inch nails
- Pennies (for spacing)
- 3.5-inch casing (for top trim)
- 1×3 wood board (for the top ledge)
- Wood glue
- Stud finder
- Level
- Jigsaw
- Power drill/screwdriver
- 1 ½-inch machine screws (for electrical outlets)
- ScotchBlue™ Painter’s Tape
- 3M™ Wood Filler
- Wood stain (Varathane Carrington used here)
- Clean cloths (for wiping stain)
- Vaseline
- Latex paint (matched to existing trim)
- Paint roller and tray
- 3M™ Ultra Flexible sanding sheets (150-grit recommended)
Building Your Distressed Plank Wall: A Step-by-Step Guide
With your materials prepped and tools ready, it’s time to bring your vision to life. Follow these steps carefully for a smooth installation.
Step 1: Preparing Your Plywood Planks
Once you’ve brought your pre-cut planks home, you’ll need to cut them to fit your wall’s length. There’s no strict rule for the pattern of the planks, but a good practice is to avoid having all your joints line up vertically. Staggering the seams creates a more organic and visually appealing look, mimicking traditional planking. For instance, start your first piece at 4 feet, and the next at 6 feet. Continue cutting pieces of varying lengths to create an attractive, random pattern as you work your way up the wall, ensuring that no two adjacent vertical joints are directly above each other.
Step 2: Locating and Marking Wall Studs
Securely attaching your planks is paramount. While some prefer panel adhesive, nailing the planks directly to the wall studs offers a significant advantage: it makes the wall treatment more temporary and easier to remove if your design preferences change down the line, or if you’re renting your home. Using a reliable stud finder, carefully locate and mark the studs along the entire length of your wall. These marks will serve as your guide for nailing, ensuring a strong and stable installation.
Step 3: Ensuring a Level Foundation
Before you commit to nailing, use a level to ensure that your first row of planks is perfectly horizontal. This foundational step is critical, as any slight tilt in the initial row will be magnified as you add subsequent rows, leading to a visibly crooked finish. Continually check for levelness as you progress up the wall, making minor adjustments as needed to maintain a professional appearance.
Step 4: Nailing the Planks into Place
With your studs marked and level line established, begin nailing each plank securely into every stud using 2-inch nails. Drive the nails in firmly, ensuring they are flush with the wood surface or slightly countersunk. This method guarantees that your plank wall is firmly affixed to the structural elements of your home, providing durability and peace of mind.
Step 5: Perfect Spacing with Pennies
To achieve a consistent and intentional gap between your planks – a key feature of a rustic or distressed look – use pennies as spacers. As Whitney demonstrated in her Pallet Wall project, simply place pennies between each plank as you nail them into place. This clever trick ensures uniform spacing, adding to the authenticity and charm of your finished wall. Once the plank is nailed, remove the pennies and reuse them for the next one.
Step 6: Navigating Electrical Outlets and Switches
Don’t let existing electrical outlets or light switches intimidate you; incorporating them into your plank wall is surprisingly straightforward.
****Before handling any electrical components, ALWAYS turn off the power to that area at your circuit breaker for safety!**** With the power safely off, unscrew the machine screws holding the electrical sockets and light switches in place. You don’t need to remove them entirely; just loosen them enough so that your ½-inch plank can slide underneath.
Carefully measure and mark the exact location of the socket or switch on the plank that will cover it. Using a jigsaw, precisely cut out the opening. Take your time to ensure a clean cut that snugly fits around the electrical box.
Once the plank is in place, you’ll likely find that the original machine screws holding your sockets and switches are no longer long enough to extend through the added ½-inch of plywood. This is an easy fix!
Purchase 1 ½-inch machine screws (easily found at hardware stores like Home Depot for a couple of dollars) and use them to replace the existing shorter screws. This allows you to securely reattach the outlets and switches over your new planking. With this, your progress should look something like this:
Step 7: Adding the Top Trim and Ledge
Once you’ve installed all your planks up to the desired height (in this case, after 7 rows), it’s time to add the finishing touches that will define the top edge of your plank wall.
A 3.5-inch piece of casing trim provides a clean, polished transition from the planked section to the painted wall above. Attach this trim piece directly on top of your uppermost planks. Use both wood glue for strong adhesion and 2-inch nails driven into the wall studs for structural integrity.
To add a touch of functionality and further enhance the custom look, a small ledge was created. This was achieved by gluing and nailing a 1×3 piece of wood directly on top of the casing. This ledge is perfect for displaying small decorative items, photos, or even seasonal decor, adding another layer of charm to your dining room.
Allow ample time for the wood glue to fully dry before proceeding to the finishing steps. This ensures all components are securely bonded and ready for painting and distressing.
The Art of Distressing: Finishing Your Plank Wall
The distressing process is where the true character of your plank wall emerges. This technique allows you to create an aged, weathered look that adds immense depth and warmth to your space.
Step 8: Preparing for Paint and Stain
Before applying any finishes, proper preparation is key. Use high-quality ScotchBlue™ Painter’s Tape to mask off the surrounding walls, ceiling, and any other areas you want to protect from paint or stain. This ensures crisp, clean lines and a professional finish.
Next, address all the nail holes. Using 3M™ Wood Filler, carefully fill every nail hole, ensuring a smooth, seamless surface. Once dry, lightly sand any excess filler to blend it perfectly with the wood. This step is crucial for achieving a refined finish before applying your stain and paint.
Step 9: Applying the Base Stain
To achieve the dark, rich tones that peek through the distressed paint, the first finishing step is to apply a single coat of wood stain. Focus on applying the stain primarily around the edges of each plank. This technique ensures that when the paint is later distressed, the darker stain beneath is revealed, creating a beautiful contrast and an authentic aged appearance. Varathane Carrington Wood Stain was used for this project, offering a deep, warm hue.
Allow the stain to penetrate the wood for about 5 minutes, then use a clean cloth to gently wipe off any excess. This allows the wood grain to show through while establishing a darker base for the distressed effect.
Step 10: The Vaseline Distressing Secret
Once the stain is completely dry, here’s the clever trick for effortless distressing: apply a very thin layer of Vaseline to the specific edges and areas where you want the underlying stain to “peek through” after painting. The Vaseline acts as a resist, preventing the paint from fully adhering to those spots, making it incredibly easy to distress later.
Step 11: Painting Your Plank Wall
Now it’s time for the top coat of paint. Using a roller, apply two smooth coats of latex paint over the entire planked surface, including the areas where you applied Vaseline. For a cohesive and integrated look, the paint used for this project was custom-mixed at Home Depot to perfectly match the existing trim, ensuring the baseboards seamlessly blend into the new wall treatment.
Step 12: Revealing the Distressed Look
Once the paint has thoroughly dried, it’s time for the magic of distressing. This is where the 3M™ Advanced Abrasives line truly shines, particularly with the 3M Ultra Flexible sanding sheets. This innovative product is truly amazing!
Its unique flexibility allows you to roll it, fold it, and shape it to get into any contour, making it perfect for distressing edges. It works effectively whether wet or dry, is clog-resistant, and remarkably resists punctures, tears, and creases—making it the ultimate sanding solution for a project like this.
Simply take a 150-grit sheet and gently run it along the edges of the planks where you applied the Vaseline. You’ll find that the paint effortlessly comes off, revealing the beautiful dark stain underneath. This controlled removal creates that sought-after aged, worn-in character that defines a distressed finish.
Step 13: The Final Touches
Once you’ve achieved the perfect distressed look, carefully remove all the painter’s tape. Then, reattach the cover plates over your light switch and electrical socket. With these final steps, your beautiful new distressed plank wall is complete!
Your Stunning New Distressed Plank Wall
And just like that, you’ve transformed your dining room with a custom, character-filled distressed plank wall! This project truly is a testament to the power of DIY – it can easily be completed in a single day, and at a cost of around $100, it delivers incredible visual impact for a minimal investment. The satisfaction of stepping back and admiring your handiwork is immeasurable.
I am absolutely thrilled with how my new plank wall turned out. It brings a unique warmth and style that truly elevates the entire dining area.
If you love the look of this room, you might be interested in other DIY projects that complement it. You can download FREE plans to build your own $110 Restoration Hardware-inspired Dining Table HERE. Learn about creating bespoke DIY lined window panels HERE, craft a unique wine bottle centerpiece HERE, or read about the flooring installation in this room HERE. Discover details on the elegant chandelier HERE, and find information on the wall paint color HERE!
Discover More with 3M DIY
For more inspiration and valuable resources for your next home improvement project, be sure to check out the 3M DIY Website. They’ve recently unveiled a fresh new look for their site and are constantly featuring exciting new project ideas designed to fuel your DIY passion. Explore their vast range of products and discover innovative solutions to tackle any challenge.
You can also connect with 3M DIY on their various social media channels for daily tips, project showcases, and community engagement:
- 3M DIY Twitter
- 3M DIY Facebook
- 3M DIY Pinterest
- 3M DIY Instagram
As a proud 3M-sponsored blogger, I have the wonderful opportunity to evaluate products from 3M DIY. The opinions expressed in this post are entirely my own, and any additional products used in this project were personally selected by me to ensure the best possible results.