
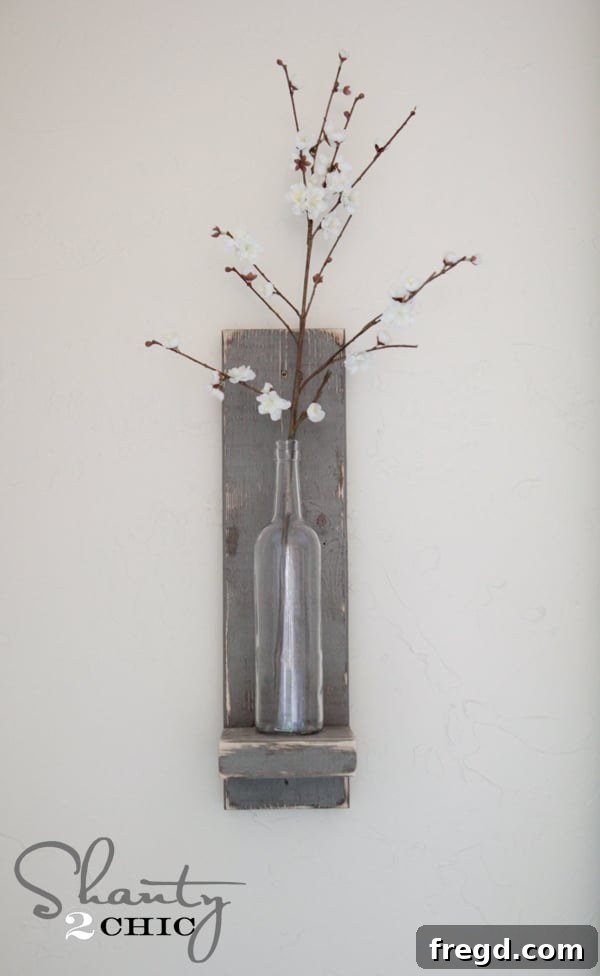
As many of you know, my dining room transformation has been a labor of love, a journey I’ve been thrilled to share with you every step of the way. We’ve tackled the dining table, crafted custom benches, built a stunning sideboard, and installed those chic floating shelves. Each project has brought us closer to a space that feels uniquely ours, brimming with character and warmth. Today, I’m absolutely delighted to unveil the latest addition to this evolving space: the DIY wine bottle wall sconces. These charming pieces, hanging gracefully on either side of my window, add a touch of rustic elegance and a whole lot of personality. Get ready to fall in love with these easy-to-build, incredibly affordable, and utterly captivating wall accents!
DIY Wine Bottle Wall Sconces: Rustic Charm on a Budget
Transforming your home doesn’t have to break the bank, and these wine bottle wall sconces are living proof! Designed to add a touch of farmhouse chic or industrial flair to any room, they are not only incredibly simple to build but also astonishingly budget-friendly. Whether you’re enhancing your dining room, adding character to a hallway, or bringing a cozy glow to a living space, these DIY sconces offer a unique blend of functionality and style. Let’s dive into how you can craft these beautiful accents for your home.
Why You’ll Love This DIY Project
Aren’t they absolutely charming? I think so too! What makes these DIY wine bottle wall sconces even better is their incredible simplicity and affordability. We’re talking about a project that delivers maximum impact with minimal effort and cost. You can construct two beautiful sconces from a single 2×6 board, which typically costs around $6. For the wine bottles themselves, I sourced mine from Hobby Lobby for under $2.50 each, saving me the time and effort of cleaning labels off used bottles. However, you can absolutely repurpose old wine bottles you have on hand, making this project even greener and more economical!
This means the total material cost for a pair of these stunning sconces can be as low as $6, if you reuse bottles. That’s right, six dollars! This is undeniably too good to be true, yet it is. This project is perfect for beginners, those looking for quick home updates, or anyone who appreciates the unique character of handmade decor. The process is straightforward, and the result is a custom piece that looks far more expensive than it is. Let’s get started and I’ll show you just how simple it is to build these beauties!
Tools & Materials You’ll Need
Before we begin crafting our exquisite wine bottle wall sconces, let’s gather everything we’ll need. Having all your tools and materials ready will ensure a smooth and enjoyable building process. Remember, safety first! Always wear appropriate safety gear when working with power tools.
Materials:
- One 2×6 wood board (you can get multiple sconces from one board)
- Wine bottles (new from craft stores or repurposed, clean old bottles)
- Gorilla Wood Glue
- 2-inch wood screws
- Gorilla Glue Epoxy (or similar strong two-part epoxy)
- Varathane Dark Walnut stain (or your preferred wood stain)
- Vaseline (for the distressed look)
- Latex paint (I used Sherwin Williams color Anonymous, SW 7046, or your chosen paint color)
- 2.5-inch wood screws (for wall mounting)
- Wall anchors (if mounting where studs are not available)
Tools:
- Miter saw (for precise wood cuts)
- Kreg bar clamp (or other sturdy clamps)
- Drill/Impact driver (for pre-drilling and driving screws)
- Ryobi Corner Cat sander (or any orbital/block sander, sandpaper)
- Safety glasses
- Gloves
- Paper plate and stir stick (for mixing epoxy)
- Lint-free rags or brush (for stain and paint application)
- Stud finder (for safe wall mounting)
Step-by-Step DIY Wine Bottle Sconce Instructions
Step 1: Making Your Wood Cuts
The foundation of our sconces begins with accurate wood cuts. I used my reliable miter saw to achieve clean, straight cuts, which is essential for a professional finish. For each sconce, you’ll need two pieces of wood: one longer back piece and one shorter front piece that will hold the bottle. While specific dimensions aren’t provided in the original text, based on the images, a good starting point for a single sconce might be a back piece around 18-24 inches long and a front piece about 5-6 inches long. Adjust these lengths to suit your desired aesthetic and the size of your wine bottles. Always measure twice and cut once, and ensure your cuts are perfectly square for a seamless assembly.
Step 2: Applying Wood Glue for a Strong Bond
Once your wood pieces are cut, it’s time to prepare for assembly. Take your smaller wood piece, which will serve as the shelf for your wine bottle, and apply a generous, continuous line of Gorilla Wood Glue along one of its edges. This high-quality wood glue provides an incredibly strong bond, crucial for the longevity and stability of your sconce. Ensure the glue is evenly distributed across the entire edge that will meet the larger back piece. This step is key to creating a durable structure that will securely hold your decorative bottles.
Step 3: Clamping and Securing the Pieces
With the glue applied, carefully position the smaller wood piece onto the front of the longer back board. For optimal placement, I aligned my small board approximately 2 inches from the bottom edge of the long board. This creates a balanced look and ensures there’s enough space above the bottle for stems or other decorative elements. Once positioned, use a Kreg bar clamp (or any strong wood clamp) to firmly hold the pieces together. The clamp not only keeps the pieces in place while the glue sets but also ensures a tight bond. After clamping, use 2-inch wood screws, driving them through the back of the long board and into the smaller front piece. It’s highly recommended to pre-drill pilot holes before driving the screws. This prevents the wood from splitting, especially with softer woods, ensuring a clean and secure attachment. I used two screws for each sconce, providing ample stability.
Step 4: Inspecting the Sconce Structure
At this point, your sconce should start taking its recognizable shape – a sturdy wooden structure ready for its decorative finish. Take a moment to inspect the joints, ensuring they are tight and secure. The combination of wood glue and screws creates a robust framework that will confidently support your wine bottle and its contents. This stage is exciting because you can already envision the final product and how it will enhance your home decor. Now, let’s move on to adding character and charm through staining and painting.
Step 5: Applying the Rustic Finish
Before permanently attaching the wine bottles, we need to bring out the rustic beauty of the wood. I started by staining the sconces using Varathane Dark Walnut stain. This rich, deep stain provides a beautiful base color and enhances the natural wood grain, adding warmth and depth to the piece. Apply the stain evenly with a brush or rag, allowing it to penetrate the wood, then wipe off any excess according to product instructions. Allow the stain to dry completely, which typically takes several hours.
Once the stain is fully cured, it’s time for my favorite distressing technique! I applied a small amount of Vaseline to the edges and corners of the sconce – anywhere that would naturally show wear and tear over time. This creates a resist effect. After the Vaseline, I painted the entire sconce with a latex Sherwin Williams color called Anonymous (SW 7046), a sophisticated gray that beautifully contrasts with the dark walnut stain. Once the paint was thoroughly dry, I used my Ryobi Corner Cat sander (any fine-grit sander will work) over the entire piece. The magic happens where the Vaseline was applied: the gray paint simply chips away, revealing the dark stain beneath. This technique creates an authentic, naturally distressed finish that I absolutely adore, giving the sconces a timeworn, cherished appearance perfect for farmhouse or rustic decor.
Step 6: Attaching the Wine Bottles with Epoxy
Now for the star of the show – the wine bottle! To securely attach the bottle to the wooden sconce, I used Gorilla Glue Epoxy. This powerful two-part adhesive creates an incredibly strong bond, ensuring your bottle stays firmly in place. Epoxy typically comes with two tubes that need to be mixed together in equal parts. I recommend mixing them on a disposable surface, like a paper plate, using a stir stick until the mixture is uniform. Work quickly, as epoxy has a limited working time.
Once mixed, apply a generous amount of epoxy to the bottom surface of each wine bottle. Ensure sufficient coverage for maximum adhesion. Then, carefully place the epoxied bottom of the bottle in the center of the smaller wooden shelf on your sconce. Gently press down to ensure good contact. Once positioned, leave the bottles undisturbed and allow the epoxy to cure completely, which can take several hours depending on the product. Refer to the epoxy’s instructions for exact drying times. This waiting period is crucial for establishing a permanent and reliable bond.
Step 7: Mounting Your Sconces to the Wall
The final step is to proudly display your handmade wine bottle wall sconces. For secure mounting, I used my Ryobi Impact driver with 2.5-inch wood screws. The most critical part of wall mounting is finding studs in your wall – these provide the strongest anchor points. Use a stud finder to locate them and mark their positions. If your desired sconce placement doesn’t align perfectly with studs, don’t worry! You can use appropriate wall anchors (like toggle bolts or self-drilling anchors) for a secure hold in drywall. Simply drive the wood screw directly through the backboard of the sconce and into the stud or anchor in the wall. I chose to leave my screws showing, knowing that the lovely floral stems I planned to place in the bottles would perfectly cover and conceal them, maintaining the sconce’s aesthetic appeal while ensuring robust support.
Styling Your New Wine Bottle Sconces
And that’s it! As promised, this DIY project is refreshingly easy and yields incredible results. Once your sconces are securely mounted, the fun of styling begins. These versatile pieces can be adorned in countless ways to match your home’s seasonal decor or permanent aesthetic. I found my beautiful floral stems at Hobby Lobby, which add a vibrant pop of color and natural texture to the dining room. My elegant window panels, sourced from Pottery Barn, complete the cohesive look. Consider these styling ideas:
- Fresh or Faux Florals: Use seasonal flowers to refresh your decor throughout the year. Faux flowers and greenery offer a maintenance-free option.
- Fairy Lights: For a magical evening glow, tuck a strand of battery-operated fairy lights into the wine bottles.
- LED Candles: While real candles in glass bottles can be risky, flameless LED pillar candles offer a safe and cozy alternative.
- Dried Botanicals: Wheat stalks, lavender, or other dried arrangements can enhance a rustic or farmhouse vibe.
- Seasonal Decor: Small ornaments for holidays, mini gourds for fall, or spring branches can easily transform your sconces.
Explore More Dining Room Transformations!
If you’re as excited about these wall sconces as I am, you’ll definitely want to check out the other DIY updates I’ve completed in our dining room. Each project was designed to be approachable, affordable, and impactful, demonstrating that a dream home is truly built by hand. Don’t miss these detailed tutorials and plans:
DIY Dining Table with Turned Legs
Learn how to build a stunning, sturdy dining table that will be the centerpiece of your family gatherings for years to come.
DIY Triple Leg Benches
Pair your new dining table with these charming and robust triple leg benches, perfect for accommodating more guests with style.
DIY Sideboard with Free Woodworking Plans
Add essential storage and serving space with this elegant farmhouse-style sideboard, complete with free detailed plans.
DIY Floating Shelves
Discover how to build and install sleek floating shelves, perfect for displaying decor and adding functional storage without visible supports.
Final Thoughts & Your Next DIY Adventure
Crafting these DIY wine bottle wall sconces has been a rewarding experience, and I hope this detailed guide empowers you to create your own unique pieces. This project perfectly embodies the spirit of DIY: taking simple materials, adding a touch of creativity, and transforming them into something truly special for your home. Remember, the beauty of DIY lies in the personalization – feel free to experiment with different wood stains, paint colors, or distressing techniques to match your personal style.
Thanks so much for stopping by and joining me on this creative journey! Your enthusiasm and support mean the world. If you embark on this project or have any questions at all, please don’t hesitate to reach out. I love seeing your creations and hearing about your DIY experiences. Happy building, and I look forward to sharing more inspiring projects with you soon!