
Hello DIY Enthusiasts!
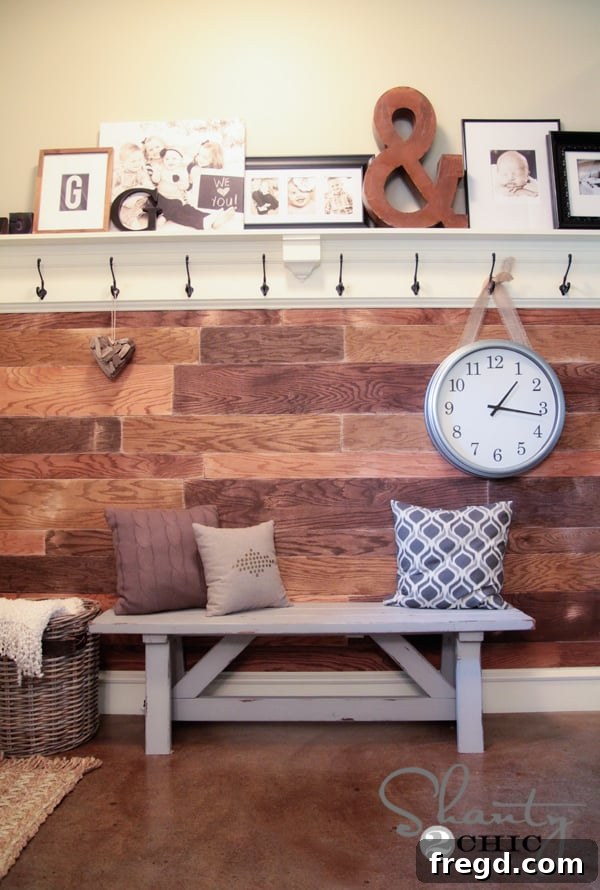
I trust you all had a wonderfully productive week! Your incredibly kind comments and enthusiastic shares on my recently completed entryway plank wall were truly inspiring. Today, I’m thrilled to unveil the perfect companion project: a stylish and functional wall shelf designed to complement the plank wall beautifully. This project isn’t just for planked walls; it’s a fantastic way to add character and utility to any mundane wall in your home, transforming it into a focal point. Feast your eyes on how this custom-built shelf elegantly caps off my plank wall installation…
Why Build a Custom Wall Shelf? Enhance Your Home with DIY Style
There’s a unique satisfaction that comes from creating something beautiful and functional with your own hands. This DIY wall shelf project is more than just adding storage; it’s about infusing your home with personalized charm and practical elegance. Whether you have a grand entryway, a cozy hallway, or simply a blank wall yearning for attention, a custom-built shelf offers unparalleled benefits.
Firstly, it allows for complete customization. Unlike off-the-shelf options, you can precisely tailor the dimensions, materials, and finish to perfectly match your existing decor and functional needs. For our entryway, it provides a much-needed spot for keys, mail, and decorative accents, along with essential hooks for coats and bags. Secondly, a DIY project like this can be incredibly cost-effective. You’ll often find that the materials for a custom piece are significantly less expensive than purchasing a comparable pre-made unit, especially one of this scale and quality. Finally, the pride of accomplishment is immeasurable. Every time you walk past your beautiful, handcrafted shelf, you’ll be reminded of your skill and dedication.
Gathering Your Essential Supplies for This DIY Shelf Project
Before diving into the build, ensure you have all your materials and tools at hand. Planning ahead makes the process smoother and more enjoyable. My particular wall spans 9 feet, so the material list below reflects those dimensions. Remember, you can easily adjust the lengths of your boards and moulding to perfectly fit the unique contours of your own space. This flexibility is one of the many advantages of taking on a DIY project!
Materials You’ll Need:
- 1 – 2x10x10 pine board: This will form the sturdy top surface of your shelf, offering ample space for decor or essentials.
- 1 – crown center block: Located in the moulding aisle, this decorative piece adds a sophisticated touch to the shelf’s facade.
- 1 – 1x6x10 pine board: This board acts as the front apron of the shelf, providing a clean, finished look and adding structural integrity.
- 9 ft of base moulding: I opted for an economical choice, but feel free to select a profile that best suits your aesthetic. This moulding will beautifully trim the bottom edge of the shelf.
- Hooks: Personalize your shelf with hooks from your favorite craft store – I found mine at Hobby Lobby!
- Finishing materials: Think wood glue, wood filler, primer, paint (or stain), and any brushes or rollers required.
- Safety supplies: Absolutely essential for any DIY project.
The total cost for materials, including those charming hooks, came in at approximately $60. This represents a significant saving compared to purchasing a ready-made shelf of this caliber.
Prioritizing Safety: Essential Gear for Every Project
Before any cutting, nailing, or painting begins, let’s talk about safety. It’s the most crucial step in any DIY endeavor. We frequently receive questions from our readers about recommended safety gear. In my workshop, certain items are non-negotiable staples, and I conscientiously use each of them on every single project, no matter how small. Your well-being should always be your top priority.
When I’m tackling projects, I consistently rely on 3M™ Safety Products for their proven reliability. Among my favorites are the 3M WorkTunes Connect Hearing Protector, which not only provides excellent noise reduction but also allows me to listen to music or podcasts, and the Holmes protective glasses. It’s worth noting that some protective glasses even come with integrated ear protection, offering a convenient all-in-one solution if you prefer that over a separate headset. Always protect your eyes and ears from debris and loud machinery.
Building Your Elegant Wall Shelf: A Step-by-Step Guide
Step 1: Preparing the Decorative Crown Block
To begin, I took my crown center block and attached it to a small piece of scrap wood. This scrap piece was cut to the same width as the block and approximately an inch longer. This subtle addition serves a crucial aesthetic purpose: it allows the crown block to sit just slightly lower than the main shelf, creating a more refined and visually appealing profile for the overall shelf design.
Step 2: Cutting and Attaching the Main Shelf Board
Next, I used my miter saw to precisely cut the 2×10 pine board to the exact length of my wall space – 9 feet in my case. Accuracy here is key for a seamless fit. Once the main shelf board was cut, I centered the pre-assembled crown block (with its scrap wood backing) on the top edge of this board. The crown block should be positioned centrally, adding a stately focal point to your shelf. I secured it firmly using my Ryobi AirStrike nailer and a strong application of Gorilla Wood Glue. This combination ensures a durable and lasting bond. It’s truly that simple to bring these core elements together!
Step 3: Attaching the Front Apron (1×6 Board)
Following the attachment of the crown block, the next step involves adding the 1×6 pine board. This piece will serve as the front apron of your shelf, giving it a deeper profile and a more finished, substantial appearance. Cut this 1×6 board to the exact same length as your 2×10 main shelf board. Once cut, apply a generous bead of wood glue along the edge of the 2×10 where the 1×6 will connect, then secure it firmly with your nailer. This creates a robust and elegant front edge for your shelf.
At this stage of construction, your shelf will begin to take on its recognizable form, looking cohesive and sturdy.
Step 4: Incorporating the Base Moulding for a Polished Look
Now, it’s time to add that crucial decorative flair with your base moulding! Carefully measure the length of each side of your shelf – they should be very consistent. The trick here is to attach the base moulding upside down. This means the flatter, typically bottom edge of the base moulding will butt up perfectly against the bottom edge of the 1×6 shelf piece you just attached. This orientation creates a subtle, elegant trim that finishes the shelf beautifully. Use your nailer to secure the moulding in place, working your way along the length of the shelf. After nailing, you’ll notice small holes left behind by the nailer. Don’t worry, these are easily remedied!
Step 5: Achieving a Flawless Finish with Wood Filler
To achieve a perfectly smooth, paint-ready surface, wood filler is your best friend. I wholeheartedly recommend 3M Wood Filler – this product is truly fantastic for its ease of use and excellent results. It’s perfect for covering those small nail holes left by the nailer, creating an unblemished surface. Additionally, for shelves that will be painted, I like to conceal any prominent wood knots. While knots can add rustic charm when staining, for a painted finish, a smooth, uniform surface is often desired. The 3M Wood Filler works wonders for this purpose.
Here’s how straightforward it is:
Simply apply a small dab of wood filler directly onto the knot or nail hole, ensuring it slightly overfills the imperfection.
Next, take a scraper or putty knife and carefully wipe away the excess filler, leaving only the filled area flush with the wood surface.
And just like that, the knot or hole vanishes, leaving behind a perfectly smooth, uniform surface ready for the next steps!
Step 6: Pre-Painting Prep: Light Sanding
Once the wood filler is completely dry, it’s essential to lightly sand over these spots. This ensures the filled areas are perfectly smooth and level with the rest of the wood, creating an undetectable repair. For this task, I find 3M Advanced Abrasives sanding pads incredibly efficient. Their compact size and effective grit allow for quick and precise sanding, making this prep step a breeze.
Step 7: Priming the Shelf for a Durable Finish
With all the pieces assembled and imperfections filled and sanded, the next crucial step is priming. Before attaching the shelf to the wall, I applied a thorough coat of primer to the entire structure. Priming serves several vital purposes: it seals the wood, prevents knots from bleeding through your topcoat of paint, and creates a uniform surface that allows your final paint color to adhere better and appear more vibrant and consistent. Don’t skip this step – it’s the foundation for a professional-looking, long-lasting finish.
Step 8: Secure Wall Mounting
Now that your shelf is assembled and primed, it’s time to securely mount it to your wall. This is a critical step for both the functionality and safety of your shelf. First, use a reliable stud finder to locate and mark the studs within your wall where the shelf will be installed. Mounting directly into studs is essential for maximum stability and weight-bearing capacity. Once your stud locations are marked, pre-drill pilot holes through the back of your shelf and into the marked stud locations. This prevents the wood from splitting when you drive in the screws. Then, using robust 3 1/2″ wood screws, attach the shelf firmly to the wall, driving the screws directly into the studs.
After the shelf is securely mounted, you’ll have small screw holes visible on the shelf’s surface. Just like with the nail holes, fill these with 3M wood filler. Once the filler is completely dry, use your sanding pad to lightly buff these spots smooth, ensuring an immaculate finish that will be invisible once painted.
Step 9: The Grand Finale: Painting and Adding Hooks
The final transformative step before adding those adorable hooks is painting! This is where your shelf truly comes to life and integrates seamlessly with your existing decor. I opted to paint the entire shelf with my trim paint for a cohesive look. As an optional but recommended touch, I added a small piece of decorative trim to the very bottom edge of my shelf, sitting directly on top of the planked wall. This served a practical purpose: it perfectly covers the transition point between the shelf and the planks, creating a clean, professional finish.
To ensure crisp, clean lines, I meticulously taped off the surrounding areas using ScotchBlue™ Painter’s Tape. This high-quality tape is essential for preventing paint bleed and achieving sharp edges, especially when painting against a textured surface like the plank wall. Once taped, I applied my chosen paint to the entire shelf. After the paint dried, the only thing left was to screw in those cute hooks!
DONE! While it may seem like a multitude of steps when written out, I can confidently promise you that assembling this beautiful shelf is incredibly straightforward and surprisingly quick once you get going. Each step builds logically on the last, and the end result is a truly rewarding piece of functional art.
Admire Your Masterpiece: Finished Shelf Views
Here are a few final shots of the completed shelf, showcasing its integration with the plank wall and its newfound purpose in our entryway. Witness how it transforms the space, adding both charm and practical utility.
Customization & Design Ideas for Your DIY Shelf
One of the greatest joys of DIY is the endless potential for personalization. While I chose a classic painted finish to match my trim, your shelf can be a true reflection of your style. Consider staining the wood for a rich, natural look that highlights the grain, or experiment with bold, contrasting paint colors to make it pop against your wall. The types of hooks you choose can also significantly impact the overall aesthetic – from rustic iron to sleek modern designs, the options are limitless. Think about what you’ll display on your shelf: small potted plants, cherished photographs, a collection of antique books, or practical baskets for mail and keys. Each choice contributes to making this shelf uniquely yours and perfectly suited to your home’s character.
Conclusion: Your Next DIY Success Awaits!
I genuinely hope you cherish this custom-built wall shelf as much as I do! It’s incredible how a relatively simple project can have such a profound impact on a space, adding both beauty and functionality. If you haven’t already, please remember to explore the initial plank wall project HERE to see the first half of this entryway transformation.
I would be absolutely thrilled if you would share this shelf project with your friends, family, and fellow DIY enthusiasts. Don’t forget to Pin it like crazy to inspire others to create their own custom pieces! You all are an amazing community, and I’m always here to help. If any questions pop up during your build, please don’t hesitate to ask – I’ll do my best to provide guidance.
Happy building!
~Whitney
This project was proudly created in collaboration with 3MDIY.com. For the latest on innovative projects, product releases, and sampling opportunities, be sure to visit 3MDIY.com.
You can also stay connected with 3M DIY across all their social media channels:
- 3M DIY Facebook Page
- 3M DIY Twitter Page
- 3M DIY YouTube Page
- Link to 3M DIY Pinterest Page