
Welcome, fellow DIY enthusiasts and holiday decorators, to Day 6 of our exciting “12 Days of Christmas” series! As we dive deeper into the festive season, we’re thrilled to share another fantastic project that combines affordability, ease, and undeniable charm. To ensure you don’t miss any of our festive creations and behind-the-scenes magic, be sure to Follow us on Instagram!
Craft Your Own Stylish & Budget-Friendly DIY Wood Tray for Just $8!
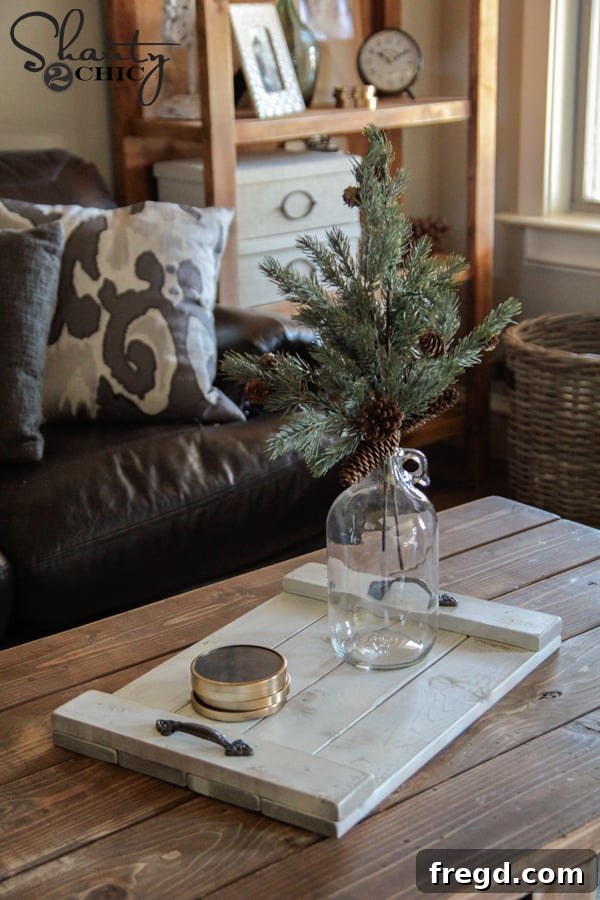
Get ready to be amazed by this next project! I’m absolutely delighted with how this DIY wood tray turned out. It was crafted with love as a special gift for my little sister this year, and the best part? It took me less than 30 minutes to build! This versatile piece serves as a perfect handmade gift for friends and family, and it’s also an elegant, functional addition to any holiday entertaining setup. Imagine serving drinks or displaying festive decor on this charming, rustic tray. Let’s take a closer look at my finished DIY wood tray, and then we’ll show you exactly how to make your own.
The Unbeatable Price: An $8 DIY Marvel
Perhaps the most astounding aspect of this project, besides its beautiful outcome, is its incredibly low cost. This truly is a budget-friendly masterpiece! The wood needed for this entire tray came in at less than $4, and the stylish cabinet pulls I selected were under $4 for the pair. That’s a grand total of just $8! In a world where decorative trays can easily cost upwards of $30-$50, creating a custom, high-quality piece for a fraction of that price is incredibly rewarding. This project proves that stunning home decor doesn’t have to break the bank. You’ll love it even more knowing you crafted something so beautiful and functional at such an amazing value.
Ready to transform some affordable wood into a chic, personalized tray? Let’s get started on this simple yet impactful DIY journey!
DIY $8 Wood Tray Supply List: Everything You Need
Crafting this beautiful wooden tray requires only a handful of readily available and inexpensive materials. Here’s your complete shopping list:
- 1 – 1 x 4 x 8 furring strip (These are fantastic for DIY projects due to their affordability and versatility.)
- 1 – 1 x 3 x 8 furring strip (Perfect for the sides of your tray, adding structural integrity and aesthetic appeal.)
- 2 cabinet pulls (Choose a style that matches your aesthetic – brass, matte black, or brushed nickel can all look stunning.)
- Gorilla Wood Glue (A strong, reliable adhesive essential for robust wood projects.)
- 1 1/4″ brad nails (For securely fastening the wood pieces together.)
- Wood stain (e.g., Rust-Oleum Wood Stain in Carrington, to add depth and character to your wood.)
- Spray paint (e.g., Rust-Oleum Heirloom White Spray Paint, for creating that desired distressed look.)
Essential Tools for a Smooth Build
While many woodworking projects can seem daunting, this tray is designed for accessibility. Here are the tools that will make your building process efficient and enjoyable:
- Saw (A miter saw for precise cuts, or a hand saw if you’re working with basic tools.)
- Tape measure and pencil (For accurate marking and cutting.)
- Brad nail gun (Such as the Ryobi AirStrike Nail Gun, highly recommended for its cordless convenience and speed.)
- Orbital sander or sanding block (A Ryobi Corner Cat sander is ideal for distressing, but sandpaper will also work.)
- Drill (For attaching the cabinet pulls.)
- Clamps (Optional, but useful for holding glued pieces while they dry.)
Step-by-Step Guide: Building Your $8 Wood Tray
1. Prepare Your Wood: Making the Cuts
Begin your project by carefully making the necessary cuts. For a tray of approximately 20 inches by 14 inches (a common and versatile size), you’ll need the following pieces. Remember to always measure twice and cut once for accuracy, and prioritize safety when using any power tools.
- From the 1×4 furring strip: Cut four pieces, each 20 inches long (these will form the base of your tray).
- From the 1×3 furring strip: Cut two pieces, each 14 inches long (for the shorter sides of the tray), and two pieces, each 21.5 inches long (for the longer sides, accounting for the thickness of the 1×3 ends).
2. Assemble the Base of the Tray
Once your wood pieces are cut, it’s time to start assembling the tray’s foundation. Lay out your four 1×4 boards side by side, ensuring they are perfectly aligned and flush. These boards will form the bottom panel of your tray. A smooth, even surface is key for a professional-looking finish.
To create a strong and durable bond, apply a generous line of Gorilla Wood Glue along the edges of each 1×4 board where they will meet. Press the boards together firmly. For extra security, and to expedite the process, I attached the top pieces (the 1×3 sides) using 1 1/4″ brad nails. This is where my absolute favorite tool, the Ryobi AirStrike Nail Gun, shines!
This cordless wonder uses the same battery as my drill and requires no air compressor or cumbersome cords, making it incredibly convenient and efficient. If you’re looking to add a fantastic tool to your workshop (or hint to Santa for Christmas), this nail gun is an absolute must-have for DIY projects! It makes assembly quick and flawless.
At this stage, your tray will have its basic structure formed, looking like a sturdy, open box. The glue will be drying, and the nails will be holding everything securely in place, ready for the next exciting step.
3. The Art of the Distressed Finish: Adding Vintage Charm
Now for the fun part that truly gives this tray its unique character: creating a distressed finish. This simple two-step process achieves a beautifully aged, rustic look that instantly elevates the tray’s aesthetic.
**Step 1: Staining for Depth.** Begin by applying a coat of wood stain to the entire tray. I used Rust-Oleum Wood Stain in Carrington, which provides a rich, warm base color. Ensure even coverage and allow the stain to dry completely according to the manufacturer’s instructions. This layer will peek through later, giving your tray an authentic, worn appearance.
**Step 2: Layering with Paint.** Once the stain is thoroughly dry, apply a layer of spray paint over the entire stained tray. I opted for Rust-Oleum Heirloom White Spray Paint, which creates a beautiful contrast with the underlying stain. Apply in light, even coats to avoid drips, and again, allow this layer to dry completely. Patience here ensures the best results for the distressing process.
**Step 3: Revealing the Layers with Sanding.** This is where the magic happens! Once the spray paint is bone dry, grab your sander. I used my Ryobi Corner Cat sander, which is excellent for reaching corners and creating natural-looking wear. Gently sand through the white paint in areas where natural wear and tear would occur – along edges, corners, and raised surfaces. As you sand, the beautiful wood stain beneath the white paint will begin to reveal itself, creating that coveted distressed look. Adjust the pressure and duration of sanding to achieve your desired level of distressing. This technique adds depth, texture, and a story to your tray, making it truly unique.
The finished product after distressing will boast a charming, aged appearance, showcasing the interplay between the white paint and the warm wood stain. It’s a super easy method to achieve a high-end, vintage aesthetic.
So cute! So easy!
4. The Final Flourish: Attaching Your Handles
The last step in completing your beautiful wood tray is adding the cabinet pulls, which serve as both functional handles and stylish accents. I found my cute little handles at Hobby Lobby, but you can explore various hardware stores or online retailers for pulls that complement your tray’s design and your personal style. Simply mark the placement for your handles on the shorter sides of the tray, drill pilot holes, and then securely attach the pulls with their screws. This small addition makes a big difference in both the usability and the overall finished look of your tray.
Here it is, all finished up and looking fabulous on my table, ready to be presented to my sister as a thoughtful, handmade gift!
Beyond the Build: Uses for Your Versatile DIY Tray
These DIY wood trays are incredibly versatile! They make fantastic, personalized gifts for any occasion – birthdays, housewarmings, or, of course, Christmas. Imagine the delight of a loved one receiving a handmade item crafted with care. Beyond gifting, these trays are incredibly functional around your own home. They work perfectly for serving guests during holiday gatherings, carrying drinks and appetizers from the kitchen to the living room with ease. They can also serve as stylish organizers on your coffee table or ottoman, keeping remotes, magazines, or decorative items neatly contained. On a dresser, they can hold jewelry or perfumes, adding a touch of rustic elegance. The possibilities are endless for how this simple, $8 tray can enhance your home decor and entertaining needs.
And again… the incredible price point of just $8 for such a functional and beautiful piece. Enough said. This project truly embodies smart, stylish, and sustainable DIY!
Share Your Creativity!
Thank you so much for stopping by and joining us on this DIY adventure! We hope this tutorial inspires you to create your own stunning wood tray. If you loved this project, we would be absolutely thrilled if you would share this tray tutorial and PIN it with your friends below! Your support helps us continue to bring you more exciting and affordable DIY ideas.
While you’re here, be sure to check out all of the other amazing “12 Days of Christmas” posts from our talented friends!
More Festive Inspiration from Our Friends:
Stamped Spoon Napkin Rings
Festive Bow Wreath
Snowman Wreath
Stacked Gear Tealights
Deer Vignette
We hope you have a wonderful day, and we look forward to seeing you tomorrow for more festive inspiration!
In case you missed any of our previous “12 Days of Christmas” posts, you can catch up on all the fun DIY projects below:
Catch Up on Our “12 Days of Christmas” Series:
Day 1 – DIY Blanket Ladder
Day 2 – DIY Bow Picture Frame
Day 3 – DIY Stocking Holders
Day 4 – Picture Frame Ornament
~Whitney