
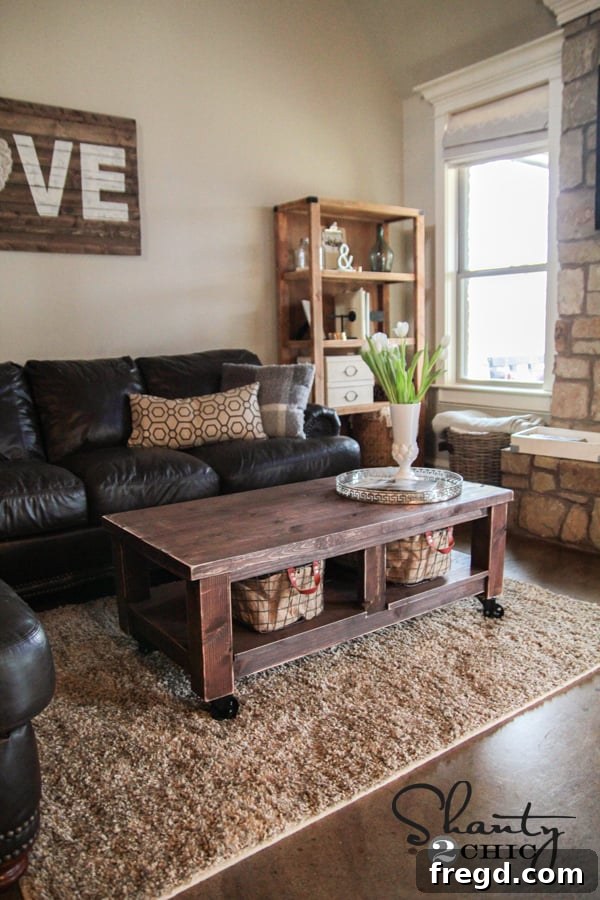
Mastering the Art of DIY: Build Your Own Pottery Barn-Inspired Coffee Table
Welcome, fellow DIY enthusiasts! We’re thrilled you’ve joined us today as we embark on an exciting woodworking journey. There’s nothing quite like the satisfaction of transforming raw materials into a functional and beautiful piece of furniture for your home. Today, we’re showcasing a project that embodies both elegance and practicality: a stunning coffee table inspired by the coveted designs of Pottery Barn, but crafted with your own hands. This isn’t just about saving money; it’s about infusing your living space with personality and a story only you can tell.
Creating custom furniture allows for unparalleled customization, ensuring the final product perfectly complements your interior design aesthetic. We’re absolutely captivated by how this latest furniture build turned out, blending rustic charm with sophisticated simplicity. The moment Ana approached us about tackling this table, we knew it was a project destined for success. Get ready to be inspired as we unveil our very own Pottery Barn Knockoff coffee table, a centerpiece sure to spark conversation and admiration.
Why Choose to Build Your Own Coffee Table?
Beyond the sheer joy of creation, building your own coffee table offers numerous benefits. Firstly, the cost savings can be significant. High-end furniture pieces, especially those with a distinctive style like Pottery Barn, often come with a premium price tag. By sourcing your materials and investing a little time, you can achieve a very similar look for a fraction of the cost. Secondly, you gain complete control over the design, dimensions, and finish. Need a specific height or a unique stain to match existing decor? DIY allows for that precision. Lastly, the durability of a handmade piece often surpasses mass-produced alternatives. When you choose quality materials and employ robust joinery techniques, your furniture is built to last, serving your family for years to come.
This particular design proves that achieving a sophisticated aesthetic doesn’t have to be complicated. In fact, this project was surprisingly straightforward to build! As always, we’re here to guide you through the process, sharing essential tips and detailed photos from our build. For those ready to dive into the full construction details, you can access the comprehensive set of free plans directly on Ana White’s site! Ana’s plans are renowned for their clarity and ease of use, making even ambitious projects accessible to beginner and intermediate woodworkers alike.
Sourcing Your Materials: The Foundation of Your Build
One of the core elements of this coffee table’s robust and inviting aesthetic comes from its sturdy 4×4 legs. We frequently receive questions about where to find these substantial pieces of lumber. Here in Texas, both major home improvement retailers, often referred to as “orange” and “blue” stores, consistently stock 4×4 untreated Douglas Fir boards. These are typically available in 8-foot lengths and are quite budget-friendly, usually retailing around $10 per board. Douglas Fir is an excellent choice for furniture legs due to its strength and attractive grain.
When working with 4×4 lumber, there’s one critical consideration: many standard compound miter saws simply won’t cut through their thickness in a single pass. This can be a hurdle for some DIYers. We personally rely on a Ridgid 12″ compound miter saw, a tool we absolutely adore for its power and precision. It slices through 4x4s with remarkable ease, akin to “butta” as we like to say. If your saw isn’t quite up to the task, don’t despair! Many home improvement stores offer cutting services, so you might inquire if they can cut your 4x4s to the specified lengths for you. While we haven’t personally used this service, it’s a widely available option worth exploring to ensure your project starts smoothly.
The Kreg Jig Advantage: Precision Joinery Made Easy
This entire coffee table was constructed with the incredible assistance of our Kreg Jig K5! For anyone contemplating adding this tool to their workshop, our advice is unequivocal: DO IT! A Kreg Jig revolutionizes woodworking by creating strong, hidden joints with remarkable simplicity, making it perfect for projects like this coffee table. It truly opens up a world of possibilities for DIY furniture builds.
If you’re curious about the versatility of this tool, we have an extensive collection of Kreg Jig projects available right here on our site, showcasing its many applications. Both Ashley and I are currently using the newer Kreg Jig K5 model. We absolutely loved and extensively used the K4 model for two years, but the K5 takes things to an entirely new level with its enhanced features and ease of use. It’s a game-changer for creating strong, professional-looking joints quickly and efficiently. You’ll undoubtedly find it to be an indispensable tool in your DIY arsenal!
Here’s a glimpse into how we made the crucial pocket holes in our 2×3 boards, forming the internal structure of the coffee table:
Step-by-Step Assembly: Bringing Your Coffee Table to Life
Let’s walk through the assembly process with a series of progress shots, providing a clear visual guide on where to strategically place all your pocket holes for a sturdy and seamless build:
For robust construction, we attached all these pieces using 2.5″ pocket hole screws. These screws, combined with properly drilled pocket holes, create an incredibly strong joint that will hold up beautifully over time.
**Critical Assembly Sequence for the Bottom Shelf:** This next stage requires careful attention to the order of operations to ensure a smooth and successful build. You must attach only one side of the table base before incorporating your bottom shelf. This provides the necessary access to secure the shelf properly. Furthermore, make sure to attach your top runner with pocket hole screws *before* connecting it to your main table base. Following this sequence prevents frustrating bottlenecks later in the build.
To craft the shelf piece, we employed our reliable Ryobi Jig Saw. Instead of opting for hardwood plywood, we made a conscious choice to use a 2′ x 4′ pine project panel. This ingenious substitution eliminates the need for edge banding or complex finishing techniques on the exposed edges, simplifying the process and saving valuable time while still achieving a clean, polished look.
Once the shelf was precisely cut, we carefully positioned it within the table base. It was then securely attached using our Ryobi Airstrike Nailer, providing strong and discreet fastening, all before the second side of the table base was permanently affixed. This ensures the shelf is fully integrated and stable.
Here, you can clearly see the placement of the final pocket holes designated for the top braces. These braces are essential for providing a solid foundation for your tabletop, ensuring stability and longevity.
Crafting the Table Top: A Strong and Beautiful Surface
For the table top, our strategy involved assembling all the individual plank pieces together using the Kreg Jig *before* attaching the entire top to the table base. This method is, hands down, the easiest and most effective way to create a strong, planked wood surface. The Kreg Jig ensures each joint is tight and perfectly aligned, resulting in a tabletop that’s both aesthetically pleasing and incredibly durable.
Once your planked tabletop is fully assembled, it’s time to secure it to the base. Make sure to apply a generous amount of high-quality wood glue across the contact surfaces to create a tenacious bond. While the glue cures, we recommend using 2″ finish nails to temporarily hold the top firmly in place. This prevents any shifting and ensures the glue dries perfectly, leaving you with an impeccably sturdy table.
The Finishing Touches: Wheels, Stain, and Distressing
With the core structure complete, it’s time to add personality and functionality. We opted for industrial-style wheels to give the table an extra touch of character and mobility. We sourced our specific wheels at Home Depot. Before attaching them, we gave them a quick but effective makeover, painting them with Rust-Oleum Black spray paint. This simple step transforms their appearance, ensuring they seamlessly integrate with the table’s overall aesthetic.
For the final finish, we chose Rust-Oleum stain in the rich hue of Carrington. This particular stain provides a beautiful, warm tone that enhances the natural grain of the wood, adding depth and character. Once the stain had completely dried, we used our trusty Corner Cat sander to lightly distress the edges of the table. This technique subtly scuffs and softens the hard lines, giving the piece a charming, authentically vintage, and well-loved appearance. It’s these small details that truly elevate a DIY project from good to exceptional.
The Grand Reveal: Your Stunning DIY Coffee Table
And there you have it – the finished masterpiece! Take a moment to admire the culmination of your efforts. From raw lumber to a functional work of art, this coffee table is a testament to the power of DIY. We hope you love it as much as we do, and that it inspires you to take on even more ambitious projects.
Ready to Build Your Own?
Don’t forget to grab the complete set of free plans directly from Ana White’s site! They provide all the measurements and specific details you’ll need to replicate this project with confidence. Whether you’re a seasoned woodworker or just starting your DIY journey, these plans are designed to be user-friendly.
We would absolutely LOVE for you to share your finished table with us and inspire others by PINNING this project with all your friends and followers! Your creations motivate us and the entire DIY community. If you have any questions at all about the build, the tools, or the finishing process, please don’t hesitate to ask in the comments below. We’re here to help you every step of the way!
~Whitney