
Transforming a space often starts with focusing on its key features, and windows are undoubtedly among the most impactful. Today, we’re thrilled to share one of our most satisfying home renovation projects to date: a dramatic dining room window makeover in our sister’s Houston home. We recently embarked on a mission to refresh her space with a series of DIY updates, and the dining room window presented a unique challenge and opportunity. Many homeowners encounter half-circle or arched windows, which, while architecturally interesting, can often pose several practical and aesthetic dilemmas. These distinctive windows are notorious for being tricky to manage when it comes to controlling excessive sunlight and blocking unwanted heat gain, especially in warmer climates. Beyond their functional aspects, half-circle windows can sometimes unintentionally anchor a room’s decor to a specific era, making the space feel dated or less adaptable to modern design trends.
While various commercial solutions exist for these types of windows, such as custom sunburst shades or cellular blinds, we envisioned a more integrated and architectural approach. Our goal was to not just cover the window, but to fundamentally alter its appearance, creating the illusion of a more contemporary casement window style and elevating the entire dining room’s aesthetic. We believed a strategic application of window trim could achieve this transformation, giving the room a fresh, updated, and intentionally designed look. What began as an idea for “a little trim” quickly evolved into a comprehensive trim installation project, proving that thoughtful carpentry can truly redefine a home’s character. This DIY journey allowed us to craft a custom solution that not only enhanced the window’s functionality but also seamlessly blended with the desired modern farmhouse style of the home.
Before diving into the detailed steps, a common question we anticipate is regarding the exterior appearance of the window once this trim is installed. From the outside of the house, the upper portion of the window now presents a clean, crisp white finish. This simple, elegant look is what we aimed for, but the beauty of a DIY project is its customizability. If you prefer a different aesthetic, you can certainly add a backing material or paint the exterior-facing side of the boards a complementary color before attachment. For us, the understated simplicity of white perfectly complements the home’s exterior and interior design scheme, creating a cohesive and harmonious appeal.
It’s crucial to understand that every half-moon or arch window presents its own unique set of dimensions and architectural nuances. What works perfectly for one setup might require slight modifications for another. We will walk you through the precise method we employed for our sister’s arch window configuration, but we encourage you to adapt these techniques to suit your specific window dimensions and wall structure. The success of any custom window trim project hinges on accurate measurements and a willingness to tailor the plan to your individual circumstances. Our first foundational step in this comprehensive window framing project was to address the existing window stool, the horizontal ledge at the bottom of the window. We carefully removed the old stool, making way for new boards that would sit perfectly flush with the adjacent wall edge, creating a seamless and integrated base for our trim work. To achieve the exact width required for these new stool pieces, we utilized our trusty table saw, ensuring precise cuts. For the entire project, we opted for primed white pine boards, chosen for their smooth finish, readiness for paint, and excellent workability, providing a solid foundation for our architectural window trim.
Once the new window stool pieces were perfectly cut and positioned, securing them firmly in place was our next priority. We applied a generous amount of high-quality wood glue to the contact surfaces to ensure a strong, lasting bond. Following this, we reinforced the attachment using our Ryobi 16G Finish Nailer, driving 2-inch nails through the boards and into the window frame and wall studs. This combination of wood glue and finish nails creates an incredibly robust connection, minimizing any movement or gaps over time and providing a solid, stable base for the subsequent layers of trim that will define the new window aesthetic.
With the window stool firmly in place, our attention shifted to crafting the “L” piece, commonly known as the apron, which elegantly runs directly beneath the window. This component plays a crucial role in providing a finished look and architectural depth. We constructed this apron using two distinct pieces of primed pine: a 1×4 board serving as the main body and a 1×2 piece attached precisely to one end, forming the “L” shape. Accurate measurement is paramount here. To determine the length of the 1×4 piece, we meticulously measured the total width of the entire window opening, from the very outer edge of one side to the outer edge of the other. Once this base measurement was acquired, we added an additional 7 inches to that figure. This extra length accounts for the vertical 1×4 trim pieces that will be installed on each end in a later step, ensuring a perfectly integrated and symmetrical design. Therefore, remember: measure the full window width, then add 7 inches to that number for your 1×4 apron piece.
For the accompanying 1×2 piece, precision is key for a polished finish. We cut this board so that it extends 1.5 inches longer on each end than the 1×4, ensuring it protrudes evenly and creates a subtle, decorative overhang. To join these two pieces, we applied wood glue along the contact surfaces for maximum strength and then secured them together using 1.25-inch brad nails, driven with our Ryobi 18G brad nailer. This creates a robust and aesthetically pleasing “L” assembly. Once assembled, we carefully positioned this apron piece, aligning it perfectly flush with the underside of the newly installed window stool. It was then securely attached to the wall using our finish nailer and 2-inch nails, ensuring it sits evenly and solidly beneath the window, ready to provide that classic, finished look.
With the lower trim elements in place, our attention moved upwards to tackle the unique challenge presented by the half-circle window. This particular step might be optional for some window setups, depending on whether your arch window is distinctly separated or, like ours, directly adjoined to the lower rectangular windows. In our sister’s dining room, the half-circle was seamlessly integrated with the windows below, necessitating the creation of a clear separation to define the new, straight-edged upper frame. To achieve this, we needed to install a head jamb — a horizontal piece of trim that would effectively divide the upper arch from the main window body. Our first action was to precisely measure this critical point, ensuring the new jamb would create a clean, level break, transforming the overall window profile from a combined arch and rectangle into a more traditional, squared-off appearance at the top of the main window.
After obtaining the precise measurement for the head jamb, we carefully cut a board to perfectly fit that designated space. This piece would serve as the crucial horizontal divider between the half-circle and the main window below. To ensure a secure yet discreet attachment, we employed our Kreg Jig to drill 3/4-inch pocket holes into the top edge of this board. This strategic placement of pocket holes means they will be completely hidden from view once the trim is installed, maintaining a clean and professional finish. With the pocket holes prepared, we then attached the board firmly to the wall on each side using 1.25-inch pocket hole screws. This method provides a strong, invisible connection, creating a stable and level base from which to build the rest of the upper window trim and effectively “hide” the arch in a structurally sound manner.
From this newly established head jamb, we meticulously worked our way upwards, building the intricate header that would crown the window and complete its new, structured look. The first component of this impressive header was constructed from a 1×10 board and a 1×2 board. We cut the 1×10 to the exact same length as the 1×4 piece we used for the apron beneath the window, ensuring continuity and symmetry throughout the design. Similarly, the 1×2 board was cut to extend 1.5 inches beyond each end of the 1×10, mirroring the overhang of the apron for a cohesive aesthetic. These two pieces were carefully joined together using strong wood glue and reinforced with brad nails, creating a single, robust unit. Once assembled, we positioned this first header piece so its bottom edge sat flush with the inside top of the main window opening. For maximum stability and to ensure it could securely support subsequent trim layers, we attached it directly into the wall studs using durable 2-inch Spax screws, checking for stud locations beforehand to ensure a firm anchor. This step is crucial for the overall structural integrity of the newly framed window.
Building upon the first header piece, we then constructed the remainder of the header, designed to add further architectural detail and depth. This next component consists of a 1×8 board, cut to the identical length as the apron and the previous header piece, maintaining a consistent horizontal line across the window’s top. To each end of this 1×8 board, we attached a 1×2 board. These 1×2 pieces were cut to the same precise measurements as the earlier 1×2 boards used on the apron and the first header, ensuring all decorative overhangs are uniform. This meticulous attention to detail in consistent sizing is what gives the finished window trim a professional and custom-built appearance, effectively creating an eye-catching focal point. The layered design of the header adds significant visual weight and sophistication, enhancing the window’s presence in the room.
To assemble this final header piece, we carefully applied wood glue between the 1×8 and its accompanying 1×2 end pieces, then secured them with brad nails for a strong, integrated bond. Once this entire unit was ready, we meticulously attached it to the wall directly above the previously installed header component. Ensuring a sturdy and long-lasting connection, we used 2-inch Spax screws, driving them firmly into the wall studs. This robust attachment guarantees that the entire header assembly is stable, aligned, and ready to withstand the test of time, completing the upper framing of our transformed window with architectural precision.
With the horizontal trim elements – the stool, apron, and multi-layered header – meticulously installed, we shifted our focus to the vertical trim pieces, which frame the window’s sides and tie the entire design together. We started with the two outermost vertical boards, utilizing 1×4 primed pine for their construction. After carefully taking precise measurements from the top of the apron to the underside of the lowest header piece, we cut these 1×4 boards to their exact size. This ensures a snug, gap-free fit that defines the outer edges of the window’s new architectural casing. The simplicity of these vertical pieces belies their importance in completing the visual structure and providing a finished boundary for the window opening.
Once cut to perfection, these two outside 1×4 vertical trim pieces were attached firmly to the wall. We used 2-inch finish nails for this step, strategically placing them to secure the boards without causing visible damage. This method ensures a strong hold while minimizing the need for extensive filling later on. The installation of these side pieces creates the initial framework, defining the new boundaries of the window and preparing it for the final, inner vertical trim details that will complete its transformation.
To complete the vertical framing of the window, we then turned our attention to the inside trim pieces. Again, meticulous measurement was key to achieving a flawless finish. We carefully measured the precise distance between the installed stool and the lowest part of the head jamb to determine the required length. For these inner pieces, we started with 1×6 boards and used a table saw to trim them down to the exact custom width needed to fit snugly within the window opening. These inner vertical pieces were cut to the same length as the two outer vertical trim boards, ensuring a consistent height for the entire frame. Once cut, we attached these inner pieces with the same reliable method: 2-inch finish nails, securing them firmly in place. This layering of trim not only adds dimension and character but also creates a substantial, built-in feel, effectively completing the structural part of our DIY window trim project and making the half-circle window a distant memory.
And just like that, the structural installation of the trim was complete! However, as any seasoned DIYer knows, the real magic, the step that truly elevates a good project to a professional one, lies in the finishing touches: caulk and wood filler. My stepdad once shared a timeless piece of wisdom with me: “Caulk and paint make a carpenter what he ain’t.” And it couldn’t be more true! This adage becomes incredibly relevant when working with existing homes, where walls are rarely perfectly square or entirely flush. Small gaps, nail holes, and slight imperfections are inevitable, but they are also entirely fixable. We meticulously filled all the seams and joints where the new trim met the wall, or where individual trim pieces met each other, with high-quality caulk. This not only creates a smooth, seamless transition but also helps to seal out drafts, improving energy efficiency. For all the nail holes left by our fasteners, we carefully applied wood filler, ensuring a perfectly smooth surface. After the caulk and wood filler had completely dried and cured, we handed the brushes over to our sister, who then painted the newly installed trim to flawlessly match the rest of the room’s elegant decor. The difference is truly astounding!
Now, let’s take another look at the remarkable transformation, appreciating the journey from dated to dazzling. Prepare to be amazed by the “before” and “after” comparison. Here is the initial state of the window, complete with blinds, a testament to its previous era.
And here’s another perspective of the dining room window, captured just before we began our DIY window trim project, showcasing its raw, untapped potential.
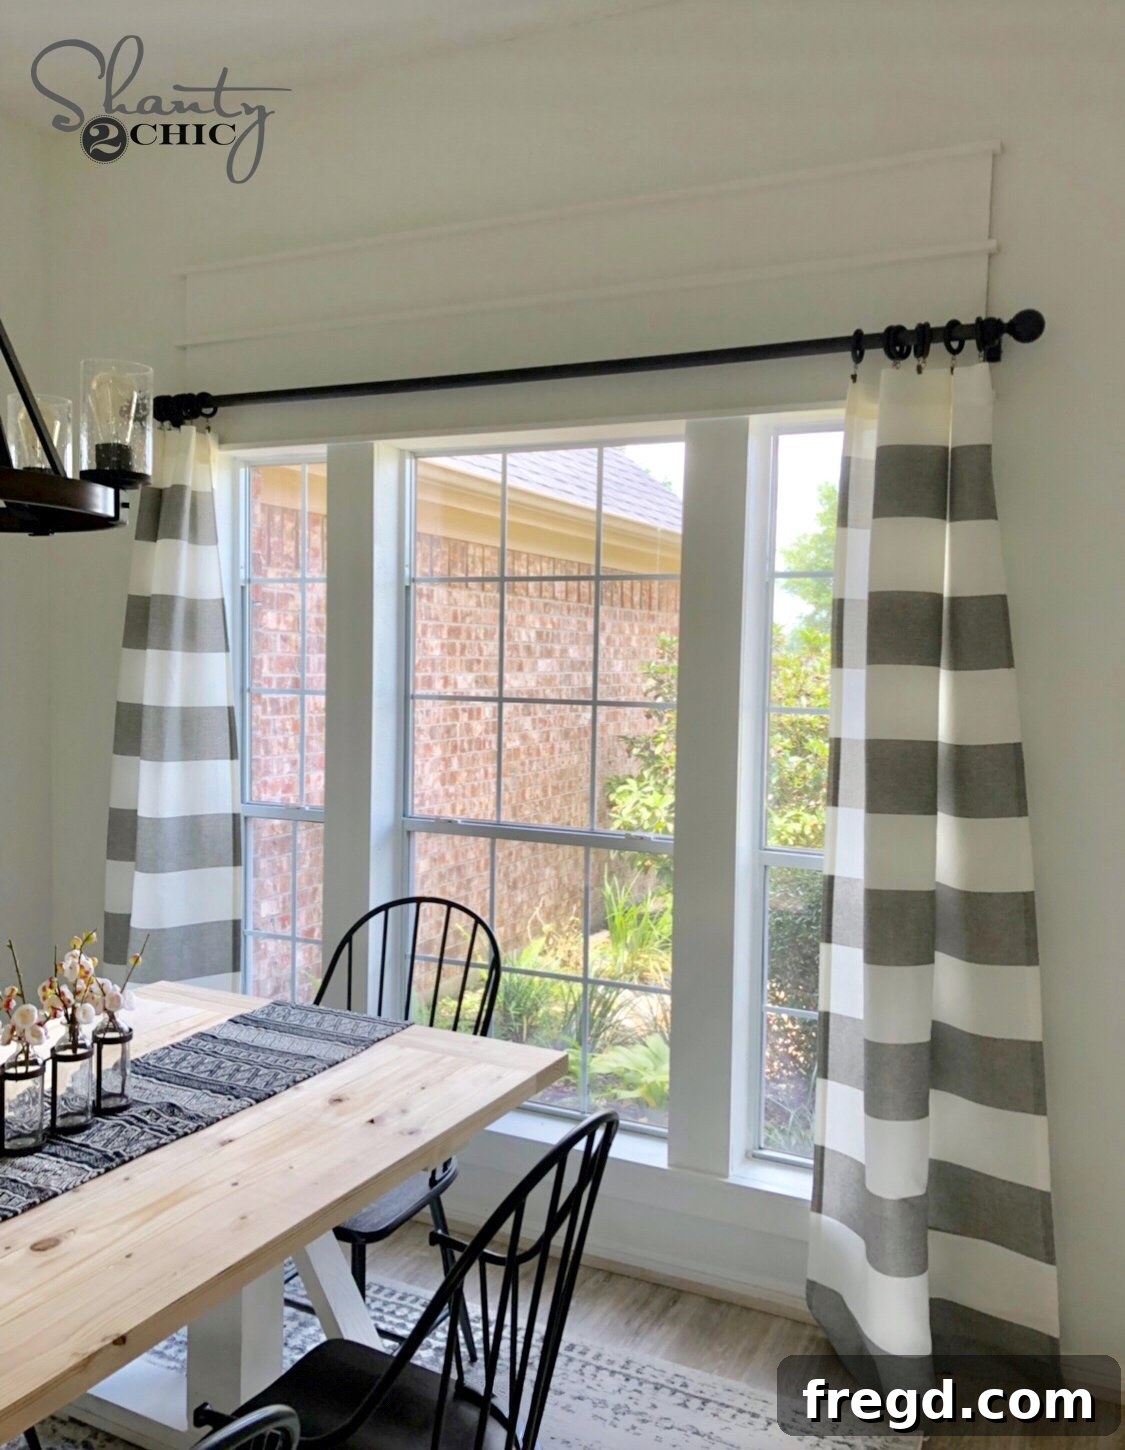
And now, behold the breathtaking “after”! The transformation is truly incredible. By carefully installing custom architectural trim, we successfully concealed the dated half-circle window, giving it a modern, squared-off appearance that instantly elevates the entire room. A key part of this revitalization was removing the old blinds, which instantly flooded the space with an abundance of natural light, making the dining room feel brighter, more open, and inviting. For privacy, we opted for elegant curtains, which offer a softer, more sophisticated look compared to traditional blinds, while still providing the necessary seclusion. This thoughtful combination of custom trim and strategic window treatments has not only updated the window’s aesthetic but has also completely redefined the ambiance of the dining room. It’s a testament to how a well-executed DIY project can dramatically enhance a home’s beauty and functionality.
What do you think of this dramatic transformation? We are absolutely thrilled with the results, and our sister’s dining room has been utterly revitalized. This project proves that with a clear vision, the right tools, and a bit of elbow grease, you can tackle even seemingly complex home improvement challenges and achieve professional-level results. We hope this detailed guide to building custom window trim and effectively hiding a half-circle window inspires you to embark on your own home decor upgrades. It’s truly amazing the difference a well-designed window can make to the overall feel and aesthetic of a room. This DIY window makeover is a fantastic way to add character, value, and a touch of personalized elegance to any space, proving that dated architectural elements can be beautifully reimagined for modern living.
And for a complete perspective, here’s a shot capturing the entire dining room, showcasing how the newly trimmed window seamlessly integrates with and enhances the overall aesthetic, creating a cohesive and beautifully updated space. The custom window trim project truly anchors the room, drawing the eye and adding a layer of sophisticated architectural detail that ties all the decor elements together into a stunning, harmonious design.
For those interested in replicating the cohesive look of this renovated space, here are direct links to all the décor purchases we carefully selected to complement our DIY window trim project. These items were chosen to harmonize with the updated aesthetic, ensuring every detail contributes to the overall modern farmhouse charm and functionality of the dining room.
Finish for tabletop click HERE
Paint for base of table click HERE
Rug under table click HERE
Window panels click HERE
Dining Chairs click HERE
Table Runner click HERE
Centerpiece Vase Click HERE