
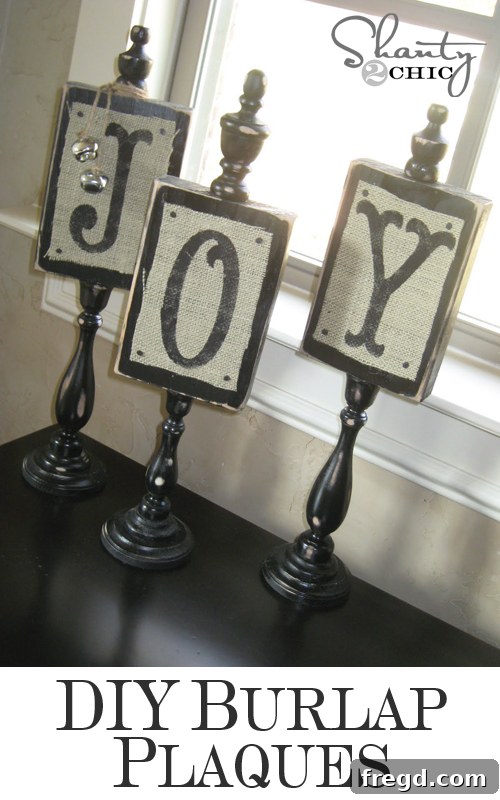
Crafting Joy: Your Guide to DIY Rustic Christmas Plaques
Like many avid decorators, my sister Ashley and I share a beloved tradition inherited from our wonderful mother: kickstarting the Christmas decorating festivities as early as November. There’s something truly magical about transforming your home into a festive wonderland long before the holiday rush begins. And if you’ve been following our crafting adventures, you know our affinity for projects involving candlesticks and finials. Today, we’re diving back into that creative well, and trust me, you won’t be disappointed with this charming, budget-friendly DIY project! Get ready to infuse your home with rustic holiday cheer.
For this particular holiday season, I envisioned creating a set of elegant yet rustic wooden plaques that collectively spell out “JOY.” This project not only adds a warm, personalized touch to your Christmas decor but also makes for an incredibly thoughtful, handmade gift. The beauty of DIY lies in its ability to be customized, allowing you to tailor each piece to your unique style and seasonal themes. Let’s walk through the steps to bring these enchanting “JOY” plaques to life, transforming simple materials into cherished holiday keepsakes.
Why Choose DIY for Your Holiday Decor?
In a world saturated with mass-produced decorations, opting for DIY holiday decor offers a refreshing change. It’s an opportunity to inject personality, warmth, and a unique story into your home. Handmade items carry an inherent charm that store-bought pieces often lack. Beyond the aesthetic appeal, crafting your own decorations allows for significant cost savings, proving that beautiful decor doesn’t have to break the bank. Furthermore, the act of creating can be incredibly therapeutic, a quiet moment of focus amidst the holiday hustle. It’s a chance to make memories, whether you’re crafting solo or inviting loved ones to join in the fun. These “JOY” plaques, for instance, were a labor of love, designed to evoke a sense of heartfelt tradition and rustic elegance.
Gathering Your Crafting Arsenal: Essential Supplies
Every great project begins with a well-stocked supply list. One of the joys of this DIY is that most materials are readily available at your local craft and hardware stores. Here’s what you’ll need to create your own set of rustic “JOY” plaques:
- Three Unfinished Candlesticks: These will serve as the elegant bases for your plaques. I found mine at Michael’s, but similar styles can often be found at other craft stores or even online retailers specializing in unfinished wood items. Look for a design that complements the rustic aesthetic you’re aiming for.
- Three Small Wood Circles: These will provide a stable foundation for the candlesticks. I picked up my circles at Hobby Lobby. Ensure they are slightly wider than the base of your candlesticks for optimal stability and visual balance.
- An 8-foot 2×6 Lumber Piece: This will be transformed into your main wooden plaques. I purchased mine from Lowe’s. While you could ask a hardware store like Home Depot to cut it down for you to buy a smaller quantity, I personally found the 8-foot piece to be an incredible value at just $3, offering plenty of extra wood for future projects. This dimension provides a substantial, rustic look.
- Gorilla Glue Epoxy: This is a game-changer for secure, permanent bonds in crafting. Its unique consistency, similar to hot glue but with a much stronger and more durable hold, makes it ideal for attaching different wood components.
- Stanley Hand Saw: An indispensable tool for small-scale wood cutting, especially if you don’t own a power saw. My $12 Stanley hand saw from Lowe’s proved to be perfect for this project, offering precision and ease of use for quick cuts.
- Gorilla Tape: An ingenious trick borrowed from fellow crafters, Gorilla Tape acts as a strong, temporary clamp to hold pieces together while the epoxy cures.
- Wood Finials: These decorative elements will crown your plaques, adding a touch of sophistication. I discovered a lovely selection at Lowe’s. Choose finials that match the scale and style of your candlesticks.
- American Accents Canyon Black Spray Paint: This provides the base color for your plaques, offering a deep, rich hue that contrasts beautifully with natural wood and burlap. Any good quality matte black spray paint will do.
- 3M Block Sander with 80-Grit Sandpaper: Essential for distressing the painted edges, giving your plaques that coveted “shanty” or aged, rustic look.
- Burlap Fabric: You’ll need enough to cut three 4×6 inch pieces. Burlap adds a lovely texture and earthy feel, perfect for the rustic aesthetic.
- Elmer’s Spray Adhesive: For cleanly attaching the burlap to your wooden plaques.
- Decorative Furniture Nails: These small, ornamental nails will secure the burlap at the corners and add a charming, finished detail.
- Cricut Personal Cutter (or pre-made stencils): For creating crisp letter stencils. If you don’t own a Cricut, you can find various alphabet stencils at craft stores.
- Black Acrylic Paint: For stenciling your “JOY” letters onto the burlap.
- Stenciling Brush: To ensure even and clean application of paint through your stencil.
- Twine and Jingle Bells: Optional but highly recommended embellishments to add extra festive flair and a playful touch.
Now that we have all our materials, let’s dive into the creative process!
Step-by-Step Guide: Crafting Your Festive Plaques
Foundation First: Assembling the Bases
Our first order of business is to create sturdy bases for our wooden plaques. This involves securely attaching the unfinished candlesticks to the small wooden circles. For this crucial step, I turned to my trusty Gorilla Glue Epoxy. This product has become an absolute favorite in our crafting arsenal for good reason. Its consistency is remarkably similar to hot glue, which makes it easy to work with and position your pieces. However, unlike hot glue, which offers a temporary bond, Gorilla Glue Epoxy sets in approximately five minutes, providing a robust, permanent hold. This extended working time allows for precise placement and adjustments, ensuring your bases are perfectly aligned and incredibly durable.
To begin, apply a modest amount of Gorilla Glue Epoxy to the center of each wooden circle. You don’t need excessive amounts; a thin, even layer will create a strong bond without messy overflow.
Carefully center the base of an unfinished candlestick onto the epoxy-covered circle. Gently press down to ensure good contact. Repeat this process for all three candlesticks and circles. Allow these assemblies to dry thoroughly according to the epoxy manufacturer’s instructions. A strong bond here is vital for the stability of your finished plaques.
Preparing Your Wooden Canvas: Cutting the Plaques
While your candlestick bases are drying, you can move on to preparing the wooden plaques themselves. Using the 8-foot 2×6 lumber, measure and mark segments every 8 inches. This will give you three perfectly sized blocks for your “JOY” letters.
For cutting, my $12 Stanley hand saw from Lowe’s proved to be an invaluable tool. It’s a fantastic investment for anyone tackling small-scale DIY projects, especially if you don’t have access to a power saw. A good hand saw, combined with a steady hand and a solid workbench, can achieve surprisingly clean cuts. Always remember to secure your wood piece before cutting and to saw along your marked lines for precision.
Once cut, you’ll have three uniform wooden blocks, each ready to become a letter in your “JOY” display. Their substantial size and raw wood finish are perfect for the rustic aesthetic we’re aiming for.
Building the Structure: Attaching Plaques to Bases
With your candlestick bases dry and your wooden plaques cut, it’s time to marry these two components. This step will form the main structure of your decorative pieces. Once again, Gorilla Glue Epoxy is our adhesive of choice for its unmatched strength and reliability.
Apply a generous amount of epoxy to the top surface of each candlestick. The goal is to create a secure bond across the entire contact area.
Carefully place one of your cut wooden blocks squarely on top of each epoxy-covered candlestick. Now for a clever trick I “stole” from the ingenious “Gorilla Glue Girls”: use Gorilla Tape to firmly clamp the pieces together while the epoxy dries. This ensures maximum contact and a perfectly straight bond. Wrap the Gorilla Tape tightly around the candlestick and the base of the wooden block, creating a secure hold.
The Gorilla Tape acts as a fantastic makeshift clamp, applying even pressure as the epoxy sets.
This clever clamping method ensures a rock-solid assembly, giving your plaques a professional and sturdy feel. Doesn’t look too shabby, right?
Adding the Finishing Touch: Affixing Finials
Once your main wooden plaques are securely attached and fully dry, it’s time to add another layer of elegance: the wood finials. These small, decorative elements provide a polished, architectural detail that elevates the overall design. I found my finials at Lowe’s, selecting a style that complemented the existing candlestick design.
Using Gorilla Glue Epoxy once more, apply a small dab to the very top center of each wooden plaque.
Carefully place a wood finial onto the epoxy, ensuring it’s centered and straight. Hold it in place for a moment until the epoxy begins to set, then allow it to cure completely. This small detail makes a big impact, transforming your rustic blocks into sophisticated decorative pieces.
With the finials in place, the basic structure of your “JOY” plaques is complete. They’re already starting to take shape and exude that rustic charm!
Bringing Color to Life: Painting and Distressing
Now for the fun part: adding color and character! I chose American Accents Canyon Black spray paint for these pieces. A rich, matte black provides a beautiful contrast to the natural wood and burlap we’ll be adding later, giving them a sophisticated, aged look. Apply several thin, even coats of spray paint, allowing each coat to dry completely before applying the next, to achieve a smooth and opaque finish.
Once the paint is thoroughly dry, it’s time to distress the edges to create that desirable “shanty” or aged appearance. Using a 3M block sander with 80-grit sandpaper, gently sand along the edges and raised areas of your plaques. This technique removes bits of paint, revealing the natural wood underneath and giving the pieces a wonderfully weathered, rustic charm.
A Crucial Safety Lesson: During this sanding process, I learned firsthand the paramount importance of wearing safety gloves. In an unfortunate mishap, one of the sanding blocks ended up about an inch into my thumb. Crafting should be enjoyable and safe, so please, always protect your hands with appropriate safety gear when sanding or working with tools. Learn from my mistake!
Rustic Elegance: Burlap Application
After tending to my thumb (and applying a much-needed band-aid!), I moved on to the next step, which adds a beautiful textural element: burlap. I cut three pieces of burlap, each measuring approximately 4×6 inches. These will be the rustic canvases for our “JOY” letters.
To attach the burlap to the painted wooden plaques, I used Elmer’s Spray Adhesive. This provides an even, strong bond without soaking through the fabric. Simply spray a light, even coat of adhesive onto one side of a burlap piece and carefully position it onto the front of a wooden plaque. Smooth out any wrinkles or bubbles, ensuring it adheres flat.
To further enhance the rustic charm and provide an extra layer of security, I added decorative furniture nails to each corner of the burlap. These small, often ornate nails not only secure the burlap but also contribute to the overall aesthetic, giving the plaques a more finished and intentional look.
At this stage, all three plaques will have their burlap applied and secured with decorative nails, ready for their unique letters.
Personalizing Your Message: Stenciling the Letters
The moment has arrived to personalize your plaques with the word “JOY.” For crisp, clean letters, I utilized my Cricut Personal Cutter to precisely cut out each letter (J, O, and Y) from stencil material. If you don’t have a cutting machine, don’t worry! You can easily purchase pre-made letter stencils at any craft store or even print and cut your own designs.
Position the “J” stencil onto the center of the first burlap-covered plaque. Using black acrylic paint and a stenciling brush, carefully dab the paint onto the burlap through the stencil. The key to clean stenciling is to use very little paint on your brush and apply it in a dabbing motion, rather than brushing, to prevent bleeding under the stencil. Repeat this for the “O” and “Y” on the remaining two plaques. Allow the paint to dry completely.
The Final Flourish: Twine and Jingle Bells
To add an extra touch of festive whimsy, I decided to incorporate some simple embellishments. I tied a small length of natural twine around the finial of each plaque and then threaded a few jingle bells onto the twine. This small addition introduces a subtle auditory element and a classic Christmas feel. Of course, this step is entirely optional, but it’s these little details that often make a handmade piece truly special. Feel free to add any other small ornaments, ribbon, or greenery that complements your personal style.
And with that, your beautiful, custom-made “JOY” wooden plaques are complete!
Behold the Beauty: The Grand Reveal!
It’s always the most exciting part of any DIY project – the grand reveal! After all the cutting, gluing, painting, and detailing, witnessing the finished product come together is incredibly rewarding. These “JOY” plaques radiate a charming rustic elegance that perfectly captures the spirit of the holidays. They’re substantial, heartfelt, and possess a unique character that simply can’t be replicated by store-bought decorations. Take a look at these beauties:
Your Crafting Journey: Reflections and Customization
So, what do you think? I absolutely adore how these “JOY” plaques turned out! They embody everything I love about DIY Christmas decor: personal touch, rustic charm, and incredible affordability. The most impressive part? I created all three for under $12! Now, that’s what I call a thrifty gift idea or a smart way to decorate for the holidays without stretching your budget.
These versatile wooden plaques aren’t just limited to spelling “JOY” for Christmas. Imagine them customized with other festive words like “NOEL,” “PEACE,” or even “MERRY.” They would make exceptional teacher gifts, unique hostess gifts, or thoughtful presents for friends and family. The beauty of this project lies in its adaptability. By simply changing the word, paint color, or embellishments, you can transform these plaques into decor suitable for any season or occasion throughout the year. Think “FALL” for autumn, “LOVE” for Valentine’s Day, or “HOME” for year-round charm. The possibilities are truly endless!
DIY projects like these allow you to create beautiful, meaningful pieces that reflect your style and add character to your home. They are a testament to the fact that with a little creativity and a few basic supplies, you can achieve stunning results. So, gather your materials, embrace the crafting spirit, and let your imagination lead the way.
Join the Crafting Community!
I hope this detailed guide inspires you to try your hand at creating your own set of rustic wooden plaques. Whether it’s for Christmas, a special occasion, or just to add a handmade touch to your everyday decor, the process is as rewarding as the finished product. Don’t be afraid to experiment with different paints, distressing techniques, or embellishments to make them truly your own. Share your creations with us – we love seeing what you come up with!
~Whitney