
Craft Your Own Rustic Magnetic Recipe Holder: A DIY Kitchen Essential
Hello fellow DIY enthusiasts and home decor lovers! Today, we’re diving into a charming project born from a newfound appreciation for the timeless appeal of magnets and the industrial-chic beauty of galvanized tin. Get ready to transform your kitchen with a beautifully functional, custom-made magnetic recipe holder. This isn’t just a utilitarian piece; it’s a statement of rustic elegance that will keep your favorite recipes organized, visible, and always at your fingertips. Forget cluttered countertops or sauce-splattered cookbooks – our DIY magnetic recipe holder promises to streamline your cooking experience while adding a touch of farmhouse sophistication.
Inspired by the desire to merge practicality with aesthetic appeal, this project combines sturdy wood, rugged metal, and a touch of vintage flair. Whether you’re a seasoned chef or a casual home cook, having your recipes neatly displayed and easily accessible is a game-changer. Plus, the joy of creating something beautiful and useful with your own hands is truly unmatched. Let’s embark on this creative journey together and craft a piece that will be cherished in your kitchen for years to come!
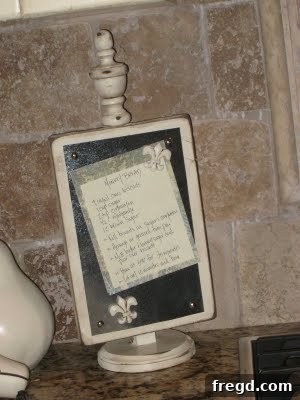
Behold the finished magnetic recipe holder, a perfect blend of rustic charm and practical design, ready to grace your kitchen countertops or wall.
Why a Magnetic Recipe Holder is a Kitchen Must-Have
In the bustling heart of any home, the kitchen, efficiency and organization are key. A magnetic recipe holder offers numerous advantages over traditional recipe storage methods. It keeps your cherished recipe cards clean and away from spills, allows for effortless viewing while your hands are busy, and adds a decorative element that enhances your kitchen’s ambiance. Beyond culinary directives, it’s incredibly versatile – perfect for holding grocery lists, children’s artwork, or cherished family photos. The thoughtfully chosen combination of rustic wood and industrial galvanized metal lends itself perfectly to popular farmhouse, shabby chic, or industrial-style decor, making it not just a tool, but a piece of decor that elevates your kitchen’s aesthetic.
Gather Your Materials: What You’ll Need
Before we embark on this exciting project, ensure you have all your supplies meticulously gathered. Investing in quality materials is the cornerstone of a lasting and beautiful creation. Here’s a comprehensive list of what you’ll need to create your very own magnetic recipe holder, designed to stand the test of time and countless meals:
- Wood Board: One piece of 1x8x4 common board (e.g., pine). This will be cut to form the main display plaque for your recipes. Look for straight, knot-free pieces at your local hardware store, such as Lowe’s.
- Square Dowel: One large square wooden dowel. This robust piece will serve as the sturdy vertical support and stand that elevates your recipe plaque, giving it prominence.
- Craft Circle: A small wooden craft circle. This simple yet crucial component will form the stable, anti-tip base of your holder, ensuring it stands securely on any flat surface.
- Strong Adhesive: Gorilla Glue Epoxy (or a similar heavy-duty, quick-setting two-part epoxy). This adhesive is indispensable for creating strong, durable bonds between your wooden components and for securing the metal element.
- Spray Paint: Rustoleum American Accents Heirloom White spray paint (or any neutral, light color that complements your kitchen decor). This provides an excellent base coat, crucial for achieving that desirable distressed, aged look.
- Wood Stain: Minwax Dark Walnut stain (or a comparable deep, rich wood stain). This product is essential for meticulously “shantying up” or antiquing the edges of your wood, adding depth and character.
- Decorative Glaze: Ralph Lauren Smoke Glaze (or a suitable decorative glaze in a warm, muted tone). Applying this glaze will add further layers of age and subtle patina, making your project truly unique.
- Galvanized Roof Flashing: A manageable piece of galvanized metal flashing. This highly magnetic metallic sheet can be found in the roofing section of most hardware stores and will be the star magnetic surface for your recipes.
- Decorative Nails: A handful of small silver nails or brads. These are primarily for aesthetic purposes, adding an authentic, rustic-industrial embellishment to the galvanized metal.
- Wood Embellishments for Magnets: Small, charming decorative wood pieces (e.g., elegant Fleur-de-lis designs, as showcased in this project). These will be artfully decorated and fitted with magnets to complete your set.
- Craft Magnets: Several small, strong craft magnets. Ensure they are powerful enough to reliably hold multiple recipe cards or even heavier items like small photographs.
Essential Tools for Your DIY Project
Equipping yourself with the right tools not only makes any DIY project smoother and more efficient but also ensures safety and better results. For constructing this stylish magnetic recipe holder, you’ll need a few basic woodworking and crafting implements:
- Saw: A miter saw is ideal for making precise, straight cuts on your wood board and dowel. A good quality hand saw can also suffice with careful measurement and technique.
- Drill: A standard power drill equipped with various drill bits will be necessary for creating the pilot hole for your finial and potentially for pre-drilling nail holes.
- Sander or Sandpaper: An orbital sander or a selection of sandpaper grits (medium to fine) will be used for smoothing rough edges and meticulously distressing the wood surfaces.
- Paint Brushes/Applicators: Assorted brushes for applying stain and glaze evenly, and potentially for touch-ups.
- Metal Shears: Or heavy-duty tin snips, specifically designed for safely and cleanly cutting the galvanized flashing. Exercise extreme caution when working with metal.
- Clamps (Optional but Highly Recommended): Woodworking clamps are invaluable for holding pieces securely in place while the epoxy sets, ensuring a perfectly aligned and strong bond.
- Safety Gear: Always prioritize safety. Wear safety glasses to protect your eyes, gloves to protect your hands from chemicals and splinters, and a dust mask when sanding or spray painting to protect your respiratory system.
A glimpse at the raw materials: the 1×8 wood board and the large square dowel, poised for transformation into our functional art piece.
The humble craft circle, which will soon become the stable and elegant base of our magnetic recipe holder.
Step-by-Step Guide: Building Your Magnetic Recipe Holder
Step 1: Constructing the Main Stand and Plaque
- Cut the Dowel to Size: Don your safety glasses and carefully cut your large square dowel to an approximate length of 11 inches. A miter saw will provide the cleanest, most precise cut, which is crucial for the stability of your stand. Smooth any rough edges with sandpaper.
-
Attach Dowel to Base: Prepare your Gorilla Glue Epoxy according to its instructions (typically mixing two parts). Apply a generous, even layer of the mixed epoxy to one end of the cut dowel. Carefully center and firmly press this end onto the small wooden craft circle. Hold it in place or use clamps for a few minutes to ensure initial adhesion, then allow the epoxy to fully cure as per manufacturer’s guidelines. This creates a solid foundation.
The dowel securely glued to the craft circle base, forming the stable foundation of our recipe holder stand.
- Prepare the Recipe Plaque: Next, take your 1×8 wood board and cut it to a precise length of 10 inches. This piece will form the main display area for your recipes. Once cut, thoroughly sand all edges and surfaces to achieve a smooth, splinter-free finish, ready for painting and distressing.
-
Attach Plaque to Dowel: Apply another ample amount of Gorilla Glue Epoxy to the remaining free end of the dowel. Carefully align and attach the 10-inch wood plaque to the front face of the dowel, ensuring it is perfectly centered and level. Use clamps if available to maintain pressure while the epoxy dries completely. This strong bond is critical for the integrity of your holder.
The main wood plaque now firmly attached to the dowel, creating the core structure of the recipe holder.
-
Allow for Thorough Curing: Patience is indeed a virtue in DIY. Let the entire assembled wood structure dry and cure completely. This vital curing period allows the epoxy to achieve its maximum strength, which is paramount for ensuring your recipe holder is sturdy, durable, and ready for years of use.
The entire structure drying, allowing the epoxy to set firmly and create a strong, lasting bond between all components.
-
Drill for the Finial: Once the glue is fully cured and the structure is stable, use your power drill to create a pilot hole at the very top center of the dowel. This perfectly sized hole is where your chosen decorative finial will eventually be attached, adding an elegant and refined finishing touch to your creation.
A precisely drilled hole at the top of the dowel, perfectly prepared for the ornamental finial, enhancing the overall design.
Step 2: Adding Rustic Charm with Paint, Stain, and Glaze
-
Paint the Wood Structure: With the wooden structure now fully assembled and dry, it’s time for the aesthetic transformation. In a well-ventilated area, apply Rustoleum American Accents Heirloom White spray paint (or your preferred light, airy color) evenly over the entire wood structure. Aim for thin, even coats to achieve a smooth, professional finish without drips. Allow each coat to dry thoroughly before applying the next, ensuring a pristine base.
The wood structure freshly painted in Heirloom White, eagerly awaiting its rustic transformation with distressing and glazing.
-
Distress the Edges for an Aged Look: Once the paint is completely dry to the touch, use a hand sander or a piece of sandpaper (medium grit) to gently “shanty up” or distress the edges and corners of the wood plaque, dowel, and base. This technique subtly reveals glimpses of the raw wood beneath, creating a beautifully aged and naturally worn appearance. Follow this by applying a small amount of Minwax Dark Walnut stain to the distressed areas, wiping off any excess quickly to prevent over-darkening. This step emphasizes the rustic aesthetic and adds authentic character.
Distressing the edges with a sander and carefully applying Minwax Dark Walnut stain to achieve an aged, charming rustic look.
-
Apply Smoke Glaze for Depth: To add an even deeper layer of character and an authentic antique patina, apply a thin, even coat of Ralph Lauren Smoke Glaze over the distressed and stained areas. Work in small sections, applying the glaze and then immediately wiping it back with a clean, lint-free cloth. This allows you to control the level of “smokiness” or antiquing, blending it seamlessly to achieve your desired vintage effect. This final finish truly brings out the unique charm of the wood and distressing.
Applying the Ralph Lauren Smoke Glaze to further enhance the aged patina and subtle depth of the beautifully prepared wood.
Step 3: Integrating the Galvanized Magnetic Surface
-
Source the Galvanized Flashing: Locate a sturdy piece of galvanized roof flashing. This robust metallic sheet is easily found in the roofing or building materials section of hardware stores like Lowe’s. Its magnetic properties and distinct industrial look are key to this project’s charm.
The raw galvanized roof flashing, an essential and visually striking element for our magnetic display surface.
-
Cut the Flashing to Size: Don your heavy-duty gloves and use metal shears (tin snips) to carefully cut a piece of the galvanized flashing. Ensure this piece is just slightly smaller than the distressed wood plaque. This intentional sizing allows for a subtle, attractive wooden border to show around the metal, beautifully accentuating the contrast between the materials. Always use caution when cutting metal.
The galvanized flashing precisely cut to fit the wood plaque, ensuring a visible and attractive distressed wooden border.
- Attach Metal to Plaque: Apply Gorilla Glue Epoxy evenly to the entire back surface of the cut galvanized metal piece. Carefully center and firmly press it onto the front of your beautifully painted, stained, and glazed wood plaque. Apply consistent pressure across the metal surface and allow the epoxy ample time to fully cure, creating an incredibly strong and lasting bond.
-
Add Decorative Nails: For an added touch of authentic industrial-rustic “shanty-ness,” carefully tap a small silver nail or brad into each corner of the galvanized flashing. While these nails are primarily decorative, enhancing the visual appeal, they also provide a little extra security for the metal, cementing the overall aesthetic.
Decorative silver nails carefully added to each corner of the galvanized flashing, enhancing the rustic-industrial appeal and providing a secure finish.
A detailed close-up view highlighting the decorative nails and the contrasting, rich textures of the distressed wood and cool galvanized metal.
Step 4: Crafting Your Custom Magnets
No magnetic recipe holder is truly complete without its own set of charming and functional magnets! This final step allows for a burst of personal creativity and ensures your magnets perfectly complement your newly crafted holder.
- Prepare the Wood Embellishments: Take your small decorative wood pieces – whether elegant Fleur-de-lis designs (as seen here) or other shapes you prefer. Paint and glaze them using the same techniques and colors you applied to your main recipe holder. This consistency in finish ensures a cohesive, polished, and professionally coordinated look for your entire set.
-
Attach Magnets Securely: Once your decorative wood pieces are completely dry and cured, use a strong adhesive like Gorilla Glue to firmly attach a small but powerful craft magnet to the back of each piece. Ensure the magnets are securely fixed and properly oriented so they will adhere effectively to the galvanized surface of your holder. Allow ample drying time for the glue to set, guaranteeing durable magnets that will hold your recipes effortlessly.
The elegant Fleur-de-lis wood pieces, meticulously painted and glazed, poised for the attachment of their magnets.
Magnets securely attached to the back of the embellishments, transforming them into functional and stylish recipe holders.
The Finished Product: A Kitchen Masterpiece!
And there you have it! Your very own custom-designed, rustic magnetic recipe holder is now triumphantly complete. This charming and meticulously crafted piece is not only incredibly practical for keeping your kitchen impeccably organized but also serves as a beautiful, eye-catching decorative accent. The unique blend of painted and expertly distressed wood, complemented by the cool, industrial feel of galvanized tin, creates a distinctive focal point that will elevate any kitchen style, from cozy farmhouse to modern transitional. Place it proudly on your counter, ready to display your favorite culinary creations!
The completed recipe holder, a beautiful and highly functional addition, ready to bring organization and style to any kitchen.
Showcasing the holder with a recipe card elegantly in place, demonstrating its practical and convenient use during cooking.
Another appealing angle of the holder, highlighting its handcrafted details, the sturdy construction, and the harmonious blend of materials.
A captivating close-up look at the intricate distressing and glazing techniques that endow the wood with its unique, aged character and rich texture.
The magnetic recipe holder proudly displayed in a warm kitchen setting, perfectly integrated and ready to serve its purpose with style.
A detailed shot showcasing the charming custom magnets firmly holding a recipe card against the galvanized surface, highlighting their effectiveness.
More Than Just a Recipe Holder: Versatility in Your Home
While this magnetic holder was primarily conceived for its role in the kitchen, its robust design and magnetic surface extend its functionality far beyond culinary endeavors. Its sturdy construction and versatile magnetic surface make it an ideal display for cherished family photographs, children’s vibrant drawings, important notes, essential reminders, or even small holiday cards. Imagine it transforming a home office into an organized haven, or a craft room into a neat space for patterns and ideas. This remarkable adaptability makes it a truly valuable and cherished addition to virtually any room in your home, offering both impeccable organization and a significant touch of personalized, rustic decor.
Illustrating the holder’s wonderful versatility: it also makes a stunning and personal display for treasured family photographs.
Another delightful example of the holder presenting a picture, beautifully demonstrating its flexible use as a decorative and functional display piece.
Share Your Thoughts & Discover More at The Shanty Shoppe!
What are your thoughts on this charming and incredibly practical DIY project? We are absolutely thrilled with how it turned out and firmly believe it’s a fantastic, personal way to infuse personality and organization into your kitchen space. If you’re feeling inspired but perhaps prefer a ready-made, handcrafted piece, then you’re in luck! This very magnetic recipe holder, along with a curated collection of many other unique “shanties” (our endearing term for our handcrafted rustic items), is now thoughtfully available at our Shanty Shoppe on Etsy. Due to the overwhelming and heartwarming requests from our community, we’ve decided to share our passion for rustic, handmade decor with a wider audience, bringing a piece of our creativity directly to your home.
You can effortlessly visit our shop by simply clicking the prominent HERE link, or by conveniently navigating to the Shanty Shoppe button located on our website’s sidebar. We are constantly dreaming up and adding new, unique creations, so be sure to check back often to discover fresh inspiration and treasures for your home!
A huge, heartfelt thank you for all your wonderful and encouraging comments on Traci’s recent Shanty Spotlight post. Your invaluable feedback and enthusiasm truly mean the world to us and fuel our creative passion! If you haven’t had a chance to explore it yet, we highly recommend you just scroll down a bit on our blog – it’s packed with endless fun, inspiring ideas, and a glimpse into our creative world. Happy crafting and decorating!