
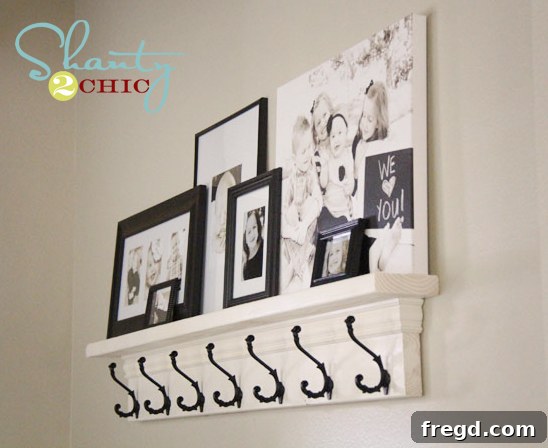
Transform Your Entryway: Build a Stylish & Functional Farmhouse Hook Shelf
Hello fellow DIY enthusiasts and home decor lovers! Today, I’m absolutely thrilled to finally share a project that has been a long time in the making. This particular piece of functional decor has been a vision in my mind for months, ever since I stumbled upon a captivating image online that sparked immediate inspiration. I’ve always dreamed of having a charming mantle in my home, but with no suitable fireplace space, that dream felt out of reach. However, this project offers the perfect workaround – a beautiful and practical wall-mounted shelf that gives me that same cozy, personalized feel!
What makes this entryway hook shelf even better is its simplicity and speed. You don’t need extensive woodworking experience or a garage full of specialized tools. In fact, the core construction can be completed in just an afternoon, allowing you to enjoy your newly organized and decorated space almost immediately. This isn’t just a shelf; it’s an entryway transformation, providing much-needed organization for coats, bags, and keys, while also offering a lovely surface to display cherished photos, seasonal decorations, or other personal touches. It’s a versatile solution for adding both rustic charm and practical storage to any home.
Join me as we walk through each easy step to create your own custom farmhouse-style hook shelf. Get ready to add character, charm, and clever storage to your home with this approachable and rewarding DIY woodworking project!
Gathering Your Materials: What You’ll Need for Your DIY Hook Shelf
Before diving into the build, ensuring you have all your materials and tools at hand will make the process smooth and efficient. Most items are readily available at your local hardware store or craft supply outlets. Remember, precise measurements and good quality materials are key to a professional-looking and durable finish.
Essential Wood Components:
-
1x 2×6 board, cut to 5.5 feet (66 inches): This robust piece will serve as the top shelf surface, providing ample space for decor items, photos, or even small storage baskets. Common pine boards are an excellent, affordable choice for projects that will be painted, offering a smooth finish.
-
1x 2×8 board, cut to 5 feet (60 inches): This slightly wider board forms the main back support of your shelf. It’s where all the functional hooks will be securely attached, and where the shelf will be mounted to the wall. Again, pine is recommended for ease of use and cost-effectiveness.
-
Casing molding (e.g., standard door casing): You’ll need enough molding to cover three sides of your shelf front – specifically, the bottom edge of the 2×8 and the two exposed ends of the 2×6 top piece. Measure the length of your 2×8 and add twice the thickness of the 2×6 (approximately 3 inches per side for a 2×6, totaling 6 inches) to get the required length, plus a little extra for precise miter cuts and any mistakes.
Adhesives & Fasteners for a Sturdy Build:
-
Wood Glue: A high-quality wood glue is absolutely crucial. It provides superior strength to your joints, preventing future separation and making the shelf incredibly durable. Always apply generously to contact surfaces.
-
2-inch Drywall Screws: These will be used for the initial assembly, firmly attaching the top 2×6 shelf to the 2×8 backboard. Ensure you have enough for even spacing, typically every 8-12 inches.
-
Finishing Nails (1.5-2 inch): Essential for securing the decorative casing molding without leaving prominent holes. A nail gun simplifies this, but a hammer and nail set work perfectly well.
-
1-inch Drywall Screws: Specifically for attaching the decorative hooks to the 2×8 backboard. These shorter screws are ideal as they prevent piercing through the front of the board.
-
3-inch Long Wood/Construction Screws: These are the most important fasteners for safe and secure wall mounting. They must be long enough to penetrate through the shelf’s backboard and into the structural studs of your wall, ensuring the heavy shelf remains firmly in place.
Finishing Supplies for a Professional Look:
-
Caulk (paintable acrylic latex): Perfect for filling any small gaps, cracks, or seams where wood meets, especially along the molding. This creates a smooth, seamless appearance once painted.
-
Wood Filler: Indispensable for concealing all visible screw and nail holes. It dries hard and can be sanded smooth, making the fasteners virtually disappear.
-
120-Grit Sandpaper: Your primary sandpaper for preparing surfaces for paint, smoothing out rough edges, and leveling wood filler. For an exceptionally smooth, professional finish, follow up with 220-grit sandpaper.
-
Spray Paint (e.g., Rust-Oleum Painter’s Touch 2X in Heirloom White): Or your preferred color and finish. Spray paint is often recommended for its ability to provide a quick, smooth, and even application without brush marks. I used Heirloom White for a classic, versatile farmhouse aesthetic.
Necessary Tools:
-
Miter Saw or Circular Saw: For making precise, straight, and angled cuts on your wood boards and molding. Accuracy here ensures tight, professional joints.
-
Drill/Driver: Essential for pre-drilling pilot holes (to prevent wood splitting) and driving all your screws efficiently.
-
Stud Finder: An absolute necessity for locating wall studs, ensuring your heavy shelf is securely mounted into structural supports, not just drywall.
-
Measuring Tape & Pencil: For accurate marking and measuring at every stage of the project. Remember the old adage: measure twice, cut once!
-
Level: Crucial for ensuring your shelf is perfectly straight when mounted on the wall.
-
Safety Glasses: Always wear safety glasses when operating power tools or working with wood to protect your eyes from debris.
-
Optional but Recommended: Nail gun (for speed and ease with finishing nails), painter’s tape (for crisp lines if painting different colors), tack cloth (for removing sanding dust), rags.
Decorative Elements:
-
Hooks (7 pieces, or as desired): The style and finish of your hooks can significantly influence the overall look of your shelf. Choose hooks that complement your home’s decor. I found mine at Hobby Lobby for an excellent price, proving that stylish hardware doesn’t have to break the bank!
Step-by-Step Construction: Bringing Your Farmhouse Shelf to Life
With all your supplies ready, let’s begin building this beautiful and functional piece. Take your time with each step, and don’t be afraid to double-check your measurements. Precision and patience will lead to a superior finished product.
Step 1: Assembling the Core Structure of Your Shelf
We’ll start by joining the two main wood pieces to form the basic shelf unit. This connection needs to be strong and secure, as it forms the foundation of your entire project.
-
Lay the 5-foot 2×8 board flat on your work surface. This piece will serve as the back support of your shelf and the anchor for your hooks.
-
Apply a generous, continuous bead of high-quality wood glue along the top edge of the 2×8. Wood glue, when properly cured, creates a bond stronger than the wood itself, providing incredible strength to the joint and making it far more durable than screws alone.
-
Carefully center the 5.5-foot 2×6 board on top of the glued edge of the 2×8. The 2×6 should overhang the 2×8 by approximately 3 inches on each end. This overhang is intentional, creating a clean, finished look and offering additional display space on your top shelf.
-
Using your drill and 2-inch drywall screws, secure the 2×6 to the 2×8. Drive the screws down through the top surface of the 2×6, into the 2×8 below. It’s recommended to pre-drill pilot holes to prevent the wood from splitting, especially near the ends. Space the screws evenly, every 8-12 inches, for maximum stability across the entire length of the shelf. Ensure the screw heads are driven flush or slightly below the surface to prevent snags and allow for easy finishing later with wood filler.
This is what the initial assembly looked like, forming a robust L-shape that defines the core structure of your entryway shelf:
Step 2: Elevating the Design with Decorative Casing Molding
Adding decorative molding is a quick and incredibly effective way to elevate the look of your shelf, instantly giving it that refined, custom-built, farmhouse feel. Instead of complicated crown molding, we’ll use simple flat casing, which is much more forgiving and easier for DIYers to work with.
-
First, accurately measure the bottom edge of your 2×8 backboard, and then measure the two exposed sides of the 2×6 top shelf (the portions that overhang the 2×8). You’ll need three distinct pieces of casing to cover these areas.
-
Using your miter saw, cut the ends of your casing pieces at a precise 45-degree angle. This technique creates clean mitered corners that seamlessly wrap around the shelf, mimicking professional carpentry. Precision here makes a significant difference in the final appearance, so if you’re new to miter cuts, it’s always a good idea to practice on scrap pieces first.
-
Apply a thin, even layer of wood glue to the back of each casing piece before attaching it to the shelf. This adhesive bond, combined with the nails, prevents the molding from separating or gapping over time, especially with seasonal changes in humidity.
-
Attach the casing to the shelf using finishing nails. Position the nails strategically to secure the molding firmly without splitting the wood, typically every 10-12 inches. If you have a nail gun, this step will be incredibly fast and effortless, but a traditional hammer and nail set will achieve the same excellent results with a little more care.
-
Ensure the molding aligns perfectly at the mitered corners, creating crisp, professional-looking joints that contribute to the high-end look of your DIY shelf.
The casing instantly adds a touch of elegance and architectural interest, transforming a simple wooden structure into a feature piece:
Step 3: Preparing for a Flawless Finish – The Key to a Professional Look
This stage is absolutely crucial for achieving that smooth, professional painted look that truly makes your DIY project shine. Do not rush or skip these steps; they make all the difference in the final aesthetic and durability of your entryway hook shelf!
-
Caulking for Seamless Joints: Apply a thin, even bead of paintable acrylic latex caulk along all seams, cracks, and joints where wood pieces meet. Pay particular attention to where the decorative casing meets the 2×8 backboard and the 2×6 top shelf. Use a wet finger or a specialized caulk tool to smooth the caulk, pushing it into any tiny gaps. This step effectively seals all imperfections, creating a monolithic, seamless appearance when the shelf is painted.
-
Wood Filling to Conceal Fasteners: Fill all visible screw holes (from Step 1) and nail holes (from Step 2) with wood filler. Apply the filler by overfilling slightly, allowing for shrinkage as it dries. Let it dry completely according to the manufacturer’s instructions – this is critical for proper adhesion and hardness. Once dry, sand the filled areas flush with the surrounding wood using 120-grit sandpaper. This hides all fasteners, making them virtually disappear, resulting in a cleaner, more polished surface.
-
Thorough Sanding for a Smooth Surface: Once the caulk and wood filler are completely dry, sand the entire shelf thoroughly using 120-grit sandpaper. Focus on any rough spots, sharp edges, and especially the areas where you applied wood filler, ensuring they are perfectly smooth. The goal is a uniform surface that will readily accept paint evenly. If you desire an even smoother, furniture-grade finish, follow up with finer 220-grit sandpaper. After sanding, meticulously wipe down the entire piece with a tack cloth or a slightly damp rag to remove all dust particles. A clean, dust-free surface is essential for proper paint adhesion and a smooth finish.
Step 4: Painting Your Masterpiece – The Final Aesthetic Touch
Choosing the right paint and applying it correctly is a key factor in achieving the desired final aesthetic of your entryway shelf. I opted for a classic, versatile finish that complements a wide range of decor styles.
-
Paint Selection: I personally used Rust-Oleum Painter’s Touch 2X in Heirloom White. This particular spray paint is a long-standing favorite for many DIYers because it offers exceptional coverage, a beautiful semi-gloss finish, and is incredibly durable – features that are essential for a functional piece in a high-traffic area like an entryway. Its versatility makes it suitable for farmhouse, shabby chic, or even transitional decor styles. It’s widely available at major home improvement stores like Home Depot and craft supply stores like Hobby Lobby.
-
Application Technique: Always work in a well-ventilated area, preferably outdoors or in a garage with open doors. Lay down a drop cloth or old newspaper to protect your workspace from overspray. Apply two light, even coats of spray paint, allowing adequate drying time between coats as recommended by the manufacturer on the can. Applying several thin coats is always superior to one thick coat, as this technique prevents drips, runs, and ensures a smoother, more professional-looking finish. If you prefer to brush or roll your paint, ensure you use a high-quality brush or a smooth foam roller for the best, streak-free results.
This chosen paint provides a beautiful, lasting finish that truly elevates the simple wood shelf into a polished piece of home decor:
Step 5: Attaching the Decorative and Functional Hooks
Now for the practical element that makes this shelf so incredibly useful – the hooks! The number of hooks and their spacing are entirely up to your specific needs and aesthetic preference, allowing for ultimate customization.
-
Strategic Spacing: First, decide on the total number of hooks you wish to incorporate. Then, measure the full length of the 2×8 backboard where they will be attached. To achieve even spacing, divide the total length by the number of hooks plus one (this accounts for the spaces between hooks and the spaces from the ends). Mark these points carefully with a pencil along the bottom edge of the 2×8 board, ensuring they are equidistant for a balanced look. Use a ruler or tape measure to double-check your marks.
-
Secure Attachment: Using 1-inch drywall screws, attach each hook securely to the 2×8 board at your precisely marked points. Before driving the screws, it’s a good practice to pre-drill small pilot holes through the hook’s mounting holes and slightly into the wood. This prevents the wood from splitting and ensures the screws go in straight. Ensure each hook is perfectly straight and level before fully tightening the screws. These shorter 1-inch screws are sufficient as they only need to hold the hooks firmly to the backboard, not the entire shelf to the wall.
The hooks add both undeniable charm and essential functionality, ready to hold coats, bags, keys, or even seasonal decorations like stockings:
Step 6: Secure Wall Installation – Ensuring Stability and Safety
This is perhaps the most critical step to ensure your beautiful new shelf is safe, sturdy, and can reliably hold all your entryway essentials. Since the assembled shelf is quite heavy, proper installation directly into wall studs is absolutely non-negotiable for stability and peace of mind.
-
Locate and Mark Wall Studs: Using a reliable stud finder, carefully locate and mark the center of at least two, but preferably three or more (depending on the overall length of your shelf), vertical wall studs where you plan to hang your shelf. Mark these points with a pencil at your desired height on the wall. Mounting into studs is vital for bearing the weight of the shelf and its contents.
-
Position and Level the Shelf: With the essential help of a friend or family member (this shelf is indeed heavy, so two sets of hands are highly recommended!), carefully hold the shelf against the wall. Align the back of the shelf with your marked stud locations. Use a level placed on top of the shelf to ensure it is perfectly straight and level before proceeding to the next step.
-
Secure with Long Screws: While the shelf is being held firmly in place, use your drill to pre-drill pilot holes through the 2×8 backboard of the shelf, directly into the exact center of your marked wall studs. Then, drive 3-inch long wood or construction screws through these pilot holes and deep into the wall studs. I used four screws spaced across the shelf for incredible, unwavering stability. These long, robust screws are absolutely vital for bearing the combined weight of the shelf and anything you might hang or place on it.
-
Conceal Fasteners for a Seamless Look: Once the shelf is securely mounted to the wall, fill the visible screw holes in the 2×8 backboard with wood filler. Allow the filler to dry completely according to its instructions. Lightly sand the dried filler smooth, and then apply a small amount of your touch-up paint (from Step 4) to seamlessly blend these areas with the rest of the shelf. This provides a clean, finished look, eliminating the need for additional, often unsightly, hanging hardware or visible brackets.
The Grand Reveal: Your Finished Entryway Shelf!
And just like that, after a rewarding afternoon of DIY, your beautiful, custom-built entryway hook shelf is complete! It’s an incredibly satisfying feeling to see a project come to fruition, especially one that adds so much style, functionality, and personal charm to your home. Take a moment to step back and admire your handiwork.
Want to see how it all came together in its final glory?
Here are some various views of the finished piece, adorned with personal touches and ready to serve its purpose as a central hub for organization and display in your entryway:
The Impact: More Than Just a Shelf – A Hub of Organization and Memories
What do you think of the final result? For me, this project is truly a game-changer for our entryway. I am finally able to proudly display a multitude of my kiddos’ photos, which I absolutely adore! It brings a personal touch, warmth, and a flood of cherished memories that were noticeably missing from this space before. The top shelf serves as a perfect gallery, bringing personality and joy right to our home’s entrance.
Beyond the undeniable aesthetic appeal, this entryway hook shelf is a powerhouse of functionality. It offers dedicated, easily accessible spots for hanging coats, scarves, hats, and bags, effectively keeping our entry tidy and clutter-free. No more piles on chairs or lost items! During the festive holiday season, this shelf will serve as the absolute perfect spot to hang our family’s stockings, truly fulfilling that “mantle-like” dream I’ve always cherished. The expansive top surface is also ideally suited for keys, incoming mail, a small decorative vase with fresh flowers, or a fragrant candle, adding both convenience and charm to what is often the busiest, high-traffic area of the home. It’s a versatile centerpiece for both utility and beauty.
Customization & Personalization Ideas for Your Unique Space
One of the greatest joys and advantages of embarking on a DIY project is the inherent ability to customize your creation to perfectly match your personal style, existing home decor, and specific functional needs. While I opted for a timeless, classic farmhouse look, here are numerous ideas to inspire you and make this hook shelf uniquely yours:
-
Explore Different Paint Colors & Finishes: Instead of the serene Heirloom White, imagine a bold navy for a sophisticated coastal vibe, a deep charcoal gray for a modern industrial edge, or a soft sage green for a natural, rustic, and calming feel. You could also apply a distressing technique after the paint has dried, using sandpaper to reveal hints of the wood beneath, for an aged, chippy, and authentically vintage look. Alternatively, if you select a wood with beautiful grain, consider applying a wood stain to highlight its natural patterns, followed by a clear protective topcoat.
-
Vary Your Hook Styles: The hooks are a prominent feature, so their design can drastically change the shelf’s character. Explore vintage-inspired bronze hooks for an antique touch, sleek matte black modern hooks for a contemporary feel, or even vibrant, colorful ceramic ones for a whimsical, eclectic look. Consider double hooks for increased hanging capacity, especially if you have a large family or frequently host guests.
-
Experiment with Molding Options: While standard casing is easy to work with and provides a clean finish, don’t be afraid to explore other simple trim profiles that might better suit your existing home’s architectural trim or desired aesthetic. Many options offer a flat back for straightforward attachment, allowing you to achieve different levels of detail and elegance.
-
Choose Alternative Wood Types: While pine is an excellent budget-friendly choice that’s ideal for painting, using a hardwood like oak, maple, or even reclaimed barn wood would create a more robust and premium piece. When working with hardwoods, applying a clear coat or a rich stain would allow the natural beauty and grain of the wood to be the star of your design.
-
Adjust Dimensions to Fit Your Space: The beauty of DIY is tailoring to your exact needs. Adjust the length and depth of your boards to perfectly fit your specific entryway space. A longer shelf might accommodate more hooks and decorative items, while a shallower one could be ideal for narrow hallways or smaller apartments, maximizing space without impeding traffic flow.
-
Consider Adding Functional Enhancements: Think beyond just hooks and a shelf! Consider incorporating small cubbies or partitioned sections underneath the main shelf for convenient storage of mail, keys, wallets, or sunglasses. You could even integrate a small mirror to one side for quick last-minute appearance checks before heading out the door. The possibilities for personalization and added functionality are truly endless!
Affordable Elegance: Unpacking the Cost and Time Investment
I truly hope you like this project as much as I do! It was SO easy and straightforward to build, and the transformative impact it has on the entryway space is absolutely incredible. What makes this DIY venture even more gratifying is its remarkable cost-effectiveness. This entire project, including all necessary materials from the wood to the paint and fasteners, came in at an astonishingly low price – well under $40! Surprisingly, more than half of that modest budget was actually allocated to the decorative hooks, proving unequivocally that you don’t need to spend a fortune to create high-impact, custom, and visually stunning home decor pieces.
This DIY entryway hook shelf serves as a perfect testament to the power of crafting your own home solutions. It demonstrates that with a relatively small investment of time (just an afternoon for the core build), a few basic tools, and a clear vision, you can achieve beautiful, professional-looking results that are both highly functional and deeply personal. It’s a wonderful example of how DIY can create bespoke pieces that perfectly fit your home and style, often at a mere fraction of the cost of comparable store-bought alternatives, which frequently lack the character and customizability of a handmade item. The satisfaction of building something yourself, coupled with the savings, makes this project a truly rewarding endeavor.
Ready to Create Your Own Entryway Transformation?
Thank you so much for stopping by and taking the time to explore this detailed project! I genuinely hope this comprehensive guide empowers and inspires you to tackle your own entryway transformation. This hook shelf is more than just a place to hang things; it’s an opportunity to add personal style, improve organization, and create a warm welcome in your home. Don’t hesitate to share your creations, modifications, and personal touches with us – we love seeing how you make these projects your own!
We have some super fun and exciting things coming up that we can’t wait to share with you, filled with more inspiring DIY ideas and practical home improvement tips. So be sure to stick around and keep following our journey for more creative ways to enhance your living space.
Happy building, and enjoy your beautifully organized entryway!
~Whitney