
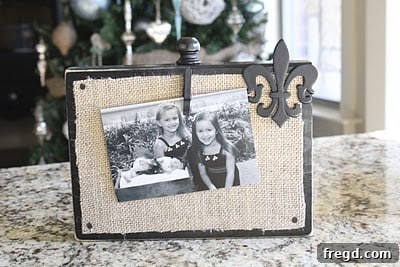
Craft Your Own Chic & Affordable Photo Display: An Easy DIY Guide to Personalized Home Decor
Hey fellow crafters! I know I promised this exciting new DIY project earlier, but a busy weekend meant a slight delay – my apologies! However, I guarantee this next frame and display idea is worth the wait. Not only is it even cheaper and simpler than our previous projects, but it also delivers an undeniably cute and stylish result that you’ll absolutely love.
This project is perfect for anyone looking to add a personalized touch to their home decor or create incredibly thoughtful, budget-friendly gifts, especially with the holiday season approaching. Imagine the joy of gifting something handcrafted, beautiful, and versatile that can display cherished memories, favorite recipes, or inspiring messages. These make a super chic yet unbelievably cheap gift for Christmas, birthdays, or just because. Let’s dive into how I brought this delightful idea to life!
Why This DIY Photo Display Is Your Next Must-Make Project
In a world of mass-produced items, there’s something incredibly special about a handmade gift or a piece of decor crafted with love. This DIY photo display stands out for several compelling reasons:
- Unbeatable Affordability: Each display can be created for under $4, making it one of the most cost-effective decorative solutions or gift ideas out there.
- Effortless Crafting: You don’t need advanced carpentry skills or a workshop full of tools. The steps are straightforward and accessible for beginners.
- Customizable Style: From the choice of paint colors to the decorative accents, every element can be tailored to match your personal aesthetic or the recipient’s taste.
- Versatile Functionality: Beyond just photos, these frames can hold recipes, motivational quotes, children’s artwork, or event tickets, making them truly multi-purpose.
- Heartfelt Gifting: A handmade gift carries a unique emotional value, showing the recipient how much you care through the time and effort invested.
Ready to create a piece that’s both charming and incredibly useful? Let’s gather our supplies!
Gathering Your Materials: What You’ll Need for Your Rustic Display
One of the best aspects of this project is that all the materials are widely available and won’t break the bank. Here’s a detailed list of what you’ll need to transform simple items into a beautiful display:
Essential Components:
- Wood Piece: We started with a 2x8x8 common board, which I purchased from Lowe’s for about $5. This dimension is perfect because it’s sturdy and provides a nice depth. You’ll want to cut this into pieces roughly 10 inches long. If you don’t have a saw at home, don’t fret! Many major hardware stores like Home Depot offer wood cutting services, often for free or a minimal charge when you purchase the wood from them. Just ask an associate, and they’ll usually be happy to help you get the precise lengths you need.
- Dowel Rod Caps/Finials: These small, decorative caps are what give the display its finished, elegant look. I found them easily at craft stores like Hobby Lobby, where they come in a convenient pack of 3 for under $2. Joann’s also carries very similar options. They are typically made of wood, making them ideal for painting.
- Small Decorative Wood Pieces: While optional, these pieces add a unique embellishment. I discovered some charming ones at Joann’s for an unbeatable price of $.59 each. They weren’t my favorite color initially, but I immediately saw their potential once painted. Look for interesting shapes or designs in the wood crafting aisle.
- Burlap Fabric: A small cut of burlap is needed for the background. You’ll cut it to be about 1/2 inch smaller than your wood frame on all sides. Burlap adds a fantastic rustic texture and is readily available at any fabric store, including Hobby Lobby or Joann’s, usually by the yard or in pre-cut squares.
- Clothespins: These are crucial for the functionality of your display. You can use standard wooden clothespins or smaller decorative ones, depending on the look you prefer. They will be glued to the frame to hold photos, recipes, or messages.
- Furniture Tacks/Upholstery Nails: These small, decorative nails add a polished, vintage touch to the corners of your frame. They come in various finishes like black, silver, brass, or antique bronze. You can pick these up at hardware stores or craft supply stores.
Tools & Adhesives:
- Hot Glue Gun & Glue Sticks: Your best friend for this project, providing quick and strong bonds for various components.
- Saw (Optional): If cutting your own wood, a miter saw offers precision, but a hand saw will also work.
- Measuring Tape and Pencil: Essential for accurate cutting and placement.
- Fine-Grit Sandpaper: For smoothing out any rough edges on your cut wood pieces, ensuring a professional finish.
- Spray Adhesive (e.g., 3M Spray Adhesive): This is vital for securely attaching the burlap to your wood frame, preventing wrinkles and ensuring a flat, even surface.
- Spray Paint: Our preferred choice is Rust-Oleum Painter’s Touch. It provides excellent coverage, dries quickly, and is incredibly durable. You can find it most affordably at Home Depot. We used Canyon Black for a sleek, modern look and Heirloom White for a classic, farmhouse feel, but feel free to choose colors that match your decor.
- Protective Gear & Workspace: Always ensure you have gloves, safety glasses, and a well-ventilated area (preferably outdoors or in a garage) when using saws and spray paint. A drop cloth or old newspapers are also useful to protect your work surface.
Having all your materials prepped and ready before you start will make the crafting process much smoother and more enjoyable. Now, let’s get started on building these beautiful displays!
Step-by-Step Project Guide: Crafting Your Personalized Display
Step 1: Preparing Your Wood Base
Begin by cutting your 2x8x8 common board into manageable pieces, each approximately 10 inches long. This size provides a robust yet compact foundation for your photo display, making it ideal for shelves, desks, or even hanging on a wall. If you’re utilizing a hardware store’s cutting service, clearly communicate your desired length. Precision here will ensure a professional outcome. Once your wood pieces are cut, it’s essential to sand all edges and surfaces thoroughly with fine-grit sandpaper. This step not only removes splinters and rough patches but also creates a smooth canvas for painting, allowing the paint to adhere evenly and beautifully. Don’t rush this stage; a well-sanded piece is the secret to a polished final product.
Step 2: Attaching the Decorative Dowel Caps
Now, grab your trusty hot glue gun. Apply a generous, even bead of hot glue to the flat base of one dowel cap. Carefully center this cap on one end of your prepared wood piece and press firmly for about 15-20 seconds to ensure a strong bond. These dowel caps serve as stylish finials, transforming a simple piece of wood into a sophisticated frame. The image below shows the added finial, but notice how the clothespin isn’t attached yet. This is a crucial tip: wait to attach your clothespins and other small embellishments until after painting. This ensures full paint coverage on all components and makes the process much cleaner, preventing any sticky glue residue from interfering with your finish.
Step 3: Selecting and Preparing Decorative Wood Pieces
While exploring the craft store aisles, keep an eye out for small, inexpensive wood pieces that catch your imagination. I found these at Joann’s for a mere $.59 a piece! Although their original color wasn’t ideal, I immediately recognized their potential to add unique character to the display once painted. These pieces will serve as an additional decorative element, offering another layer of customization. Ensure they are clean and free of dust before proceeding. If they have any rough spots, a quick sand will smooth them out for painting.
Step 4: Painting Your Components
Now for the fun part: painting! Take your main wood frame (with the attached dowel cap) and your small decorative wood pieces to a well-ventilated area. Lay them out on a protected surface, such as old newspapers or a drop cloth. We highly recommend Rust-Oleum Painter’s Touch spray paint, which you can typically find for the best price at Home Depot. Its excellent coverage and durability make it ideal for craft projects. For our displays, we chose contrasting colors: Canyon Black for a bold, modern statement and Heirloom White for a softer, more classic rustic appeal. Apply several light, even coats of spray paint, allowing each coat to dry completely before applying the next (usually 15-30 minutes, depending on humidity). This layered approach prevents drips and ensures a smooth, professional-looking finish that will make your display truly pop.
Step 5: Preparing and Attaching the Burlap Background
Once your painted frames are completely dry and cured, it’s time to add the charming burlap background. Measure and cut a piece of burlap fabric that is approximately half an inch smaller than your main wood frame on all sides. This slight border will allow the painted wood frame to show through, creating a clean, crisp edge and enhancing the overall aesthetic. Burlap, known for its natural texture and rustic appeal, can be found at any fabric or craft store. Lay your burlap piece face down and apply 3M spray adhesive evenly to the back. This adhesive is excellent for fabric and ensures a strong, long-lasting bond. Carefully center the burlap onto your painted wood frame and press down firmly, smoothing out any wrinkles or air bubbles from the center outwards to achieve a perfectly flat surface. This step significantly elevates the texture and visual interest of your display.
Step 6: Adding Decorative Furniture Tacks
To infuse a touch of sophisticated detail and a slight industrial-chic vibe, it’s time to add the furniture tacks. Carefully place one tack in each corner of your frame, pressing it in gently before using a small hammer to tap it securely into place. This detail might seem small, but it significantly enhances the finished look of your display. For a cohesive and stylish appearance, we used black tacks on our black frame to blend seamlessly, and silver tacks on our Heirloom White frame to provide a subtle contrast that catches the eye. These tacks are readily available at most hardware stores or larger craft stores in various finishes, allowing you to match your chosen aesthetic perfectly.
Step 7: Final Assembly – Decorative Pieces and Clothespins
You’re almost there! It’s time for the final touches that bring your display to life. Using your hot glue gun, carefully attach your cute, painted decorative wood pieces to the burlap background. You can position them centrally below the dowel cap, or get creative with their placement – perhaps in a corner or offset for a unique look. Once those are secure, it’s time to add the clothespins. Apply a line of hot glue to the back of each clothespin and firmly press it onto the burlap where you want your photos or notes to hang. Whether you choose a single prominent clothespin or a row of smaller ones, ensure they are spaced appropriately for what you intend to display. The hot glue provides a quick, strong bond, making this step both easy and satisfying. These clothespins are the functional heart of your display, allowing for effortless changes and personalization.
Personalizing Your Display & Creative Uses Beyond Photos
The true charm of this DIY photo display lies in its incredible versatility. While it’s perfect for showcasing your favorite photographs, its clever design allows for so much more. This isn’t just a frame; it’s a dynamic canvas for your creativity!
- Photo Gallery: Naturally, it’s ideal for displaying cherished family photos, vacation snapshots, or baby pictures. The clothespins make it easy to swap out photos as often as you like, keeping your decor fresh.
- Recipe Holder: Place it in your kitchen to hold a cherished family recipe, a weekly meal plan, or your grocery list. The rustic charm adds warmth to any culinary space.
- Inspirational Message Board: Clip an uplifting quote, a daily affirmation, or a motivational message to keep you inspired throughout your day.
- Children’s Art Showcase: A wonderful way to display your child’s latest masterpieces, giving them pride of place in your home.
- Seasonal Decor: Easily transform your display for holidays by clipping on festive cards, small ornaments, or themed artwork. Think fall leaves for autumn or snowflakes for winter.
- Memory Keeper: Use it to hold concert tickets, movie stubs, postcards, or small souvenirs from special events, creating a personal memory board.
- Gift Tag Display: For craft fairs or personalized gifting, use it to display price tags or heartfelt messages alongside your products.
Imagine gifting one of these beautiful, handmade displays to a special someone. You can personalize it even further by including a favorite family photo, a handwritten recipe passed down through generations, or a heartfelt message that speaks directly to them. Each display, costing under $4 to make, offers immense value as a personalized, thoughtful present that truly comes from the heart. It’s a gift that keeps on giving, allowing the recipient to continually update and personalize it with their own memories and inspirations.
Join Our Creative Community! Share Your DIY Successes!
We absolutely love seeing your creativity in action! These simple, budget-friendly photo displays are not only adorable but also incredibly satisfying to make. We hope you’ve enjoyed this tutorial and are inspired to craft your own. If you have any questions along the way, please don’t hesitate to ask in the comments below!
On another exciting note, mark your calendars! Get those projects ready for tomorrow’s “I Made It Without My Hubby” party! This is your fantastic opportunity to show off any and all crafts, home improvement projects, furniture revamps, or thoughtful gifts you’ve tackled entirely on your own. We want to celebrate your independence, ingenuity, and incredible talent!
And there’s more – we have a fantastic giveaway lined up exclusively for party participants, so make sure your creations are ready to shine! We’ll be posting the official party details tomorrow night, so be sure to check back for a chance to win. We can’t wait to see all the amazing things you’ve accomplished!
Have a wonderful, inspiring, and crafty week!
~Whitney