
Craft Your Own Modern Farmhouse Coffee Table: Free DIY Plans Inside!
I am absolutely thrilled to share the incredible results of my latest woodworking adventure! This project came about quite serendipitously when my fantastic hairdresser mentioned she was looking for a new coffee table. Always eager for a creative challenge and a bit of a strategic thinker, I immediately seized the opportunity for a perfect win-win trade: I get my hair done, and she receives a beautifully handcrafted coffee table. It was an irresistible offer, and the journey to creating this stunning piece has been incredibly rewarding. Get ready to be inspired to build your own!
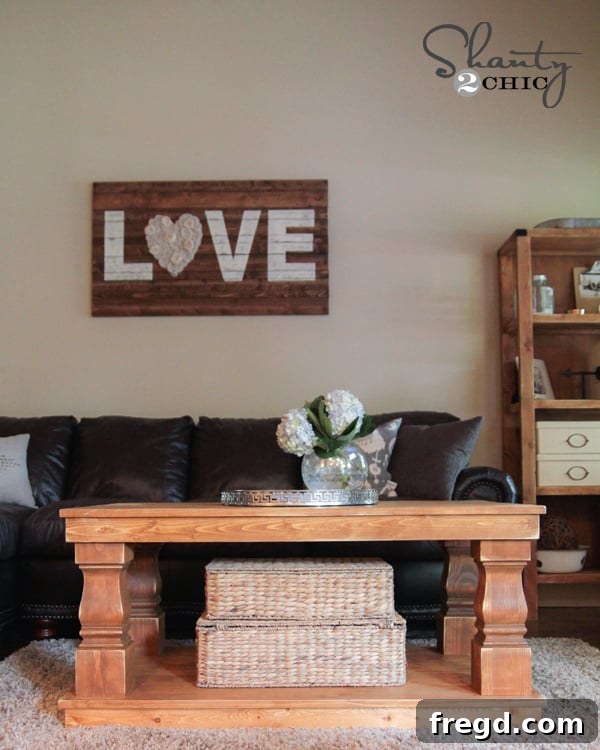
Prepare to be amazed by the final outcome. This table truly blends rustic charm with contemporary elegance, making it a standout piece in any living space. We’ve managed to capture the essence of modern farmhouse style in every detail, from its sturdy construction to its sophisticated finish. Take a look at the finished product – I think you’ll agree it’s a showstopper!
The Foundation of Style: Striking Coffee Table Legs
What do you think of those incredible legs? They are undeniably big, bold, and absolutely beautiful, aren’t they? From the very beginning of this project, I envisioned a coffee table that would make a significant statement, and I knew that the legs would be the defining feature. They are, without a doubt, what truly makes this table shine. The construction itself is surprisingly simple, but the thoughtful design and choice of these legs elevate the entire look to something truly amazing and sophisticated.
To achieve this distinctive aesthetic, I collaborated with one of our absolute favorite companies in the industry: Osborne Wood Products. Their commitment to quality, combined with fantastic pricing and an extensive variety of designs, makes them an unparalleled resource for any woodworking enthusiast. These specific legs perfectly capture the robust, elegant feel we were aiming for. If you’re looking to replicate this stunning look, or simply explore their vast selection for your next project, you can easily find these exact legs and many more options HERE on their website!
Your DIY Journey Begins: Download Free Modern Farmhouse Coffee Table Plans
I’m thrilled to guide you through the step-by-step process of building this magnificent piece. You’ll be amazed at how achievable this project is, even if you’re new to woodworking. To make your journey even smoother, we’ve created comprehensive, easy-to-follow plans that you can download and print at your convenience. These detailed plans will provide all the necessary measurements and instructions, ensuring a successful build. You can grab your FREE PLANS for this table RIGHT HERE, or simply click the button below to access them instantly! Don’t miss out on the opportunity to build a custom piece that will undoubtedly become a focal point in your home.
Essential Tools for Your Woodworking Project
Let me demonstrate just how straightforward this build truly is. The key to any successful woodworking project lies in having the right tools, and for this modern farmhouse coffee table, a few essential items will make the process efficient and enjoyable. While not an exhaustive list, these are the primary tools that will empower you to achieve professional-looking results with confidence.
Precision Cuts with a Miter Saw
I began by making all of my necessary cuts. For precision and efficiency, I relied on my Ridgid Sliding Compound Miter Saw. A good miter saw is an invaluable asset for any DIY builder, allowing you to make accurate crosscuts and miter cuts quickly and safely. This particular model offers fantastic versatility, making it perfect for handling all the various wood pieces required for this project, from the planks for the top to the components for the frames.
The Power of Pocket Holes: Kreg Jig Mastery
Once all the wood pieces were cut to size, my next step was to create the pocket holes. This coffee table design incorporates a significant number of pocket holes, but don’t let that intimidate you – it’s precisely what makes this table incredibly sturdy and robust. Utilizing the Kreg Jig for these connections is a game-changer, ensuring strong, hidden joints. The plan specifically calls for 3/4″ pocket holes, which is perfectly suited to the thickness of the wood we are working with, creating a flush and secure connection. You can see the Kreg Jig K5, which is my preferred model for its ease of use and reliability, HERE on Amazon!
Your Trusty Drill: Making Connections
Once the pocket holes were precisely drilled, I began assembling the planked tops. As you can see, I carefully aligned my boards in the Kreg Jig to ensure consistent and accurate hole placement. For creating all these essential pocket holes, I relied on my Ryobi drill. A dependable cordless drill is indispensable for quickly and efficiently driving screws and creating pocket holes throughout the project. Each of the 48-inch pieces was prepped in this manner before being attached to one another. Note that two of these boards, which will form the planks on one end of the tabletop, do not require any pocket holes, as they will be attached differently.
At this stage, you should have two complete planked pieces that form the main sections of your tabletop, each looking much like the image below. I securely attached these planks together using 1 1/4″ pocket hole screws, ensuring a strong and seamless surface for the table top. This method creates a robust foundation that will stand the test of time and everyday use.
Assembling the Sturdy Support Frames
Beneath each of these planked tabletop pieces, there will be a support frame. I proceeded to build both of these frames next. They are identical in construction, so you will create two of them. Each frame consists of three shorter boards and two longer boards. The shorter boards are crucial for adding structural integrity and will require pocket holes drilled along their length, as well as on each end for connecting to the longer pieces. To create the pocket holes that run down the length of each board, I positioned them in the Kreg Jig exactly like this, ensuring precise alignment and depth.
The pocket holes needed on each end of the boards, which will facilitate the connections to the longer frame pieces, are made by carefully lining up the boards in the Kreg Jig as depicted in this image. This two-directional pocket hole strategy ensures that the frame is incredibly strong and resistant to racking, providing a solid base for the tabletop.
To construct both frames, I used 1 1/4″ pocket hole screws in conjunction with Gorilla wood glue for maximum strength and durability. These screws are driven through the pocket holes on each end of the shorter boards and into the longer boards, forming a secure rectangular structure. It’s vital during this step to ensure that all the pocket holes running along the length of the boards are facing the same direction. This consistency will be important for the next step when you attach the frames to the planked tabletops, ensuring a clean and effective connection.
Uniting Top and Frame for a Seamless Build
The next stage in our build is effortlessly attaching these sturdy frames to your beautifully planked tabletop boards. This part is incredibly simple, thanks to the strategically placed pocket holes you’ve already created! You’ll just need to use 1 1/4″ pocket hole screws. Drive these screws through all the pocket holes running along the length of the frame boards and directly into the planked tabletop. This creates an incredibly strong, rigid, and aesthetically pleasing joint that firmly unites the two major components of your coffee table.
With the frames securely attached, you will now have two complete pieces that look exactly like the image below. These two robust sections form the upper and lower halves of your coffee table’s main structure. Each piece boasts a solid planked top supported by a strong, internal frame, ready for the next phase of assembly: attaching those gorgeous legs and bringing the whole design together!
Preparing for Legs: The ‘L’ Brackets
Now it’s time to build your clever little ‘L’ pieces! While you certainly could tackle this step earlier in the process, I found it convenient to construct them when I was ready to attach the legs themselves. You will be building four distinct ‘L’-shaped pieces, which are crucial for securely mounting the table legs. Each ‘L’ piece utilizes two different sections of 1×3 lumber: one shorter piece and one longer piece. The diagram below clearly illustrates where your pocket holes will need to be placed on each individual component before you assemble them into the ‘L’ shape. Precise pocket hole placement here ensures a strong connection to both the legs and the table apron.
Before you attach these pieces to the main table structure, you’ll first connect the shorter and longer 1×3 sections together using pocket hole screws to form your distinct ‘L’ shape. This pre-assembly makes the final leg attachment much simpler and more precise. Ensure these connections are strong, as they will bear the weight and provide stability for the entire table.
Attaching the Statement Legs
Once your ‘L’ brackets are ready, they’re designed to fit snugly around the top of each leg. The clever design allows them to secure both to the apron (the side frame) of the tabletop and directly to the underside of the tabletop itself, utilizing 1 1/4″ pocket hole screws. For an even more robust connection, you’ll also attach these ‘L’ brackets directly to the wooden legs using strong wood screws. This multi-point attachment ensures that the legs are incredibly stable and firmly integrated into the coffee table’s design, providing the substantial support and striking aesthetic we discussed earlier.
Here you can see all four legs successfully attached to the main body of the table. At this point, the table is taking its true form, showcasing those magnificent legs that make such a statement. This view demonstrates the solid foundation we’ve built, providing a preview of the finished piece. The next crucial step will be to add the bottom shelf, which not only provides extra storage or display space but also adds another layer of structural stability to the entire design.
Installing the Lower Shelf
To add the bottom shelf, an integral part of this coffee table’s design for both aesthetics and functionality, I first applied a generous amount of Gorilla Wood Glue to the top surface of each leg where the shelf would rest. This adhesive creates an incredibly strong bond, preventing any movement over time. Following the glue application, I then secured the bottom shelf by driving three 2.5″ wood screws through the bottom part of the shelf and into each leg. This method ensures a robust, long-lasting connection that completes the structural integrity of the table.
And voila! At this stage, you’ve successfully completed the structural assembly of your magnificent coffee table. All the pieces are securely joined, and the table stands proud – albeit upside down for the moment! This position is perfect for the upcoming finishing steps, allowing easy access to all surfaces. Take a moment to appreciate the solid craftsmanship and the emerging silhouette of your very own handmade piece of furniture. It’s almost ready for its grand reveal!
The Finishing Touches: Stain, Distress, and Protect Your Masterpiece
With the construction complete, the final steps involve bringing out the natural beauty of the wood and protecting it for years to come. These finishing touches are where the character of your modern farmhouse coffee table truly comes to life, allowing you to customize its appearance to perfectly match your home decor.
Choosing Your Stain: Rust-Oleum Wheat
My final step in this transformation was the staining process. I opted for Rust-Oleum stain in a beautiful, warm color called Wheat. This particular shade offers a lovely, soft, and inviting look that perfectly complements the modern farmhouse aesthetic, highlighting the wood grain without overpowering it. When applying stain, always follow the manufacturer’s instructions, ensuring an even coat and wiping away any excess for a consistent finish. A good quality brush or cloth can help achieve a smooth application.
The Art of Distressing with a Sander
Once the stain had fully dried and cured, I moved on to a technique that truly enhances the farmhouse charm: distressing. Using my Ryobi Corner Cat sander, I carefully distressed all the edges of the table. This process involves lightly sanding down corners and raised areas, creating a subtly worn and aged look that mimics years of natural use. I absolutely adore the character and depth this technique achieves, adding an authentic, lived-in feel to the new piece.
Long-Lasting Protection: The Polyurethane Coat
To ensure that this beautiful finish is protected against spills, scratches, and everyday wear and tear, I applied a durable coat of polyurethane to the entire surface. Polyurethane provides a clear, tough, and long-lasting protective layer that seals the stain and distressing, allowing the table to maintain its gorgeous appearance for many years. Always ensure the stain is completely dry before applying polyurethane, and follow product instructions for proper application and drying times. And there you have it – the entire project, from raw lumber to a stunning, finished coffee table!
Your Completed Coffee Table: A Statement Piece for Any Home
Here it is, all finished up and ready to make a grand entrance! I couldn’t resist photographing it in my own living room first, and I must confess, I’m now seriously tempted to keep it right here. The way it ties the room together and adds that perfect touch of modern farmhouse elegance is just captivating. It truly showcases how a DIY project can result in a high-quality, personalized piece that rivals expensive store-bought furniture. I’m confident that my hairdresser will love it as much as I do!
Value Beyond Price: The DIY Advantage
The total cost for the raw wood materials to construct this beautiful coffee table came in just under $250. While this might be considered one of the more expensive coffee tables I’ve tackled in terms of raw materials, it represents incredible value when you consider the alternative. When compared to the thousands of dollars that high-end furniture stores are charging for similar, custom-designed modern farmhouse pieces, I am absolutely delighted with the final price. And, of course, those magnificent legs from Osborne Wood Products are truly unparalleled – you simply can’t find quality and character like that at a better price point or with such a personal touch. This project proves that with a little effort and the right resources, you can create a high-quality, stylish piece of furniture that far exceeds the value of its material cost.
Join Our DIY Community!
We would absolutely LOVE for you to share this project and PIN this stunning coffee table with all your friends and fellow DIY enthusiasts! Your support in sharing our projects means the world to us, and we appreciate it SO MUCH. Spreading the word helps our community grow and inspires more people to pick up tools and create something beautiful. Don’t hesitate to share your thoughts and progress with us!
Thank you so much for stopping by and taking the time to explore this woodworking journey! Please don’t hesitate to reach out if you have any questions at all about the plans, the tools, the process, or the finishing techniques. We’re always here to help and love hearing from you.
Special Thanks to Our Collaborators
A huge and heartfelt thank you goes out to Jay of Jay’s Custom Creations! Jay is an absolute wizard at taking our original design ideas and transforming them into professional, easy-to-read, and printable plans for our amazing readers. His expertise makes these projects accessible to everyone, and we are incredibly grateful for his contribution. We highly recommend checking out his website – he’s truly awesome and a fantastic resource for any woodworking project!
~Whitney