
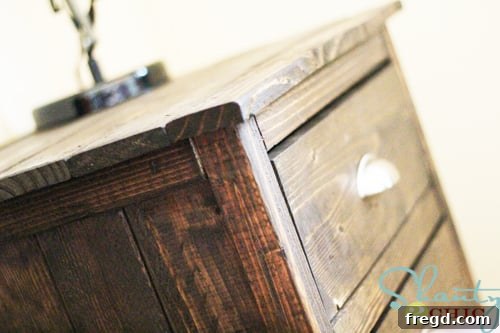
DIY Reclaimed Wood Nightstands: A Step-by-Step Guide to Crafting Bedroom Charm
Hey everyone! I am absolutely thrilled to unveil a passion project that has been taking shape in my workshop, and I simply cannot wait to share all the details with you. Embarking on a new DIY endeavor always brings a unique sense of accomplishment, and this latest creation has truly exceeded my expectations. We’re talking about a set of stunning reclaimed wood-look nightstands that not only bring rustic elegance into my son’s bedroom but also perfectly complement a piece I built for him previously. Get ready to be inspired to tackle your next woodworking adventure!
The Inspiration: Rustic Style Meets Practicality with Ana White Plans
As soon as I laid eyes on the plans for these Reclaimed Wood Nightstands over at Ana White’s website, I knew this was the next project for me. The design perfectly captured the aesthetic I was aiming for – a blend of farmhouse charm and sturdy, functional craftsmanship. What made these plans particularly appealing was their ideal match for my son’s existing Reclaimed Wood Headboard, which I had proudly built a while back. The synergy between these pieces would create a cohesive and inviting bedroom space. Ana White’s detailed instructions are always a blessing for DIY enthusiasts, providing clear, step-by-step guidance that makes even ambitious projects feel achievable. Her approach to woodworking empowers makers of all skill levels, ensuring that a professional-looking finish is within reach for anyone willing to put in the effort. Choosing a design that already complements existing furniture is a fantastic way to ensure your home decor feels thoughtfully curated and harmonious.
Unlocking Woodworking Potential with the Kreg Jig
For this build, my secret weapon and newfound best friend in the workshop was undeniably the Kreg Jig. If you’re serious about DIY woodworking and haven’t yet discovered the magic of pocket-hole joinery, prepare for a revelation! This ingenious tool simplifies the construction process significantly, making it faster, stronger, and more enjoyable. The Kreg Jig is a pocket hole system designed to create incredibly robust joints by drilling angled holes into one workpiece, allowing you to drive screws into an adjacent piece. This method pulls the two pieces of wood tightly together, forming a very strong connection without the need for complex traditional joinery or cumbersome clamps. In the past, I’ve spent countless hours trying to align pieces perfectly while pre-drilling and fastening, often feeling like I needed an extra set of hands – or fifteen! The Kreg Jig completely eliminates this frustration, allowing for precise and secure assemblies with remarkable ease. It’s a game-changer for anyone looking to build furniture with clean lines and lasting durability.
The Kreg Jig is specifically designed to streamline the assembly process. Its clever clamping mechanism holds your wood securely in place, freeing up your hands and eliminating the need for awkward balancing acts while you prepare your pieces. This precision-engineered system ensures that your pilot holes are drilled at the perfect angle every time, leading to consistently strong and stable joints. Beyond the immediate benefits of speed and accuracy, the angled screws driven by the Kreg Jig create a remarkably robust connection, far superior to simple butt joints or nails alone. This enhanced strength is crucial for furniture pieces like nightstands, which need to withstand daily use. Following Ana’s detailed instructions for building these nightstands with the Kreg Jig made the entire process incredibly straightforward. It was a refreshing departure from the time-consuming and often finicky pre-drilling methods I’ve relied on in the past, transforming what could have been a complex project into an enjoyable and efficient build. I highly recommend it for any DIY enthusiast looking to elevate their woodworking game.
The Building Journey: From Lumber to Legacy
Watching a project come to life from a pile of raw lumber is one of the most rewarding aspects of woodworking. These nightstands were no exception. The initial steps involved carefully cutting each piece of wood according to Ana’s plans, ensuring precision in every measurement. Accuracy at this stage is paramount, as it dictates how well all subsequent components will fit together. Once the pieces were cut, the real magic of assembly began, largely thanks to the Kreg Jig.
Each section of the nightstand, from the sturdy side panels to the robust back support, was carefully joined using pocket holes. The Kreg Jig allowed me to create strong, hidden joints that contribute to the overall clean aesthetic of the reclaimed wood look. The process involved drilling the pocket holes, applying wood glue for extra strength, and then securing the pieces with Kreg screws. This method ensures that the nightstands are not only beautiful but also incredibly durable and long-lasting.
As the main body of the nightstands took shape, the satisfaction grew with each perfectly aligned joint. Building furniture piece by piece offers an intimate understanding of its construction, fostering appreciation for the craft. The methodical rhythm of measuring, cutting, drilling, and screwing is incredibly therapeutic, transforming raw materials into a functional and beautiful object. This stage of the build truly highlights the power of good plans and reliable tools, making the journey from concept to tangible piece incredibly rewarding.
One of the key considerations during assembly was ensuring that all corners were square and all connections were tight. This attention to detail is critical for both the structural integrity and the aesthetic appeal of the finished piece. Each joint was checked and re-checked, guaranteeing that the nightstands would stand strong and true for years to come. The design incorporated various internal supports and crossbeams, all precisely fitted, which further contributed to the overall robustness. It’s truly amazing to see how simple wood pieces can come together to form such a substantial and appealing structure.
Crafting the Drawers: Functional Elegance
Once the main frames of the nightstands were solid, the next crucial step was constructing the drawers. Drawers are essential components of any nightstand, providing valuable storage and contributing significantly to the piece’s functionality. Building them requires careful attention to detail to ensure they glide smoothly and fit perfectly within their openings. For these nightstands, I focused on creating robust drawer frames that would hold up to daily use.
Frames for the drawers were meticulously assembled, again utilizing the efficiency of the Kreg Jig. Each corner was joined with pocket holes, creating a strong, square box that would form the foundation of each drawer. Ensuring the frames were perfectly square was vital, as any deviation here would lead to drawers that stick or don’t close properly. The plans provided clear dimensions, allowing for precise cuts and easy assembly. Once the frames were built, the bottom panels were added, completing the basic drawer structure. This methodical approach ensures that the drawers not only look good but also function flawlessly, enhancing the overall user experience of these DIY reclaimed wood nightstands.
The Finishing Touches: Bringing Out the “Reclaimed” Charm
With the construction complete, it was time to move on to the finishing process, which truly transforms raw wood into a piece of art. The goal was to enhance the wood’s natural grain while achieving that coveted “reclaimed wood” look. This stage is where the personality of the furniture truly emerges. I opted for a classic and rich finish that would complement the rustic aesthetic of the nightstands and the headboard.
I began by applying a single coat of Minwax Dark Walnut stain. This particular shade is fantastic for creating depth and warmth, perfectly mimicking the aged character often found in reclaimed wood. The stain seeped into the grain, highlighting its natural patterns and providing a deep, even color that instantly elevated the pieces. Applying just one coat allowed the wood’s texture and subtle imperfections to show through, which is essential for that authentic reclaimed feel. After the stain had thoroughly dried, I followed up with several coats of Minwax Polycrylic. Polycrylic is an excellent choice for furniture as it provides a clear, durable protective finish that guards against everyday wear and tear without yellowing the wood over time. Its water-based formula makes for easy cleanup and quick drying times, allowing multiple coats to be applied in a single day. The polycrylic not only protects the wood but also adds a subtle sheen, making the rich dark walnut stain pop and giving the nightstands a professional, polished appearance. The combination of these two finishes resulted in a beautiful, long-lasting surface that truly embodies the rustic elegance I envisioned.
Hardware Selection: The Perfect Jewelry for Your Furniture
Choosing the right hardware is like selecting the perfect jewelry for an outfit – it can elevate the entire piece and define its character. For the final touch on these reclaimed wood nightstands, I meticulously searched for pulls that would not only be functional but also enhance the rustic and sturdy aesthetic. I ultimately found these fantastic pulls at Home Depot. While they weren’t the cheapest option on the shelf, costing $4.49 each, I firmly believe that hardware is one area where it’s worth investing a little extra. Skimping on hardware can detract from even the most beautifully crafted piece of furniture, and I was determined to ensure these nightstands had that “perfect” finishing element.
The chosen pulls had a substantial feel and a classic design that perfectly complemented the dark walnut stain and the overall reclaimed wood look. Their rustic finish and robust construction made them the ideal choice, adding a touch of sophisticated charm without overwhelming the natural beauty of the wood. I’m incredibly glad I went with the hardware that I truly wanted, as it undeniably makes a significant difference to the overall look and feel of the nightstands. These carefully selected pulls serve as a testament to the idea that thoughtful details can transform a good DIY project into a truly exceptional one. The satisfaction of seeing the finished product, complete with these perfectly chosen accents, is truly immense.
The decision to invest in quality hardware paid off handsomely. The pulls don’t just open and close the drawers; they complete the aesthetic, adding a tactile element that enhances the user experience. They feel solid and sturdy, a perfect match for the durable construction of the nightstands themselves. It’s these small details that tie the whole project together and truly make it feel like a custom-made, high-end piece of furniture. I absolutely love the way these turned out, and the hardware played a crucial role in achieving that refined yet rustic look.
Styling on a Budget: The Perfect Lamp Find
With the nightstands complete and gleaming, the final touch was to accessorize them appropriately. Every nightstand needs a lamp, and finding the right one that complements the style without breaking the bank can sometimes be a challenge. My son had spotted some similar lamps in the PBTeen catalog, which, while beautiful, were definitely not within our project budget, especially since I needed two of them. This is where a little creative shopping comes in handy!
I decided to try my luck at Wal-Mart, and to my delight (and my son’s!), I discovered a super cute lamp for an incredible price of just $9! It was a moment of pure joy to find a stylish and functional piece that fit our budget perfectly. This find just goes to show that you don’t always have to spend a fortune to get the look you want. Combining custom-built furniture with smart, budget-friendly decor choices allows you to achieve a high-end aesthetic without the hefty price tag. We are both incredibly happy with this discovery, and it perfectly completes the look of the new nightstands. It’s a testament to the fact that great style can be accessible to everyone, with a little patience and a keen eye for a good deal.
The synergy between the robust, handcrafted nightstand and the thoughtfully chosen, budget-friendly lamp creates a harmonious and inviting atmosphere. It’s a reminder that personalized touches and smart decisions contribute significantly to the overall appeal of a space. Finding that balance between investment pieces and clever bargains is key to successful home decorating. And in this case, both mother and son are delighted with the outcome!
Project Cost Breakdown: Value Beyond Compare
One of the most satisfying aspects of DIY furniture building is the incredible value you get compared to purchasing retail. Here’s a quick rundown of the costs for these beautiful reclaimed wood nightstands:
- Lumber: $40
- Hardware: $30 (for both nightstands, including the specific pulls I desired)
Fortunately, I already had the Minwax Dark Walnut stain and Polycrylic on hand from previous projects, so those materials cost me nothing extra for this build. This meant the total out-of-pocket expense for two bespoke, sturdy, and stylish nightstands was just $70. Divided by two, that’s an astonishing $35 per nightstand! You simply cannot find quality furniture like this at that price point in any store. This cost-effectiveness, combined with the immense satisfaction of creating something with your own hands, makes DIY projects incredibly rewarding. It’s an investment in both your home and your skills, delivering a personalized piece of furniture that’s built to last and infused with personal pride. I’ll take that kind of value any day!
Conclusion: Crafting Comfort, One Project at a Time
Building these reclaimed wood nightstands has been an incredibly fulfilling journey, from selecting the perfect plans to applying the final coat of finish. The joy of creating something beautiful and functional for my son’s room, especially a piece that perfectly complements his existing headboard, is truly unparalleled. The Kreg Jig proved to be an indispensable tool, simplifying the construction process and ensuring robust, professional-quality joints. The careful selection of stain, polycrylic, and hardware each played a vital role in bringing the vision of rustic elegance to life, all while staying mindful of the budget.
This project is a testament to the power of DIY – not just in saving money, but in the profound satisfaction of crafting something with your own hands. It transforms a house into a home, filled with personalized pieces that tell a story. If you’ve been contemplating a woodworking project, I wholeheartedly encourage you to take the leap. The learning, the challenges, and the ultimate reward of a job well done are truly invaluable.
We’re constantly exploring new ways to enhance our home with handcrafted pieces, so make sure to stop by later and check out our second video tutorial, where we’ll delve even deeper into the techniques and tips that make these projects a success!
Happy Monday to you all, and happy building!
~Ashley