
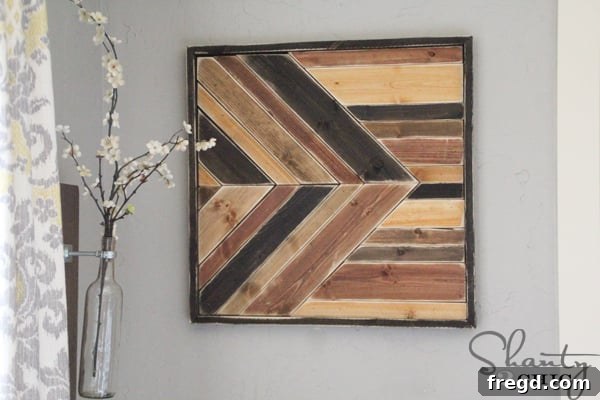
Welcome, fellow DIY enthusiasts! Today, I am absolutely thrilled to share a project that will not only add a touch of rustic elegance to your home but also proves that high-end style doesn’t have to come with a hefty price tag. My inspiration struck while flipping through a Pottery Barn magazine last week – I saw something similar that sparked my creativity, leading me to craft my very own version of stunning, budget-friendly wall art. Get ready to transform ordinary wood into an extraordinary statement piece!
This entire DIY wall art project cost me an astonishingly low $15 and took just one dedicated afternoon to complete. Imagine creating a bespoke piece of home decor, tailored to your taste, without breaking the bank or spending weeks on end. It’s truly a rewarding experience to build something beautiful with your own hands. Ready to dive in? Let’s explore how you can achieve this rustic, chic aesthetic in your own home!
Gathering Your Materials: The Foundation of Your Rustic Wall Art
Every great woodworking project starts with the right materials. For this stunning geometric wood art, the foundation is surprisingly simple and affordable. I began with a 2’x2′ sheet of 1/4″ plywood, which I picked up from Lowe’s for around $4. This piece will serve as the sturdy base for your intricate wood design. If you happen to have scrap plywood lying around, this is an excellent opportunity to put it to good use and save even more money!
In addition to the plywood, you will need various sizes of wood strips to create the captivating geometric pattern. I opted for pine boards due to their affordability and ease of working with, but you could reduce costs even further by using furring strips. Just a word of caution: if you choose furring strips, ensure they are as straight as possible. Warped wood can quickly turn a fun project into a frustrating challenge!
Here’s what I purchased for the wood strips:
- 3 – 1x2s @ 8ft. lengths
- 1 – 1×3 @ 6ft. length
- 1 – 1×4 @ 6ft. length
Pro Tip for Woodworking: Always remember to measure your cuts as you go and make any necessary adjustments. Wood can sometimes be slightly off in dimensions, and accounting for this as you progress will ensure a much smoother and more accurate assembly.
Essential Tools for Precision Cutting
Achieving crisp, accurate cuts is crucial for the overall look of your geometric wall art. I relied on my trusty Miter Saw for all the cuts, which made the process quick and precise. A miter saw allows you to make perfectly angled cuts, essential for the aesthetic of this project.
If you’re not ready to invest in a miter saw, don’t worry! A simple hand saw paired with a miter box will also get the job done effectively. While it might take a little more effort and time, the results can be just as professional. Safety is paramount when using any cutting tool; always wear appropriate eye protection and follow manufacturer guidelines.
Understanding the Cut Diagram: Crafting Your Geometric Pattern
The beauty of this wall art lies in its intricate geometric design, achieved through specific angled and straight cuts. Understanding the cut list is key to replicating this stunning pattern. You’ll encounter terms like “long to long,” “long to short,” and “long to straight” – these refer to how you measure and cut the angles on your wood strips to create precise shapes.
Let’s clarify these terms:
- Long to Long: This means you measure from the longest point on one end of the board to the longest point on the other end. This is common for parallel angled cuts.
- Long to Short: You measure from the longest point at one end to the shortest point at the opposite end. This creates a trapezoidal shape, essential for many of our geometric pieces.
- Long to Straight: This indicates that one end of the board will have an angled cut (the longest point of the angle), while the other end will be cut straight (90 degrees).
Detailed Cut List:
For the Triangle Shape Segments:
- 2 – 1x4s @ 17″ long to short
- 2 – 1x2s @ 16 3/4″ long to short
- 2 – 1x3s @ 16 1/2″ long to short (After making the first cut, you will make a 45-degree angle cut in the opposite direction, approximately 1.5″ down the board. This creates the corner pieces for a square or angled element.)
- 2 – 1x2s @ 13 1/2″ long to long
- 2 – 1x4s @ 10 1/2″ long to long
- 2 – 1x2s @ 3″ long to long
For the Horizontal Shape Segments:
- 2 – 1x2s @ 5 1/2″ long to straight
- 2 – 1x3s @ 8″ long to straight
- 2 – 1x2s @ 9 1/4″ long to straight
- 2 – 1x2s @ 10 3/4″ long to straight
- 2 – 1x4s @ 14 3/4″ long to straight
- 2 – 1x2s @ 15 3/4″ long to straight
When making these miter cuts, the process is quite straightforward. Simply set your miter saw to a 45-degree angle for the angled cuts. For straight cuts, you’ll swing the saw blade back to 0 degrees. On most miter saws, you’ll loosen a handle or knob, slide the arm to your desired degree, and then tighten it securely in place before making the cut. Always double-check your angle settings before cutting to ensure accuracy and prevent wasted wood.
Staining for Depth and Character: Choosing Your Palette
Once all your wood pieces are cut, it’s time to bring them to life with stain! This is where you can truly personalize your artwork. I selected four of my favorite wood stains to create a varied, rich, and visually interesting pattern. There was no specific rule or order to my stain choices; I simply followed what felt right aesthetically. The goal is to create contrast and depth, making each piece stand out while contributing to the overall harmonious design.
The stains I used were Kona, Early American, Light Walnut, and Summer Oak. These particular shades offer a beautiful range from deep, dark tones to lighter, warmer hues, perfect for a rustic or farmhouse style. To avoid confusion and simplify reassembly, I stained one board at a time, then immediately returned it to its intended spot on the plywood base to dry. This “stain-and-place” method ensures that you won’t have to solve a jigsaw puzzle once all your pieces are stained and dry. Apply stain evenly with a brush or rag, wiping off any excess to prevent blotchiness and achieve a smooth finish. Allow ample drying time as recommended by the stain manufacturer.
Adding Character: The Art of Distressing
After the stain had fully dried, the next step was to add that desirable aged and worn look through distressing. This technique instantly gives newly cut wood a vintage feel, making it appear as if it has a rich history. I used my Corner Cat sander to distress each piece individually. This tool is excellent for reaching corners and edges, allowing for precise distressing.
Similar to the staining process, I distressed one piece at a time and placed it back into its drying spot. This method maintains order and simplifies the final assembly. If you don’t have a Corner Cat, don’t worry! You can achieve a distressed look with regular sandpaper (varying grits for different effects), a hammer, chains, or even a wire brush. The key is to lightly scuff edges, create shallow dents, or wear down surfaces where natural wear and tear would occur. This added touch truly transforms the wood, making it look authentically old and beautifully worn, enhancing its rustic charm.
Assembling Your Masterpiece: Glue and Nails
With all your wood pieces cut, stained, and distressed, it’s time for the exciting part: assembly! This is where your geometric puzzle truly comes together on the plywood base. To ensure maximum durability and a strong bond, I used a two-part approach: wood glue followed by brad nails.
First, apply a thin, even layer of Gorilla Wood Glue to the back of each stained wood strip. Position the piece carefully onto the 2’x2′ plywood base, ensuring it aligns perfectly with your intended design. Wood glue provides a strong, lasting bond once cured. However, for immediate hold and added security, I followed up with my brad nailer, using 5/8″ brad nails. The brad nails help hold the pieces in place while the glue dries, preventing any shifting and ensuring a tight bond. Work systematically, attaching each piece to the plywood base according to your pattern.
Once all your geometric pieces are glued and nailed down, the most important step is patience! Allow the wood glue to fully dry and cure according to the manufacturer’s instructions. This usually takes several hours, or even overnight. A strong bond is essential for the longevity of your wall art. Once the glue is completely dry, you can move on to the final elegant touch: adding the trim.
The Finishing Touch: Adding the Frame
A well-crafted frame elevates your DIY wall art from a simple project to a polished, professional-looking piece. The frame not only adds visual weight and definition but also conceals the edges of the plywood base, creating a clean, finished appearance. For the frame, I used 1×2 wood strips, cutting four pieces to size.
Each frame piece was cut to 25 3/4″ from long point to long point. To achieve the perfect mitered corners that seamlessly join, turn your board so the widest part rests against the fence of your miter saw. Then, make a 45-degree angle cut on each end of the board. This creates the classic corner joint. Crucial Advice: While I provided my measurements, it is always best to measure your own assembled piece to determine the exact length of trim you’ll need. Slight variations in your base plywood or internal wood pieces can affect the final frame dimensions.
I stained the frame pieces with Kona stain to provide a deep, rich contrast against the varied geometric pattern. Attaching the frame requires a different approach to adhesive. Since the trim pieces were already stained all over, traditional wood glue wouldn’t create a strong bond on treated wood surfaces. The perfect solution was Gorilla Glue Super Glue Gel. This powerful adhesive works exceptionally well on stained and finished surfaces, providing a quick and robust bond.
Apply the Super Glue Gel to the back of each stained trim piece, then carefully align and press it onto the edges of your wall art. For added security, I again followed up with my brad nailer, this time using 1 1/4″ brad nails, which are long enough to penetrate both the trim and the plywood base. This combination of strong adhesive and brad nails ensures your frame is securely attached and will stand the test of time.
Distressing the Frame: Completing the Rustic Aesthetic
To ensure a cohesive and authentically rustic look, the frame also needs a touch of distressing. Just as with the internal geometric pieces, I ran my trusty Corner Cat sander all over the frame. This step scuffs the edges and surfaces, creating that beautiful worn-in appearance that complements the overall distressed aesthetic of the wall art.
The consistent distressing throughout the entire piece ties everything together, making it look like a cherished heirloom rather than a brand-new creation. It’s these small details that truly elevate your DIY projects and give them a unique character.
Conclusion: Your Unique Piece of Rustic Charm
And there you have it! Your very own Pottery Barn-inspired geometric wood wall art, crafted with love, ingenuity, and a minimal budget. I’m absolutely in love with how this piece turned out – it’s a testament to what you can achieve with a little inspiration and some basic woodworking skills. The blend of different wood stains, combined with the distressed finish, creates a captivating texture and visual interest that will be a focal point in any room.
This project is more than just creating wall decor; it’s about the satisfaction of making something beautiful with your own hands, learning new skills, and personalizing your living space. Imagine the pride you’ll feel when guests admire your “new” wall art, only for you to reveal it was a handmade creation!
If you’re as smitten with this DIY Pallet Art as I am, I would absolutely love for you to share it! Pin it to your favorite DIY boards, share it with friends, or even better, embark on this project yourself and share your results. Customization possibilities are endless – experiment with different stain colors, paint some pieces for a pop of color, or even try a different geometric pattern. Let your creativity shine!
Thank you so much for stopping by and joining me on this creative journey. Happy crafting!
~Ashley