
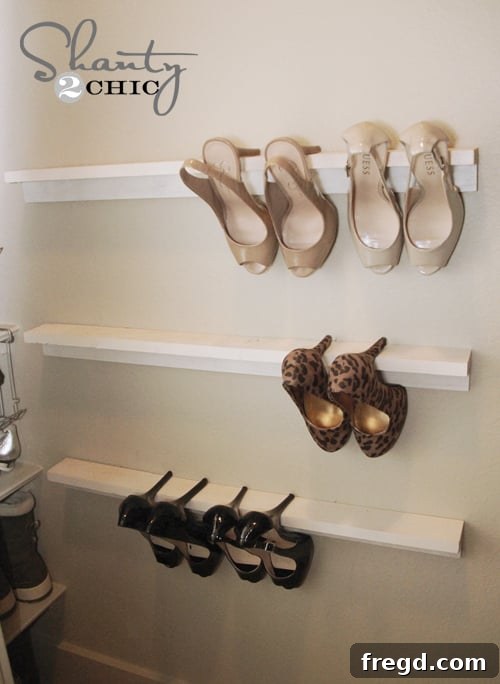
Revolutionize Your Closet: Build Custom DIY High Heel Shelves on a Budget!
Happy Monday morning, fellow DIY enthusiasts and organization lovers! I hope you all had a fantastic weekend. We’re bubbling with excitement to share some big news with you over the coming weeks, but in the meantime, let’s talk about something essential: getting organized!
My personal mantra since the holidays has been “organize everything!” This commitment was truly tested recently when I went to unpack my suitcase and found myself increasingly annoyed by the chaotic state of my shoe collection. Specifically, my beloved high heels were suffering from a serious lack of proper storage. They were either piled haphazardly on the closet floor, crammed into inadequate boxes, or precariously balanced on existing shelves. I knew I needed a better system – an itch I just had to scratch! So, I rolled up my sleeves and built some custom shelves specifically designed to store my heels efficiently and elegantly.
Why DIY Your Shoe Storage? The Benefits of Custom Closet Organization
You might be thinking, “Can it really be that fun and simple?” Absolutely! These shelves are not only incredibly easy to construct but also incredibly cost-effective. Believe it or not, all three shelves I built for my closet cost me a grand total of just $4 in materials. That’s a budget-friendly project that perfectly fits my “shanty” style!
Custom DIY shoe shelves offer numerous advantages over store-bought solutions. Commercial shoe racks often fall short in terms of fitting unique closet spaces, accommodating different shoe types, or matching your aesthetic preferences. By building your own, you gain complete control over dimensions, materials, and finish, ensuring a perfect fit and personalized style. This project is ideal for anyone looking to:
- Maximize vertical space in their closet.
- Protect high heels from damage and maintain their shape.
- Create an aesthetically pleasing and tidy shoe display.
- Undertake a satisfying and straightforward beginner-friendly woodworking project.
- Save money compared to expensive custom closet systems.
Materials You’ll Need for Your Budget-Friendly High Heel Shelves
One of the keys to the affordability of this project is the choice of material: furring strips. These are typically inexpensive, rough-sawn lumber pieces often used in construction for leveling surfaces or creating air gaps. They are perfect for this project because they are light, easy to work with, and very budget-friendly. For my shelves, I used a combination of 1×2 and 1×3 furring strips.
If this is your first time purchasing lumber, don’t hesitate to ask for help! The staff in the wood section at your local hardware store (like Lowe’s or Home Depot) will be happy to guide you to the furring strips. When selecting your wood, take a moment to inspect each piece. Look for strips that are as straight as possible, with minimal warping or knots. It might take a little digging, but finding good, straight pieces will make your project much easier and ensure a professional finish.
Here’s a comprehensive list of what you’ll need:
- Wood:
- 1×2 furring strips (actual dimensions approximately 0.75″ x 1.5″)
- 1×3 furring strips (actual dimensions approximately 0.75″ x 2.5″)
- Adhesive: Gorilla Wood Glue (or similar strong wood adhesive)
- Fasteners: Finish nails (for a cleaner look) OR wood screws (for extra strength)
- Finishing Material: Your favorite paint (I used Rust-Oleum Heirloom White)
- Tools:
- Measuring tape and pencil
- Saw (miter saw for precision, or a hand saw for simplicity)
- Stud finder
- Drill (if using wood screws, or for pre-drilling pilot holes)
- Hammer (if using finish nails)
- Level
- Sandpaper (optional, for smoothing edges)
- Paintbrush or roller
- Wood filler (optional, for concealing screw heads)
- Safety glasses and gloves
Step-by-Step Guide: Building Your Custom High Heel Shelves
Step 1: Planning and Measuring Your Closet Space
The beauty of DIY is customization! Before you make any cuts, it’s crucial to accurately measure your available wall space. Every closet is different, so start by determining the total width you want your shelves to span. Next, consider how many shelves you’d like and the ideal height between each to accommodate your high heels. Think about your tallest pair of pumps and ensure adequate clearance. For a standard heel, 6-8 inches of vertical space between shelves is usually sufficient. I started with three shelves and plan to add more later as my shoe collection grows!
Once you have your desired width, mark this measurement on all your chosen furring strips. All boards for a single shelf should be cut to the same length. If you don’t own a saw or feel intimidated by cutting wood, don’t worry! Most major hardware stores like Home Depot or Lowe’s offer complimentary cutting services for lumber purchased in-store. Just ask the friendly associates, and they can cut all your boards to your specified length, saving you time and effort.
Step 2: Assembling Your Shelf Units
Now, let’s bring those individual pieces together to form your sturdy shoe shelves. Take your 1×3 furring strips and lay them flat on a clean, level surface. These will form the back support and the slight upward angle that cradles your heels. Apply a continuous, even bead of Gorilla Wood Glue along the narrow edge of one of your 1x3s. The glue acts as a powerful bonding agent, significantly strengthening the shelf.
Next, carefully align a 1×2 furring strip directly on top of the glued edge of the 1×3, ensuring that the edges are flush. This 1×2 piece will create the lip that holds your heels in place. I used finish nails to secure mine, which creates a very clean look with minimal visible hardware. If you opt for nails, space them every 6-8 inches for optimal hold. Alternatively, you can use wood screws for even greater strength and durability. If using screws, pre-drilling pilot holes will prevent the wood from splitting, especially with thinner furring strips. Allow the glue to dry completely according to the manufacturer’s instructions before moving on to the next step – this is crucial for the shelf’s integrity.
Step 3: Adding the Finishing Touches – Paint and Protection
Once your shelves are assembled and the glue has fully cured, it’s time to add the finishing touches. I chose to keep my shelves neutral, giving them a quick coat of my favorite Rust-Oleum Heirloom White paint. This classic, elegant shade brightens up the closet and provides a clean backdrop for my shoes. Before painting, you might want to lightly sand any rough edges or surfaces for a smoother finish. A coat of primer is also a good idea, especially on raw wood, to ensure better paint adhesion and a more uniform color.
Apply your chosen paint in thin, even coats, allowing each coat to dry completely before applying the next. This prevents drips and streaks, resulting in a professional-looking finish. If your closet experiences a lot of humidity or heavy use, consider adding a clear sealant or polyurethane topcoat for extra protection and durability, which will help your shelves stand the test of time.
Step 4: Installing Your High Heel Shelves Securely
The final step is to securely mount your newly built shelves to the wall. This is where your stud finder comes in handy! It’s a simple tool to use – just run it along the wall until it indicates the presence of a stud (the vertical wooden beams within your wall). Attaching your shelves directly to these studs is crucial for stability and safety, ensuring they can bear the weight of your shoes without pulling away from the wall.
Once you’ve located and marked the studs, hold your first shelf against the wall at your desired height. Use a level to ensure it’s perfectly straight before marking the drill points through the back (the 1×3 piece) of the shelf, directly into the center of the studs. Then, use wood screws to drill directly through your 1x2s into the studs of the wall. This method provides the strongest hold. The wood screw heads will be visible, but you can easily conceal them by applying a small dab of wood filler over each screw head once the shelf is mounted, letting it dry, and then touching it up with a bit of your chosen paint. Repeat this process for all your shelves, ensuring consistent spacing and level installation.
Admire Your Beautifully Organized High Heel Collection!
Here are my finished shelves, beautifully organized and ready to hold my favorite footwear! The difference is night and day – no more cluttered floors or damaged heels. Just a clean, accessible, and attractive display.
Well, I suppose the only downside is that now I have so much extra, beautiful display space… I guess all I need now is more pumps! Darn, right? 😉 It’s a wonderful problem to have when your closet organization project works out this well!
Unleash Your Inner DIYer: A Project for Everyone!
So ladies (and gentlemen!), this truly is such a fun, functional, and deeply satisfying DIY project. It’s the perfect beginner project for anyone looking to dip their toes into home improvement or decluttering. The steps are straightforward, the materials are cheap, and the result is a custom organization solution that elevates your closet.
And if you’re still feeling a little intimidated by saws and drills, remember that teamwork makes the dream work! Just give your significant other a little wink and a “please,” and you might find yourself with an extra pair of hands to help. The satisfaction of stepping back and admiring your perfectly organized shoe collection, knowing you built it yourself, is truly unparalleled.
Thank you so much for stopping by and exploring this fantastic closet organization hack. I would absolutely love for you to share this project with your friends, family, and fellow DIY enthusiasts! Pin these ideas to your inspiration boards below – your support means the world! You guys are truly great!
Have an awesome, organized, and productive week!
~Whitney