
Maximize Your Space: Easy & Affordable DIY Storage Shelves for Sheds & Garages
Are you tired of cluttered garages or sheds? Do you dream of a perfectly organized space where every tool has its place and every item is easily accessible? If so, you’re in the right spot! Here in Texas, with the scorching summer heat finally behind us, I was itching to dive into a project that would maximize every square inch of my fantastic new WoodTex Shed. The solution? Incredibly simple, super sturdy, and surprisingly affordable DIY shelves built right into the exposed studs of the wall!
This project isn’t just for sheds; it’s a game-changer for any garage or workshop with exposed studs. These DIY storage shelves offer an unparalleled way to reclaim wasted vertical space, transforming chaotic areas into highly functional storage zones. Best of all, they’re designed for maximum impact with minimal cost and effort. You’ll be amazed at how quickly you can create robust shelving that rivals expensive store-bought units, all while staying well within your budget. Let’s get started on decluttering and organizing your space today!
These robust shelves are incredibly simple to construct, and the entire section you see here cost me less than $10 to build. Yes, you read that right – under ten dollars for a significant storage upgrade! Many of you likely have exposed studs in your garage, just as I do in my new shed. These versatile shelves are perfect for a garage storage solution too, offering a fantastic way to utilize otherwise unused space between wall studs. They provide a sturdy foundation for everything from tools and paint cans to gardening supplies and seasonal decor.
Tools and Materials You’ll Need for Your DIY Shelves
Before we dive into the construction, let’s gather all the essential tools and materials. Having everything ready beforehand will make the building process smooth and efficient. You’ll be surprised how few items are required to create such a powerful storage system.
Essential Materials:
- 1 – 2x8x8 Wood Board: This will form the main body of your shelves. We chose a 2×8 for its excellent depth, providing ample storage surface without protruding too far into your space.
- 1 – 1x2x8 Wood Board: This thinner board will serve as the front lip of your shelves, adding stability and preventing items from sliding off.
- 2.5″ Pocket Hole Screws: These specialized screws are crucial for creating strong, hidden joints with your Kreg Jig.
- Gorilla Wood Glue: Adding wood glue to your joints provides extra strength and durability, ensuring your shelves stand the test of time.
Recommended Tools:
- Measuring Tape: Accuracy is key for a precise fit between your studs.
- Pencil: For marking your measurements.
- Miter Saw or Circular Saw: To cut your wood boards to the correct length. Ensure your blade is sharp for clean cuts.
- Kreg Jig: An absolute game-changer for DIY projects, allowing you to create strong, concealed pocket hole joints. If you’re new to this fantastic tool, don’t worry!
- Check out our quick video HERE for a basic rundown of this awesomely amazing tool and how to use it effectively.
- Ryobi 18-Volt Drill: Essential for drilling pilot holes and driving screws with ease. Its cordless nature provides great flexibility.
- Ryobi AirStrike Brad Nailer: This cordless nail gun will make attaching the front trim quick and effortless.
Step-by-Step Guide to Building Your DIY Stud Shelves
Now that we have all our materials and tools ready, let’s get into the construction process. Follow these detailed steps to build sturdy, functional shelves that will bring order to your shed or garage.
1. Measure the Space Between Your Studs
The very first step is crucial: accurately measure the space between your exposed studs. Stud spacing can vary slightly, so don’t assume a standard measurement. For my shed, the distance was consistently right around 14 inches. Use your measuring tape to get a precise measurement for each section where you plan to install a shelf. This ensures a snug and secure fit.
2. Cut Your 2×8 Boards
Once you have your exact measurement, it’s time to cut your 2×8 board. You will need to cut this 2×8 board into several pieces, each at the length you just measured (e.g., 14 inches). For a standard 8-foot (96-inch) board, you can get approximately 6-7 shelf pieces, depending on your stud spacing. Ensure your cuts are straight and clean for the best results. These shorter pieces will form the individual shelves that fit between your studs.
3. Drill Pocket Holes Using a Kreg Jig
This is where the magic of the Kreg Jig comes in! It allows us to create incredibly strong and discreet joints.
- Set Your Drill Bit: Set the collar on your Kreg Jig drill bit to a depth of 1.5 inches. This ensures the pocket holes are drilled to the correct depth for optimal screw engagement with the studs.
- Adjust Your Jig: Similarly, set your Kreg Jig itself to 1.5 inches. This adjustment corresponds to the thickness of your 2×4 studs, ensuring the screws will penetrate properly.
- Drill the Holes: Drill two 1.5-inch pocket holes on each end of your 14-inch (or whatever your measurement is) boards.
Setting the drill bit depth to 1.5 inches.
Adjusting the Kreg Jig to a 1.5-inch setting for optimal results.
Take a close look at your boards after drilling. Notice how I kept all the pocket holes on one side of the board. This is important because we are attaching these shelves to 2×4 studs. By placing the holes on one side, you ensure that your screws will drive directly into the center of the stud, rather than risking them breaking out the side. You also want to make sure your pocket holes are not drilled any further than the 2×4 stud depth.
4. Attach the Shelves to Your Studs
Now it’s time to install your shelves!
- Apply Wood Glue: Run a generous line of Gorilla Wood Glue along the edges of your shelf boards that will meet the studs. This creates an incredibly strong bond, adding significant stability to your shelves.
- Position and Secure: Using your Ryobi drill, attach the boards into your exposed studs using the 2.5-inch pocket hole screws. Drive the screws firmly until the shelf is snug against the studs.
- Hide the Holes: I made sure to orient my shelves so the pocket holes faced downwards. This keeps them out of sight, giving your finished shelves a cleaner, more professional look.
I spaced my shelves approximately 16 inches apart, which works well for general storage. However, this is where you can truly customize your storage solution! You can line yours up at any length that best fits your specific storage needs. If you plan to store taller items like paint cans or smaller items like jars, adjust the spacing accordingly. I’m already envisioning making many more of these throughout my shed, and I’ll definitely be varying the lengths to accommodate different types of gear.
5. Create a Second Set of Shelves (with space for tall tools)
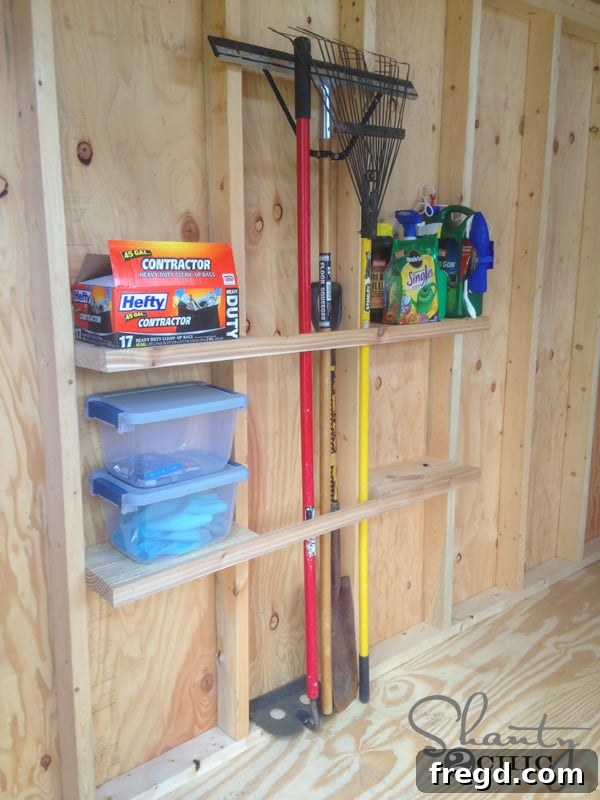
For maximum utility, we’re going to create a second, parallel set of shelves. However, there’s a clever trick here: you will skip one space between your studs between the two sets of shelves. This intentional gap is perfect for storing taller items like brooms, shovels, rakes, or other long-handled tools that would otherwise take up valuable floor space or lean awkwardly against a wall. Make your second set of shelves the same length and distance apart as your first two for a cohesive look and consistent storage. Once you have all the individual shelves attached, your wall will start to look like this:
6. Add the Front Trim for Stability and Safety
We’re almost done! The final step involves adding a front trim piece to each shelf. This 1×2 board serves two critical purposes: it prevents items from accidentally falling off the shelves, and it adds an extra layer of structural stability, making your shelves even more robust.
- Measure the Span: Measure the distance from the very end of one installed shelf, across the skipped stud space, to the end of the corresponding shelf on the other side. For my setup, this measurement was approximately 46 inches.
- Cut the 1×2 Boards: Cut two pieces of your 1×2 board to this measured length.
- Apply Wood Glue: Run a line of Gorilla Wood Glue along the edge of each 1×2 piece that will make contact with the shelves.
- Attach with Nail Gun: Finally, I used my amazing Ryobi AirStrike nail gun to attach the 1×2 trim to the front of my shelves. Place the 1×2 flush with the top of the 2×8 shelves and nail it securely into place. This quick step significantly enhances the functionality and safety of your DIY storage system.
I absolutely love this Ryobi AirStrike nail gun! It delivers all the power and precision of a traditional air nail gun, but with one critical difference: it runs on the same convenient lithium-ion battery as my drill. This means no more lugging around a bulky air compressor or being tethered to an outlet by a cumbersome cord. For this project, which involved working between my garage and my new shed, that cordless freedom saved me a tremendous amount of time and effort. This tool is a fantastic addition to any DIY enthusiast’s arsenal – you’ll thank me later! You might even find yourself wanting to put a brad nail into everything in sight!
Final Thoughts on Your New Organized Space
And just like that, you’re done! That’s it – we’ve completed the project. My absolute favorite part, after all the building, was loading up these brand-new shelves with all the tools, supplies, and miscellaneous items that had been cluttering up my garage and shed floor. The satisfaction of seeing everything neatly organized and easily accessible is truly unparalleled. Here’s a look at the finished shelves, completely loaded up and ready for action!
These DIY stud shelves are not only incredibly cost-effective but also remarkably easy to build, making them an ideal project for beginners and experienced DIYers alike. The ability to customize the shelf spacing allows you to create a storage solution perfectly tailored to your unique needs, whether it’s for gardening tools, automotive supplies, seasonal decorations, or workshop equipment. This simple project fundamentally transforms unused wall space into highly efficient, practical storage.
And for those of you who might have missed my exciting AWESOME WoodTex Shed reveal, be sure to check that out HERE! It’s quickly become my new favorite place in my home. My kids even affectionately call it ‘mommy’s little house’ – and honestly, it feels like a little sanctuary of organization and productivity.
I truly hope you love this cheap, easy, and incredibly effective storage solution. It’s a project that delivers huge returns in terms of organization and peace of mind. I’d absolutely love for you to share this idea with your friends and family, and don’t forget to PIN it for future reference! Happy building, and I hope you all have an awesome, organized weekend!