
Craft Your Own Rustic Charm: An Easy DIY Wood Shim Wall Art Tutorial
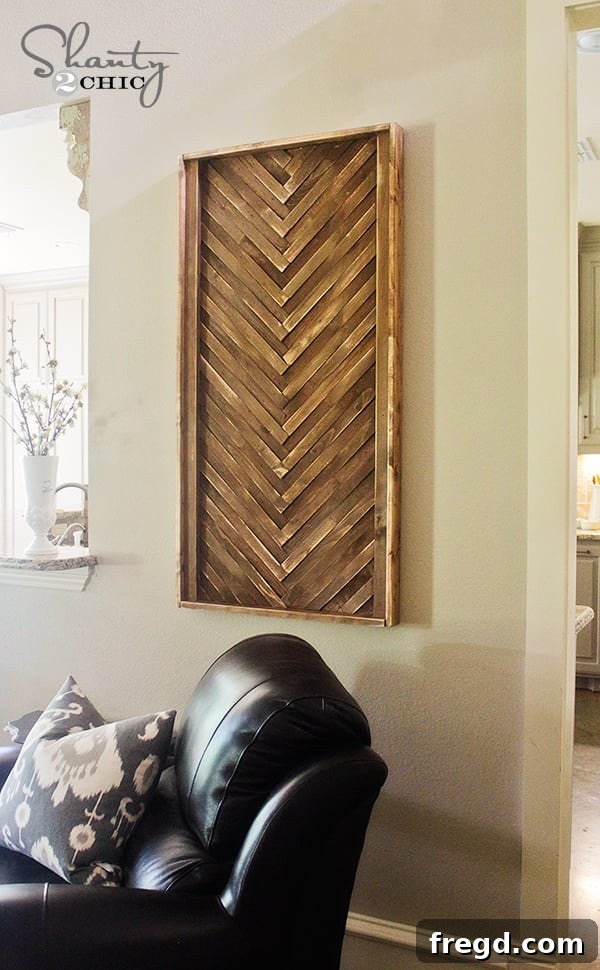
Hello, fellow home decor enthusiasts! After a wonderful Memorial Day weekend filled with family and fun, I’m thrilled to share a recent creative endeavor that has brought a touch of personalized warmth to my living room. If you’re looking for an affordable yet impactful way to elevate your home’s aesthetic, you’re in the right place. Today, we’re diving into the surprisingly simple, yet incredibly rewarding, project of creating stunning DIY wall art using ordinary wood shims!
Isn’t that just delightful? This unique piece adds incredible texture and a handmade feel that store-bought art simply can’t replicate. The best part? It’s genuinely straightforward to make, even for those new to DIY projects. Let’s get started on transforming simple wood shims into a captivating focal point for your home.
Why Choose Wood Shim Wall Art? The Allure of DIY Texture
Before we gather our tools, let’s talk about why this project is such a fantastic choice for any DIY enthusiast. Wood shim wall art offers a unique blend of rustic charm and modern geometric appeal. The inherent taper of wood shims creates dynamic variations in thickness, resulting in a three-dimensional, textured surface that plays beautifully with light and shadow. This depth adds an instant layer of sophistication and visual interest to any room, making a bold statement without overwhelming the space. Furthermore, the satisfaction of creating something beautiful with your own hands, tailor-made to your style and dimensions, is unparalleled. It’s an eco-friendly approach, utilizing readily available and often inexpensive materials, and offers endless possibilities for customization.
Gather Your Materials: What You’ll Need
To embark on this exciting project, you’ll need a few key materials. These are all easily sourced from your local hardware store, making the preparation process quick and hassle-free:
- Plywood Sheet (2′ x 4′ or desired size): This will serve as the sturdy foundation for your artwork. A 2’x4′ sheet is a great starting point, offering a substantial piece that can fill a wall beautifully. However, feel free to adjust the dimensions to suit your specific space.
- Wood Shims (Longer size): This is the star of our project! Shims are typically found in the lumber or trim aisle. It’s crucial to select the *longer* shims for this project to ensure good coverage and easier handling. You’ll want to purchase a couple of packs, ensuring you have enough to cover your entire plywood base with some spares. While smaller shims exist, the longer ones provide a more consistent and impactful texture.
- Gorilla Wood Glue: A high-quality wood glue is essential for securely adhering the shims to the plywood and later, the framing strips.
- 1×3″ Furring Strips: These will be used to create the initial frame around the main shimmed panel, hiding the rough edges and giving your art a finished look.
- 1×2″ Furring Strips: These thinner strips will be added to the sides as a final decorative trim, further refining the edges and enhancing the overall aesthetic.
- Wood Stain (e.g., Rust-Oleum Ultimate Wood Stain in Early American): Choose a stain color that complements your home decor. “Early American” offers a classic, warm, and inviting tone that highlights the wood grain beautifully. Consider other shades or even paints for a different look.
- D-Rings and Wall Anchors/Screws: For securely hanging your finished artwork. Anchors are vital if you can’t attach directly to wall studs.
Essential Tools for a Smooth Project
Having the right tools can make all the difference in a DIY project, transforming a potentially frustrating task into an enjoyable and efficient one. For this wood shim art, I highly recommend these cordless Ryobi tools for their convenience and performance:
- Ryobi 18-Volt One+ 18-Gauge Cordless 2-inch Brad Nailer (AirStrike P320): This tool is an absolute game-changer. It drives up to 2-inch brad nails without the need for an air compressor, making it incredibly portable and easy to use anywhere. Its cordless design, powered by the same battery as other Ryobi 18V tools, offers unparalleled convenience and speed for attaching shims and trim.
- Ryobi 18-Volt One+ Cordless Orbital Jig Saw (P521): Perfect for precise cuts and trimming excess material. This cordless jig saw allows you to effortlessly follow the lines of your plywood base, ensuring clean and straight edges for your artwork. Its orbital action helps cut through wood quickly and smoothly.
- Ryobi 18-Volt One+ Corner Cat Finish Sander (P400): This compact and versatile sander is excellent for both smoothing surfaces and, in our case, creating a distressed, aged look. Its triangular pad allows it to get into corners and tight spaces with ease, making distressing edges a quick and simple task. Like the other tools, its battery compatibility is a huge plus.
- Pencil and Ruler/Straightedge: For marking your plywood and ensuring precise alignment of shims.
- Safety Glasses and Gloves: Always prioritize safety when working with power tools and wood.
Step-by-Step Guide: Crafting Your Wood Shim Masterpiece
Step 1: Preparing Your Plywood Base
We begin with the foundation of our artwork: the plywood sheet. I used a 2-foot by 4-foot piece, and I chose to keep it at its original size, without any trimming. This dimension creates a substantial piece of wall art that can anchor a space. Ensure your plywood is clean and free of debris. If there are any rough spots, a quick pass with sandpaper can create a smoother surface for adhesion.
Using a pencil and a long straightedge, draw a line down the exact center of your plywood board. This center line will serve as a crucial guide for laying out your wood shims, helping you maintain symmetry and alignment as you build the pattern. Accuracy here will contribute greatly to the overall professional look of your finished piece.
Step 2: Arranging and Attaching Wood Shims for Texture
Now for the creative fun! This is where the magic of texture comes alive. Take your longer wood shims and begin laying them down on your plywood base. The key to achieving that wonderfully textured, dynamic look is to rotate the direction of the shims. Since shims are thicker on one end and taper down, alternating their orientation every two shims creates a fascinating play of light and shadow, giving your artwork incredible depth.
Apply a generous amount of Gorilla Wood Glue to the back of each shim before carefully placing it on the plywood. For added security and to ensure a strong bond, follow up with your Ryobi AirStrike Nailer, using small brad nails to further secure each shim. This combination of glue and nails ensures your artwork will stand the test of time. Don’t worry about the shims extending past the edges of the plywood at this stage; we’ll trim those off later.
The Ryobi AirStrike Nailer is truly a fantastic tool for this type of project. Its cordless design frees you from cumbersome air hoses, allowing you to move around your workspace with ease. It’s robust enough to handle consistent nailing, making quick work of attaching all your shims. Plus, sharing batteries with other Ryobi tools is a huge convenience factor that keeps your projects moving without interruption.
Continue this process until your entire plywood sheet is covered with shims. Allow ample time for the wood glue to dry thoroughly before proceeding to the next step. Ensuring full coverage, even running shims off the shorter edges, guarantees that your final piece will have a seamless, integrated appearance.
Step 3: Trimming the Edges for a Clean Finish
With all your shims securely in place, you’ll likely have some overhang along the edges. This is intentional! Now it’s time to clean up those edges using your Ryobi Battery Jig Saw. This part is incredibly straightforward because you simply follow the existing line of your plywood base. The jig saw allows for precise cuts, creating perfectly straight and clean edges for your artwork.
Always wear safety glasses when operating power tools. The cordless nature of the Ryobi Jig Saw provides excellent maneuverability, allowing you to easily guide the blade along the plywood’s edge for a professional finish. Once trimmed, your artwork will have sharp, defined boundaries, ready for framing.
Step 4: Framing Your Artwork with Furring Strips
To give your wood shim art a refined, finished appearance and to conceal any remaining rough edges, we’ll add a frame using furring strips. Start by attaching the 1×3″ furring strips to the shorter sides of your artwork, securing them with wood glue and brad nails. Once those are in place, measure and cut the longer 1×3″ strips to fit perfectly between the already attached short pieces, then attach them as well.
This framing step not only adds structural integrity but also defines the boundaries of your art, creating a clean visual break from the textured shims. Ensure all connections are tight and secure.
Step 5: Staining for a Rich, Timeless Look
Before adding the final trim, it’s an excellent idea to apply your wood stain. I chose Rust-Oleum Ultimate Wood Stain in Early American, a beautiful shade that imparts a warm, classic, and inviting feel. Staining at this point, before the thinner 1×2″ furring strips are added, makes it much easier to get into all the nooks and crannies of the textured shims and main frame without obstruction.
Rust-Oleum Ultimate Wood Stain in Early American
Apply the stain evenly with a brush or cloth, following the wood grain. Allow it to penetrate for a few minutes, then wipe off any excess. For a deeper color, apply a second coat after the first has dried. This rich stain will enhance the natural beauty of the wood and highlight the textured pattern of the shims. Once the stain is dry to the touch, you can proceed to the next step.
Next, carefully add the 1×2″ furring strips to the sides of your artwork. These thinner strips serve to cover any remaining rough edges from the initial plywood and provide an additional layer of framing, contributing to a truly polished look. Stain these pieces separately and let them dry before attaching them, or stain them once attached, being careful with drips.
Step 6: Adding Character with Distressing
To achieve a charming, aged, and rustic look, distressing the edges of your artwork is a fantastic step. I used my Ryobi Corner Cat Finish Sander for this, and it made the process incredibly fast and effective. This sander is designed to get into tight spots, making it ideal for gently wearing away the stain and wood on the edges, revealing the lighter wood beneath and creating a beautiful, weathered effect.
Simply run the sander along the edges and corners where natural wear would occur. You control the amount of distressing, from subtle scuffs to more pronounced wear. This tool is another indispensable addition to any DIYer’s arsenal, especially given its compatibility with the Ryobi 18V battery system. It’s incredibly efficient for adding that perfect touch of character.
Step 7: Final Touches and Hanging Your Art
Your beautiful wood shim wall art is almost ready for its grand debut! The final step is to prepare it for hanging. Attach D-Rings to the back of the artwork, ensuring they are securely fastened. When hanging, it’s crucial to use appropriate wall anchors if you cannot locate and attach directly to a wall stud. For such a substantial piece, secure hanging is paramount to prevent damage and ensure safety.
Stand back and admire your handiwork! This piece is sure to be a conversation starter and a testament to your DIY skills.
Design Variations and Customization Tips
The beauty of DIY projects lies in their limitless potential for customization. While the “Early American” stain provides a classic, rustic appeal, consider these variations to truly make this project your own:
- Color Palette: Instead of staining, try painting your shims! You could use a single color for a monochromatic modern look, or use several complementary colors to create a vibrant, geometric pattern. Chalk paint or milk paint could also achieve unique distressed finishes.
- Shim Patterns: Experiment with different layout patterns. Instead of alternating every two shims, try a herringbone pattern, a chevron design, or even random placement for a more abstract feel. You could also cut shims to varying lengths before attaching them for even more unique texture.
- Frame Finish: Paint the furring strips a contrasting color to the main shim panel, or use a different type of wood for the frame to add another layer of visual interest.
- Size and Shape: Don’t limit yourself to a 2’x4′ rectangle. This technique can be applied to square canvases, smaller accent pieces, or even larger, multi-panel installations.
- Added Embellishments: Once complete, consider adding small metal accents, painted stencils, or even string art elements on top of the shims for an extra personal touch.
Maintenance and Care for Your Wooden Artwork
To ensure your wood shim wall art remains a beautiful centerpiece for years to come, a little maintenance goes a long way:
- Dusting: Periodically dust your artwork with a soft, dry cloth or a feather duster to prevent dust from accumulating in the textured grooves.
- Cleaning: For deeper cleaning, a slightly damp cloth can be used, but avoid excessive moisture, which can damage the wood and finish. Always dry immediately.
- Protect from Direct Sunlight: Prolonged exposure to direct sunlight can fade wood stain over time. Position your artwork in a spot where it’s not constantly exposed to harsh UV rays.
- Humidity Control: Wood can react to extreme changes in humidity, potentially leading to warping or cracking. Keep your artwork in a stable environment to preserve its integrity.
- Re-sealing: If your piece is in a high-traffic area or exposed to more elements, consider applying a clear topcoat or sealer every few years to protect the stain and wood.
Here are a few more glimpses of the finished project, showcasing its versatility and charm:
I truly hope you fall in love with this project as much as I have! It’s a fantastic way to add a custom, handmade touch to your home decor. If you’ve been inspired to create your own wood shim masterpiece, please consider sharing this tutorial with your friends and pinning it to your favorite DIY boards. Your support means the world!
Thank you so much for stopping by and taking the time to explore this creative endeavor. Should you have any questions at all about the steps, materials, or tools, please don’t hesitate to ask in the comments. Happy crafting!
~Whitney