
Hello, fellow DIY enthusiasts and home decor lovers! It’s truly wonderful to reconnect with you all. Do you remember the incredibly budget-friendly and straightforward Crate Shelves project that Whit and I previously introduced? It was an absolute hit, offering a simple solution for stylish storage without breaking the bank. Well, I’m thrilled to report back and share the exciting next chapter of this beloved project!
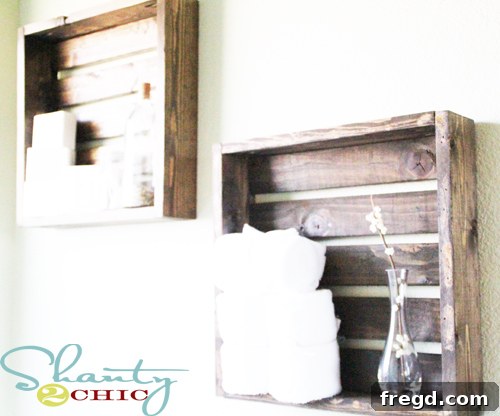
I’ve finally had the opportunity to take these versatile crates from their raw, unfinished state to a beautifully styled and functional addition to my home. They’re now proudly installed on my wall, fully dressed up and serving their purpose with remarkable charm. And honestly? I couldn’t be happier with the result! They’ve exceeded my expectations, blending seamlessly with my vision for a cozy yet chic space.
Transforming Raw Crates into Elegant Storage Solutions
The journey from humble wooden crates to sophisticated wall decor was incredibly satisfying. To achieve the desired aesthetic, I applied a single coat of Minwax Dark Walnut stain. This particular shade was chosen for its ability to impart a rich, deep hue that evokes a sense of timeless elegance and rustic warmth. The dark walnut finish instantly elevated the crates, transforming them from simple storage boxes into pieces with character and depth.
For those contemplating a similar project, selecting the right stain is crucial. Dark Walnut is an excellent choice for achieving a classic, slightly weathered look that complements a variety of decor styles, from farmhouse chic to industrial modern. The application itself was straightforward: ensuring the wood was clean and dry, then carefully applying the stain with a brush or cloth, allowing it to penetrate and bring out the natural grain of the wood. A single coat provided sufficient coverage, giving a beautiful, semi-transparent finish that allowed the wood’s inherent beauty to shine through.
These newly stained shelves found their perfect home in my master bathroom, a space that is currently undergoing a much-anticipated renovation. My goal for the bathroom is to create a serene, organized, and aesthetically pleasing sanctuary, and these crate shelves are playing a pivotal role in achieving that vision. They offer both practical storage and a touch of decorative flair, contributing significantly to the overall ambiance I’m striving for.
Mastering the Art of Bathroom Shelf Styling
Once the shelves were securely mounted, the real fun began: styling! This is where you can truly infuse your personality and creativity into a space. I embarked on a treasure hunt for suitable accessories and was delighted to discover some truly charming glass containers at Hob Lob (Hobby Lobby for those unfamiliar), which were an absolute steal at 50% off. Always keep an eye out for those sales; they can make a huge difference in your decor budget!
These clear glass vessels were perfect for organizing smaller bathroom essentials while also adding a decorative touch. I filled them strategically: some with elegant crushed shells, sourced affordably from Wal-Mart, to evoke a calming, spa-like, or coastal ambiance. Others were filled with practical items like Q-tips, neatly arranged to be both accessible and visually appealing. The combination of decorative and functional items ensures that the shelves are not just pretty but also serve a purpose in a busy bathroom environment.
When styling shelves, consider a mix of textures, heights, and purposes. Small potted succulents or air plants can add a touch of greenery, bringing life and freshness into the bathroom. Rolled hand towels in coordinating colors can contribute to a luxurious spa feel. Scented candles or diffusers can enhance the sensory experience, making the bathroom a true retreat. Don’t be afraid to experiment with small framed artwork or personal mementos to make the space uniquely yours. The beauty of these crate shelves lies in their versatility, allowing for endless possibilities in arrangement and decoration.
The Unbeatable Value of DIY: Rustic Charm and Budget-Friendly Decor
What I particularly adore about this project is the authentic “old crate” look it achieves, coupled with its incredible affordability. The satisfaction of knowing I could craft two functional and stylish shelves for an astonishingly low cost of just $5 is truly unmatched. In an era where bespoke furniture and decor can come with hefty price tags, discovering such cost-effective DIY solutions is a game-changer for anyone looking to personalize their home on a budget. This project is a testament to the power of upcycling and creative repurposing, proving that beautiful home decor doesn’t have to be expensive.
Beyond the master bathroom, these versatile crate shelves can find a place in almost any room. Imagine them in a child’s playroom for toy storage, in a home office for books and supplies, or in a living room to display small plants and decorative accents. Their rustic charm makes them adaptable to various interior design themes, from bohemian to industrial, farmhouse to eclectic. The process of making them is also a rewarding experience, offering a sense of accomplishment and a unique story behind each piece in your home. This DIY approach allows for complete customization, from the choice of stain or paint to the final arrangement of items, ensuring that the finished product perfectly aligns with your personal style and needs.
If you’re feeling inspired and are eager to create your own set of charming crate shelves, don’t miss out on the comprehensive video tutorial. It walks you through every step, making the process incredibly accessible even for novice DIYers. You can check it out right HERE! It’s a fantastic resource that breaks down the project into manageable steps, ensuring your success.
Continuing the Master Bathroom Renovation Journey
These stunning new crate shelves are just one component of a much larger project. My master bathroom renovation is an ongoing labor of love, and I’m steadily making progress towards creating the ultimate oasis. There are still many exciting changes and updates to come, from fixtures and finishes to additional storage solutions and decorative touches. Each step brings me closer to realizing the complete vision for this important space in my home.
The entire renovation journey has been filled with discovery, creativity, and the joy of transforming a space. I’m learning new techniques, finding innovative solutions, and most importantly, making my home truly reflect my style and comfort needs. It’s a testament to how small, affordable DIY projects, like these crate shelves, can seamlessly integrate into larger renovation plans, adding character and functionality along the way. I’m committed to sharing more of my progress and insights with you as the renovation unfolds.
***We absolutely love hearing from you and seeing your incredible DIY projects! If you have any questions about the crate shelves, or perhaps you’d like to share your own home decor triumphs, we warmly invite you to join the conversation. Visit us on our Facebook Fan Page or connect with us on Twitter! Your feedback and ideas fuel our creativity!***
Well, dear friends, I must bid you farewell for now as I dive back into the exciting, albeit dusty, world of my bathroom renovation. There’s still plenty to do, and I’m eager to see more of my vision come to life. Rest assured, I will be back soon to share more updates on my progress, including what’s next for the master bathroom and perhaps another budget-friendly DIY project.
Thank you so much for stopping by and sharing in my DIY adventures. Your support and enthusiasm mean the world!
Warmly,
~Ashley