
Transforming Our Playroom: A DIY Nursery Closet Build for Baby’s Arrival
Hello everyone!
Hope you’re all enjoying a fantastic Summer! With school finally out, we decided to take a little break from the usual hustle and embark on a special home project this month. I’m thrilled to share with you what I’ve been working on – a project that, while not involving my husband, definitely wouldn’t have been possible without my incredible stepdad, Bapa! This endeavor is all about creating a new space for our little one, and it’s been an exciting journey filled with learning and collaboration.
Our current playroom is about to undergo a beautiful transformation, evolving into the new baby’s room. It’s a wonderfully spacious area, full of potential, but it has one significant drawback: it lacks a proper closet. As any parent knows, ample storage is absolutely crucial for a nursery, from tiny clothes to endless diapers and toys. This missing element sparked an urgent itch over the past weekend to get a new closet started, and I’m so incredibly grateful that my stepdad was game to help! He actually built this home for us, so I knew his expert craftsmanship and handy work would be indispensable for constructing the perfect closet.
The Big Reveal: Clearing Out the Playroom
Before any construction could begin, the first and most challenging step was to completely empty the playroom. This involved relocating every toy, piece of furniture, and accessory that once filled this vibrant space. We meticulously moved everything out and into the loft, transforming it into a temporary storage zone. I won’t lie, this part of the project was undoubtedly the hardest! Deciding what to keep, what to donate, and what simply needed a new home required significant effort and organization, but it was a crucial prelude to creating a blank canvas for the nursery.
While I won’t be diving into a full, detailed how-to guide for every single step of this process, I am absolutely thrilled to share the significant progress we’ve made so far. My goal is to inspire you with the transformation and show you just how much can be achieved with a vision and the right help. Each phase of this project has been a learning experience, bringing us closer to creating that perfect little sanctuary for our new arrival.
Building the Bones: The Framing Process
Once the room was cleared, it was time for the real magic to begin. This is where my amazing stepdad, Bapa, truly shined. He swiftly started on the framing for the new closet. If you’ve ever watched a skilled builder at work, you know it’s a sight to behold. He had the entire frame completed and even half of the sheetrock done in less than a day! Talk about efficiency and expertise – whoop! The precision and speed with which he worked were incredible. Framing is the skeleton of any room, establishing the exact dimensions and structural integrity of the closet, so getting this step right is paramount for the entire project’s success. It was amazing to see the structure of the closet materialize so quickly, laying the groundwork for the functional space we envision.
A Little Helper Joins the Crew
Of course, Bapa didn’t work entirely alone. He had a little “help” if you want to call it that! 😉 Our little one was eager to be involved, supervising the work and occasionally offering a tiny hand. These moments are truly priceless, adding an extra layer of joy and memory-making to the entire renovation process. It’s wonderful to involve the family, even the smallest members, in creating a home that will welcome a new sibling. It turns a construction project into a heartwarming family affair.
Walls Taking Shape: The Sheetrock Installation
By Saturday night, we had made significant progress. The entire closet was framed up, and we had managed to get half of the sheetrock installed. Seeing the walls start to enclose the space truly brought the vision to life. The speed at which Bapa works is simply astounding, and it’s inspiring to witness such dedication and skill. Sheetrock, also known as drywall, forms the interior walls of the closet. Installing it involves precise measurements, careful cutting, and securely fastening the large panels to the wooden frame. This stage instantly transforms an open framework into a recognizable room, making the nursery feel much more tangible.
After the sheetrock was up, it was my turn to get hands-on with some of the finishing work. I took on the task of drilling in all the sheetrock screws, ensuring every panel was firmly attached. Then came the intricate process of taping and bedding the joints. This involves applying joint tape over the seams where the sheetrock panels meet, then covering it with multiple layers of joint compound (mud). The goal is to create a perfectly smooth, seamless surface, ready for paint or texture. This was a really fun new skill to learn, requiring patience and a steady hand. The satisfaction of smoothing out those seams and seeing the walls become flawless was immense. It’s a crucial step that prepares the walls for their final aesthetic finish, ensuring durability and a polished look.
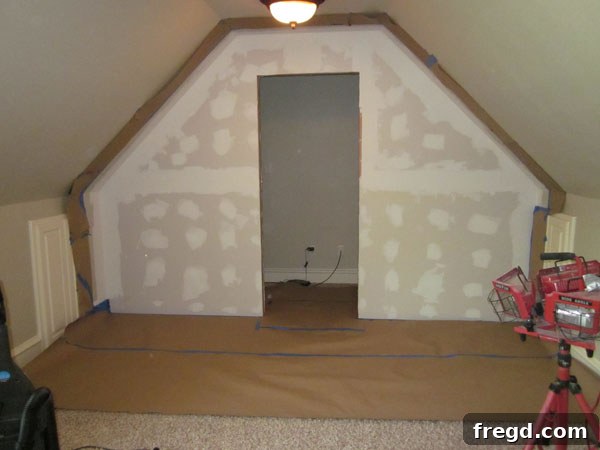
Here it is this morning, just before I began the final preparation stage: taping it off for texture. The walls are smooth, clean, and ready for the next layer that will define their character. This meticulous process ensures that the upcoming texture application will be neat and contained, preventing any overspray or unevenness in the surrounding areas. It’s a small but vital detail that contributes to a professional-looking finish. This attention to detail ensures that the nursery will have beautifully finished walls, setting the perfect backdrop for the baby’s future adventures.
The Final Touches: Preparing for Texture and Beyond
And here we are now, after a productive morning!
I’ve got the entire area cleaned up and meticulously taped off, all set for the texture application that should happen tomorrow! It’s incredibly satisfying to see everything prepped and ready for the next exciting phase. This project has been so much fun, and I’m loving the hands-on experience of transforming this space. While the construction is nearing its completion, my mind is already buzzing with nursery design ideas. I’m currently searching for inspiration, weighing different themes and aesthetics, so I can finally pick the perfect paint color to bring this baby’s room to life. The paint color will truly set the mood and atmosphere for this special space.
Beyond the DIY work, it’s also important to take breaks and recharge. We spent a wonderful day at Ashley’s house, enjoying some much-needed relaxation by the pool with the kids. They had an absolute blast, and I soaked up some glorious sun, which was a refreshing break. Speaking of Ashley, you’ll have to wait until you see what she built this morning – trust me, you are going to love it! It’s always inspiring to see what creative projects friends are tackling.
Stay Tuned for the Nursery Reveal!
I’ll definitely be back soon to show you even more progress on our nursery closet build and the subsequent decorating stages. So, make sure to stay tuned for updates! I absolutely cannot wait to get this little guy’s nursery started, bringing all the design elements together to create a warm, welcoming, and perfectly organized space. This transformation from playroom to a functional nursery is a labor of love, and every step brings us closer to welcoming our new family member. Thanks for following along on this exciting home renovation journey!