
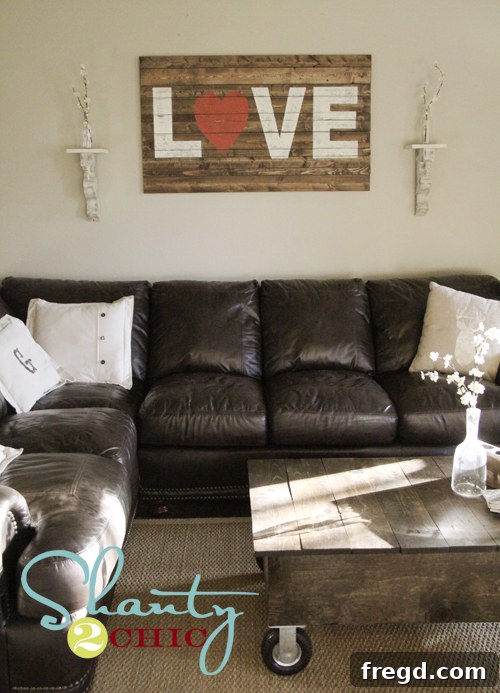
Craft Your Own Rustic Charm: An Easy DIY Wood Wall Art Project
Hello, fellow DIY enthusiasts and home decor lovers! We trust you all enjoyed a wonderful weekend, just as we did here with some beautiful weather and a dose of creative inspiration. There’s nothing quite like transforming a simple idea into a stunning piece of personalized home decor.
Many of you might recall the exquisite Reclaimed Wood Wall Art that Ashley crafted to adorn the space above her couch a while back. Her project truly captured my imagination and, honestly, every time I visit her home, I’m inspired to refresh the artwork above my own sofa. The raw beauty of wood combined with a heartfelt message creates such a captivating focal point.
Inspired by that rustic elegance and a desire to infuse my living space with a touch of warmth and personality, I embarked on my own DIY journey. The result? This charming and incredibly satisfying piece of custom wood wall art!
Why DIY Wood Wall Art? The Allure of Rustic, Personalized Decor
In a world dominated by mass-produced items, there’s an undeniable charm in creating something with your own hands. DIY projects, especially those involving natural materials like wood, bring a unique character and soul into your home. This particular project is not just about making a sign; it’s about crafting a statement piece that reflects your style and values, all while being incredibly budget-friendly. The rustic aesthetic, with its natural textures and distressed finishes, adds a cozy, inviting atmosphere that modern decor often misses. Plus, the satisfaction of looking at a beautiful piece of art and knowing you made it yourself is truly priceless.
This tutorial will guide you through each step, demonstrating just how accessible and rewarding crafting your own custom wall decor can be. You don’t need to be a seasoned carpenter or an expert artist; with a few basic tools and a dash of creativity, you can achieve stunning results. Let’s dive into the process!
Gathering Your Materials: The Foundation of Your Art Piece
The beauty of this project lies in its simplicity and affordability. We’re going to start with common wood pieces that are easy to find and gentle on your wallet. For this project, I headed to Lowe’s, but any major home improvement store like Home Depot will have what you need.
The secret to saving money here is purchasing longer pieces of wood and cutting them yourself. I opted for 8-foot long pieces and simply cut them in half, yielding two 4-foot sections from each board. This often significantly reduces the cost compared to buying pre-cut shorter lengths. If you don’t own a saw, don’t fret! Most Lowe’s or Home Depot stores offer complimentary wood cutting services, so you can have them slice your 8-foot boards down to 4-foot sections right there in the store. Alternatively, for this type of wood, a super cheap hand saw like this one will do the trick. Furring strips are quite soft and easy to cut with minimal effort, even for beginners.
Here’s the breakdown of the wood I used:
- 2 – 1×2″ furring strips (cut in half to 4 ft each)
- 2 – 1×3″ furring strips (cut in half to 4 ft each)
- 2 – 1×4″ furring strips (cut in half to 4 ft each)
My total expenditure for all the wood was incredibly modest – under $15! This makes it one of the most cost-effective ways to create a substantial piece of wall art. Furring strips are ideal for achieving that rustic, slightly imperfect look that complements the distressed aesthetic we’re aiming for. Their natural inconsistencies only add to the charm. Once your pieces are cut, you’re ready for assembly.
Constructing Your Wooden Canvas: Assembling the Boards
With your wood pieces ready, the next step is to assemble them into a cohesive panel that will form the base of your artwork. This part is straightforward and allows for some creative freedom in arranging your wood strips.
Once my furring strips were cut, I laid them out on a flat surface, experimenting with the arrangement of the different widths (1×2″, 1×3″, 1×4″) to create an aesthetically pleasing pattern. You can alternate them, group similar sizes, or create any sequence that appeals to you. The goal is to create a panel that is roughly rectangular, with the varying widths adding visual interest and depth.
To bind these individual pieces together, I used 1/4″ x 3′ birch project sticks. These can typically be found in the lumber aisle alongside other specialty boards. They are incredibly affordable, usually around $1.50 a piece, making them a perfect, cost-effective solution for this project. Their thin profile ensures they won’t add much bulk to the back of your art.
I marked the positions where I would lay these birch sticks across the back of my assembled furring strips. It’s important to place them strategically, usually two or three sticks, depending on the length of your art, ensuring they span across all the different width boards. This will provide robust structural integrity to your piece.
Once marked, I applied a generous bead of Gorilla Wood Glue along the lines where the project sticks would sit. Wood glue is essential for a strong, lasting bond, especially for vertical hanging. Make sure to spread it evenly for maximum adhesion.
Next, I secured the birch sticks to the furring strips using a nailer. This tool makes quick work of fastening, providing a sturdy connection. If you don’t have access to a nailer, wood screws are an excellent alternative. Just remember to pre-drill pilot holes through the birch sticks and into each furring strip. This crucial step prevents the wood from splitting, especially when working with thinner materials like furring strips and birch project sticks. Ensure your screws are long enough to penetrate both the birch stick and well into the furring strip for a secure hold.
Bringing It to Life: Staining and Stenciling Your Message
With the structural assembly complete, it’s time to infuse your wooden canvas with color and character. This is where the true artistic transformation begins.
The Staining Process
Once the glue was dry and the backing sticks were securely fastened, I flipped the entire piece over to expose the front surface. For staining, I reached for my absolute favorite: Rust-Oleum Dark Walnut wood stain. This particular shade offers a rich, deep hue that beautifully highlights the natural grain of the wood, providing that sought-after rustic warmth.
Applying the stain is simple: use a clean rag or a foam brush to wipe it on evenly, then immediately wipe off any excess. This allows the wood to absorb the pigment while preventing a sticky, uneven finish. Ensure you work in a well-ventilated area and allow ample time for the stain to dry completely according to the product instructions. The drying process is key to a durable and beautiful finish.
The Fun Part: Stenciling Your Personalized Message
Once your stained wood is perfectly dry, it’s time for the truly creative element: adding your chosen design or message. This is where your wall art becomes uniquely yours! I utilized my Silhouette machine along with contact paper to create custom stencils. The Silhouette machine offers incredible precision and allows for a vast array of fonts and shapes, making it a fantastic tool for detailed stencil work.
For this project, I chose the classic and bold Arial Black font for the letters “L,” “V,” and “E.” To represent the “O” in “LOVE,” I opted for a charming heart shape, which was readily available in a set of nine hearts within the Silhouette software library. Contact paper works wonderfully as a stencil material because it’s adhesive, flexible, and holds crisp edges, preventing paint bleed. You can find a detailed tutorial on cutting Contact paper with the Silhouette HERE.
If you don’t have a cutting machine like a Silhouette, don’t worry! You still have plenty of options. You can purchase pre-made stencils from any craft store, or you can easily print your desired letters or shapes from your computer, adhere them to contact paper, and carefully cut them out with a sharp craft knife (like an X-Acto knife). Just ensure your lines are clean for the best results.
Before applying the stencils permanently, I first arranged the cut-out letters and heart on the stained wood panel to visualize the final layout and ensure I was happy with the spacing and overall composition.
Once satisfied, I carefully applied the “outsides” of the letters to serve as my stencils. This means the negative space around the letter is what you’re adhering to the wood. I then used acrylic cream and coral paint to fill in the stenciled areas. Acrylic paints are perfect for this as they dry quickly and offer vibrant colors. Apply the paint by dabbing with a sponge brush or a stiff bristled brush, using light, even coats to prevent paint from seeping under the stencil edges. Remove the stencils while the paint is still slightly damp for the cleanest lines.
Adding Character: Distressing and Displaying Your Masterpiece
Your wood art is now painted, but to truly embrace the rustic aesthetic, the final touch is distressing. This step adds an authentic, aged, and weathered look, making your piece appear as if it has a rich history and has been lovingly cherished for years.
My final step before hanging it up was to “shanty it up a bit!” I used an 80-grit sanding block to lightly distress each letter. The 80-grit sandpaper is coarse enough to gently remove small amounts of paint and expose the wood underneath, creating a beautifully worn effect without being overly aggressive. Focus on the edges and raised areas of the letters for a natural, aged appearance. I absolutely adore the results – the distressing adds so much depth and character to the finished piece.
To hang this substantial piece securely, I enlisted my husband’s help – a second pair of hands is always welcome for tasks like this! We opted for a very sturdy hanging method: using 2 1/2″ drywall screws driven directly through the sign into the wall studs. Finding studs is crucial for safely hanging heavier wall art, ensuring it remains firmly in place. We used three screws strategically placed across the sign, which made it super sturdy and completely secure on the wall.
Are you ready to see it proudly displayed on the wall?
What do you think of the finished piece? It brings such a cozy and personal touch to the living room, perfectly tying together the rustic aesthetic with a heartfelt message.
Conclusion: Unleash Your Inner DIY Creator!
We truly hope you LOVE it – no pun intended! This DIY wood wall art project is a testament to how simple materials and a bit of effort can transform a space. It’s an incredibly rewarding project that yields a stunning, personalized piece of home decor without breaking the bank. Whether you choose to replicate this “LOVE” design or create your own unique message, the process is engaging and the results are always satisfying.
If this project has sparked your creativity, we would absolutely love for you to share the love! Pin it like crazy to your Pinterest boards, share it with friends, and let us know in the comments if you plan to create your own version. Your enthusiasm fuels our passion for DIY!
Thanks so much for joining us on this creative journey!
~Whitney