
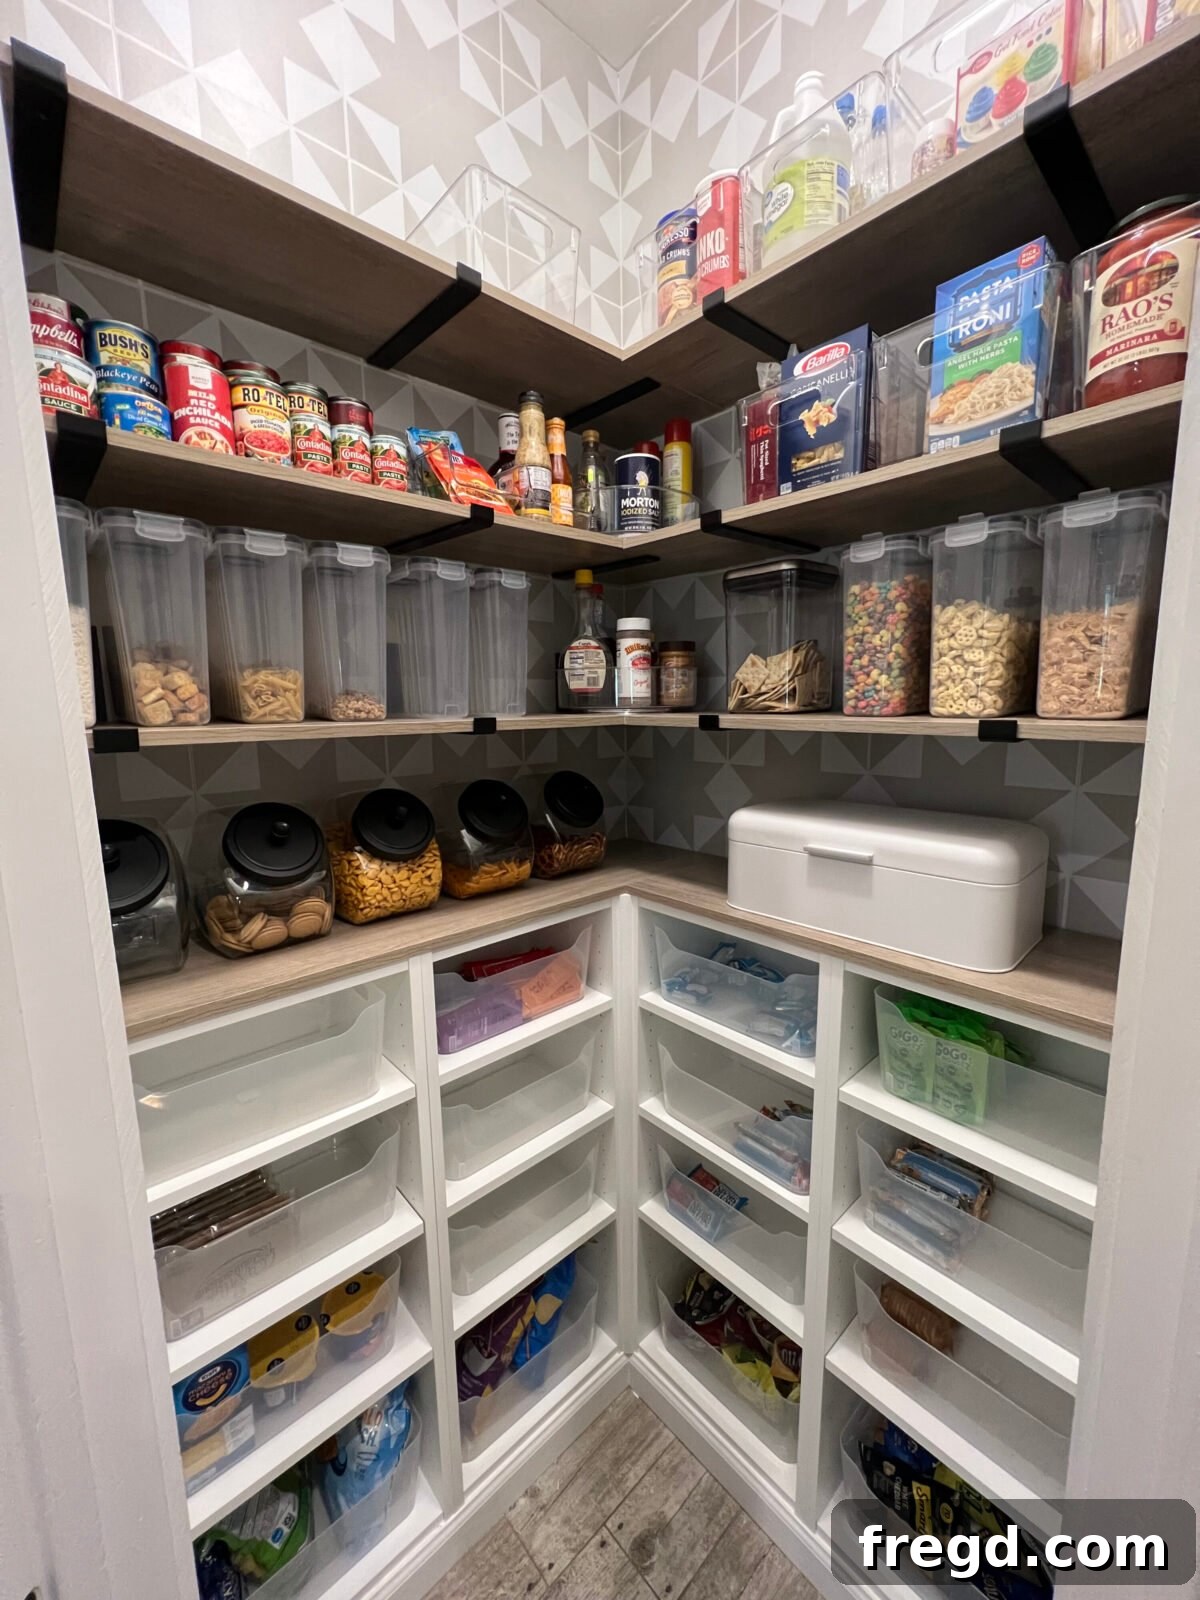
Transform Your Pantry: A Budget-Friendly DIY Corner Pantry Makeover Guide
Are you tired of rummaging through a cluttered, disorganized pantry, struggling to find ingredients or wondering what hidden treasures might be lurking in the back? You’re not alone! The pantry, often the heart of the kitchen, can quickly become a chaotic black hole of forgotten foods and misplaced gadgets. But what if you could transform that often-overlooked space into a functional, beautiful, and highly organized culinary command center, all without breaking the bank? Get ready to be inspired and discover how achievable your dream pantry truly is!
Having recently conquered the under-the-stairs closet remodel, I found myself with a newfound passion for home organization and an insatiable desire to tackle the next big project: our challenging corner pantry. Corner pantries, while offering a generous footprint, often present unique challenges when it comes to maximizing every inch efficiently and preventing items from disappearing into dark, forgotten corners. After weeks of careful planning, strategic building, and thoughtful styling, I’m thrilled to share the step-by-step journey of how I transformed my own corner pantry into a highly efficient and aesthetically pleasing space. The results exceeded all my expectations, proving that a dream pantry is absolutely achievable on a budget through clever DIY solutions!
Witness the full transformation in action and get a peek at the incredible before-and-after:
Watch the Pantry Makeover on Instagram Reel for a Visual Tour
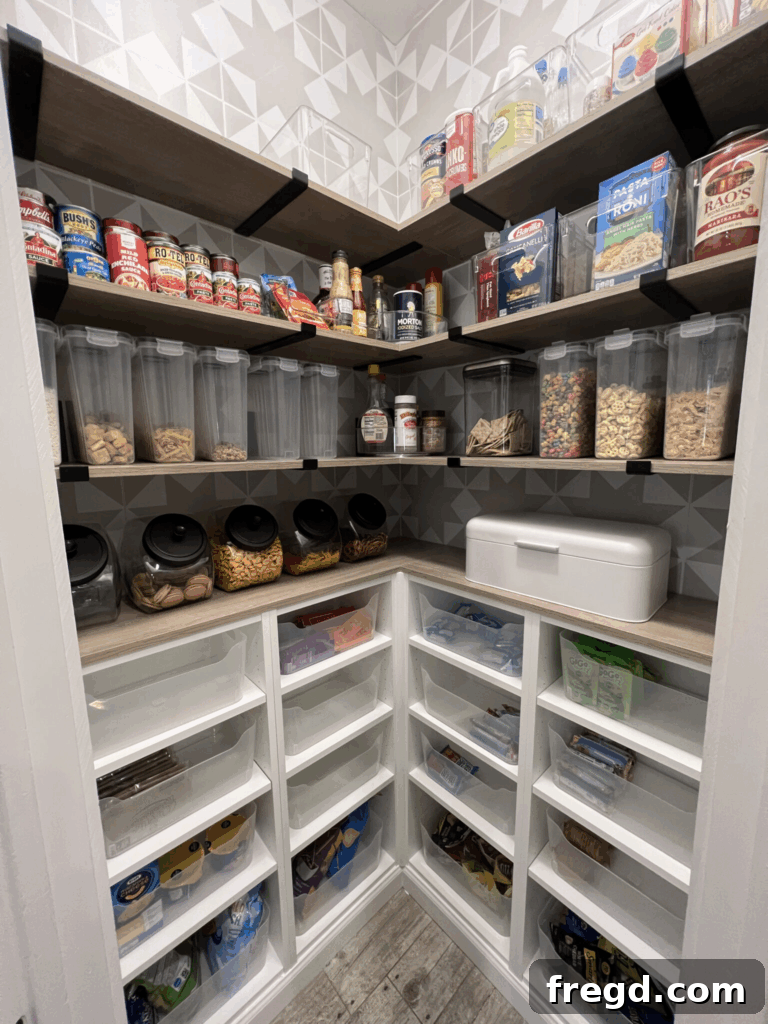
The Foundation of Organization: Crafting Smart Storage with IKEA Billy Bookcases
The secret to maximizing storage in any pantry, especially a challenging corner layout, lies in smart, adaptable, and cost-effective shelving. For the core structure of my pantry cubbies, I opted for a highly popular and incredibly versatile solution: the IKEA Billy Bookcase. Renowned for their affordability, straightforward assembly, and clean, minimalist aesthetic, these bookcases are a DIY enthusiast’s dream and serve as a perfect foundation for a budget-friendly pantry renovation that looks anything but cheap.
I utilized a total of four Billy Bookcases, strategically positioning them to create a seamless, almost built-in appearance within the corner pantry. One of the greatest advantages of the Billy system is its inherent modularity and customization potential. To truly optimize every vertical inch of storage space, I invested in one extra shelf per unit. These additional shelves, costing a mere $5 each, allowed me to precisely customize the spacing between shelves. This meant I could perfectly accommodate everything from tall cereal boxes and large pasta containers to shorter spice jars and canned goods, effectively eliminating wasted vertical space and vastly increasing the pantry’s storage capacity. A significant bonus for any DIY project is that these units come pre-finished in a crisp white. This feature saved immense time and effort, completely bypassing the messy and time-consuming need for painting or staining – a huge win for maintaining project momentum and cleanliness!
Finding the right size and style for your pantry is easy, as Billy Bookcases offer various dimensions. You can find the exact bookcases I used to achieve this organized look here: IKEA Billy Bookcase (White).
When considering IKEA Billy Bookcases or similar modular shelving systems for your pantry, think about these crucial points:
- Precise Measurement: Carefully measure your pantry space, taking into account wall depth, ceiling height, and any existing obstacles, to determine how many units will fit and which sizes are most efficient for your needs.
- Adaptability and Configuration: Billy offers various widths and heights, allowing you to mix and match for a truly custom fit that utilizes every nook and cranny. Consider combining taller units with shorter ones for varied storage needs.
- Durability and Stability: While designed for books, these units are robust enough for most pantry items. Ensure they are properly anchored to the wall for maximum stability, especially when fully loaded.
- Customization Potential: Beyond adding extra shelves, you can further personalize Billy units. Options include adding doors (glass or solid) for a more concealed look, integrating LED lighting, or even painting them to match a specific kitchen decor, though their classic white offers timeless appeal.
Affordable Elegance: Budget-Friendly Countertops and Seamless Open Shelving
No truly functional pantry makeover is complete without versatile work surfaces and easily accessible open shelving. For a truly budget-conscious approach that doesn’t compromise on aesthetic appeal or practicality, I discovered some incredibly affordable shelf boards that proved perfect for both the countertop and additional open shelves. At just $10 for a 4-foot board, these are an absolute steal and a brilliant testament to the fact that you don’t need expensive custom materials to achieve a high-end, organized look.
These versatile shelf boards come in a variety of finishes and lengths, making it incredibly easy to find a perfect match for any aesthetic, from modern minimalist to cozy farmhouse. The particular color I selected added just the right amount of warmth and natural texture to the otherwise bright white pantry, creating a welcoming and inviting atmosphere that makes spending time in the space more enjoyable. A well-placed countertop, even a small one, provides invaluable space for small appliances like a toaster oven or coffee maker, or simply serves as a temporary staging area while you’re unloading groceries, preparing meals, or organizing new items. The open shelves, on the other hand, are ideal for frequently accessed items or for artfully displaying aesthetically pleasing pantry staples in clear jars and containers, making your pantry both a functional workspace and a joy to behold.
You can discover these fantastic, super affordable shelf boards here to kickstart your own pantry transformation.
When selecting your countertop and open shelf materials, keep these important aspects in mind for optimal results:
- Material Durability: Ensure the chosen material can withstand daily use, potential spills, and the weight of your stored items. Look for finishes that are resilient and long-lasting.
- Ease of Installation and Customization: Opt for boards that are easy to cut to size and install yourself. This DIY-friendly approach will significantly save on labor costs and allow for precise customization to your specific pantry dimensions.
- Aesthetics and Cohesion: Choose a finish that not only complements your kitchen’s overall design but also enhances your preferred pantry style. The right color or texture can truly elevate the space.
- Maintenance Requirements: Prioritize materials that are easy to wipe clean. A hygienic and easy-to-maintain surface is crucial in any food storage area to prevent grime buildup and ensure food safety.
Adding Character and Protection: The Magic of Peel and Stick Backsplash
To truly elevate the visual appeal of the pantry and infuse it with distinct personality, I turned to the incredibly transformative power of a peel-and-stick vinyl backsplash. This simple yet impactful addition can make a monumental difference, instantly adding texture, a pop of color, and a polished, finished look to the space without the mess, expense, or permanence of traditional tiling. It was a remarkably quick and easy project that delivered immediate, high-impact results, completely revamping the feel and character of the pantry walls.
The installation process for peel-and-stick backsplashes is remarkably straightforward, making it an excellent choice for DIY beginners or anyone looking for a quick update. However, living in the humid climate of Texas, I’m all too familiar with the challenges that high moisture levels can pose to adhesive products. To ensure my beautiful new backsplash stood the test of time and humidity, I implemented a crucial pro tip: I secured each tile with a small dab of construction adhesive. This extra step, while minor, provides superior, long-lasting hold, giving me invaluable peace of mind that my efforts wouldn’t peel or sag with the seasonal heat and moisture. It’s a small investment of time and material that absolutely guarantees the longevity and pristine appearance of your backsplash for years to come.
Here’s the specific peel-and-stick tile I used to achieve this stunning and durable effect in my pantry.
And for that added security, particularly in humid environments, here’s the construction adhesive I recommend to ensure your backsplash stays put.
Comprehensive tips for successfully applying peel and stick backsplash:
- Impeccable Surface Preparation: Before you begin, ensure your walls are meticulously clean, completely dry, and as smooth as possible. Fill any existing holes or cracks to provide an optimal surface for adhesion.
- Precision is Paramount: Always adhere to the “measure twice, cut once” rule. Carefully measure and cut your tiles using a straightedge and a sharp utility knife for clean, professional-looking edges.
- Strategic Starting Point: Begin applying your tiles from a discreet corner or the most prominent edge of your wall and work your way across, meticulously ensuring each tile is perfectly level and aligned with the previous one.
- Eliminate Air Bubbles: As you apply each tile, use a squeegee or a clean, dry cloth to firmly smooth out any air bubbles, working from the center outwards, to ensure maximum contact and a flawless finish.
- Consider Adhesion Boosters: For areas prone to high humidity, or if your wall surface is slightly uneven, a light spray adhesive or targeted application of construction adhesive (as I did) can provide invaluable extra peace of mind and prevent future peeling.
The Finishing Touches: Stylish and Sturdy Shelf Brackets for Open Storage
When it comes to designing effective open shelving, the brackets are not merely functional components; they are critical design elements that can significantly influence the overall aesthetic and perceived quality of your pantry. I deliberately chose these minimalist black metal shelf brackets for their perfect blend of contemporary style, robust strength, and remarkable affordability. Their sleek, understated design perfectly complements the modern farmhouse-inspired look I was aiming for, while their robust construction provides reliable, long-lasting support for all my essential pantry items.
Safety and paramount durability are non-negotiable, especially in a busy family home where shelves might hold substantial weight or be accessed by children. That’s why I made absolutely sure to anchor every single bracket directly into wall studs. This critical step ensures maximum stability and prevents any potential sagging, wobbling, or pulling away from the wall, even when shelves are fully loaded with heavy items like canned goods or bulk dry goods. As the wise saying goes, “kids + shelves = better safe than sorry!” It’s an extra measure of precaution that provides invaluable peace of mind for years to come. For the unique challenge of corner shelves, where boards often meet and overlap, I cleverly utilized lip-free bracket styles. This strategic choice saved me the tedious and often tricky task of precisely trimming the width on each shelf board, allowing for a cleaner, more streamlined installation and achieving a truly custom look without the custom price tag or the frustration of complex cuts.
Discover the standard shelf brackets with a lip that offer strong, dependable support for your straight shelving runs.
And for achieving seamless corner installations, here are the clever lip-free corner brackets I used to create a clean, uninterrupted look.
Important considerations for choosing and installing shelf brackets effectively:
- Assess Weight Capacity: Always diligently check the maximum weight rating of your chosen brackets and ensure they can comfortably support the intended load of your pantry items. Overloading can lead to dangerous failures.
- Harmonize Material & Finish: Select a material (such as metal, wood, or acrylic) and a finish (like black, brass, chrome, or brushed nickel) that seamlessly aligns with your pantry’s overall aesthetic and your kitchen’s existing decor.
- Invest in a Stud Finder: A reliable stud finder is an indispensable tool for locating optimal anchoring points within your walls, ensuring maximum stability and security for your shelves.
- Proper Drilling & Anchoring Techniques: Use appropriate drill bits for your wall material and utilize heavy-duty drywall anchors (like toggle bolts or molly bolts) if studs are not available at your desired mounting locations. However, direct stud mounting is always the preferred method for heavy loads.
- Meticulous Leveling: Employ a level meticulously throughout the installation process to ensure all your shelves are perfectly horizontal. Even slight discrepancies can be noticeable and detract from the overall finished appearance.
Mastering Pantry Organization: Essential Storage Solutions for Every Inch
With the foundational structure firmly in place – sturdy shelving, a functional countertop, and a stylish backsplash – the final, and arguably most satisfying, step is to bring order and efficiency to your pantry with the right organization tools. This is where your pantry truly transforms from a mere storage space into a highly functional, beautiful, and effortless extension of your kitchen. My goal was to make this DIY pantry makeover both intensely practical and visually appealing, selecting items that are perfect for small pantry storage and specifically designed to maximize every precious inch, ensuring nothing is lost or forgotten.
Strategic Pantry Organization Principles for Lasting Order:
- Categorize for Clarity: Group similar items together (e.g., all baking supplies, all snacks, all canned goods, all pasta and grains). This makes locating items quick and returning them effortless.
- Decant for Uniformity and Freshness: Transfer dry goods from bulky, often mismatched original packaging into clear, airtight containers. This creates a uniform, visually appealing look, prolongs freshness, and helps identify contents at a glance.
- Utilize Vertical Space Intelligently: Employ stackable bins, tiered risers, and multi-level organizers to make the most of the height between shelves. Don’t let valuable vertical space go to waste.
- Prioritize Visibility: Clear containers are your best friend! They allow you to see exactly what you have on hand, preventing over-purchasing of duplicate items and significantly reducing food waste.
- Ensure Accessibility: Place frequently used items at eye level or within easy reach. Less common ingredients or bulk items can be stored higher up or lower down. Lazy Susans are fantastic for making deep or corner spaces fully accessible.
- Embrace Clear, Consistent Labels: Do not underestimate the power of clear, consistent labels! They are crucial for quick identification, especially after decanting, and help maintain the system even when multiple family members use the pantry.
My Go-To Pantry Organization Must-Haves for a Fully Optimized Space:
Here’s a meticulously curated list of the exact products and types of organizers I used to achieve a fully optimized and aesthetically pleasing pantry, transforming chaos into calm:
- Clear Plastic Bins (Medium) for Cubbies: These versatile bins are absolute game-changers for keeping items contained, categorized, and easily retrievable within the Billy Bookcase cubbies. They prevent small packages from getting lost and make it effortless to pull out an entire category of goods when needed. Shop Clear Plastic Bins (Medium)
- Lazy Susan Corner Organizers: The notoriously inaccessible back corner is the bane of many corner pantries. Lazy Susans solve this problem brilliantly, providing easy 360-degree access to items like oils, vinegars, sauces, or spices with a simple spin. Explore Lazy Susan Corner Organizers
- Airtight Cereal Containers: Say goodbye to stale cereal, messy bags, and potential pest issues. These thoughtfully designed containers keep cereal, granola, and other dry goods perfectly fresh, pest-free, and create a uniform, tidy look that instantly elevates your shelves. Get Airtight Cereal Containers
- Tiered Can Organizers: No more frustrating digging through precarious stacks of cans! Tiered organizers allow you to see all your canned goods at a glance, making it simple to grab exactly what you need and preventing items from expiring unnoticed. Find Tiered Can Organizers
- Clear Tubs for Open Shelves: Often larger and more spacious than the cubby bins, these clear tubs are perfect for grouping bulk snack bags, pasta pouches, baking mixes, or smaller infrequently used appliances on your open shelves. Their transparency maintains visual lightness while keeping clutter neatly contained. See Clear Tubs for Open Shelves
- Glass Tilted Jars with Black Lids: For items you use frequently and want to display beautifully, such as flour, sugar, coffee beans, pasta, or even pet treats, these tilted glass jars are both supremely functional (easy to scoop from) and incredibly stylish. The contrasting black lids add a chic, modern touch. Discover Glass Tilted Jars with Black Lids
- Bread Box – Obsessed with this one!: I am absolutely obsessed with this bread box, and for good reason! Not only does it keep bread, bagels, and pastries perfectly fresh for longer, but it also neatly tucks away unsightly packaging, significantly contributing to a clean, uncluttered countertop or shelf aesthetic. Shop This Gorgeous and Functional Bread Box
Your Dream Pantry Awaits: Conclusion and Inspiration for Your Own DIY Project
And there you have it – the complete, detailed journey of my corner pantry makeover, transforming it from a disorganized, frustrating mess into a highly functional, budget-friendly, and beautifully organized space! This comprehensive project serves as compelling proof that with a bit of thoughtful planning, some clever product choices, and a willingness to get hands-on, anyone can achieve their dream pantry without the need for expensive custom cabinetry or professional organizers. The satisfaction of a space you’ve transformed with your own hands is truly immeasurable.
I truly hope this detailed guide, complete with practical tips and my personal product recommendations, ignites your own inspiration if you’re contemplating a DIY pantry renovation. Remember, the ultimate goal is not just to make your pantry look good, but to make it work harder and smarter for you, simplifying meal prep, significantly reducing food waste, and bringing a profound sense of calm and efficiency to your daily routine. The unparalleled satisfaction of opening your pantry doors to a perfectly ordered, visible, and easily accessible collection of ingredients is a small luxury that makes a huge difference in everyday life.
If you have any questions at all about the products I used, the installation process, specific challenges you’re facing, or simply want to share your own brilliant home organization tips, please don’t hesitate to reach out in the comments below! I absolutely love chatting all things home organization and helping others create functional and beautiful spaces they truly adore.
Looking for more impactful DIY home improvement inspiration and transformations? Be sure to check out my other rewarding project: My Closet Under The Stairs Makeover, for another dose of budget-friendly renovation magic!