
Build Your Own Pottery Barn-Inspired Bookshelf: A Comprehensive DIY Guide
Happy Monday, fellow DIY enthusiasts!
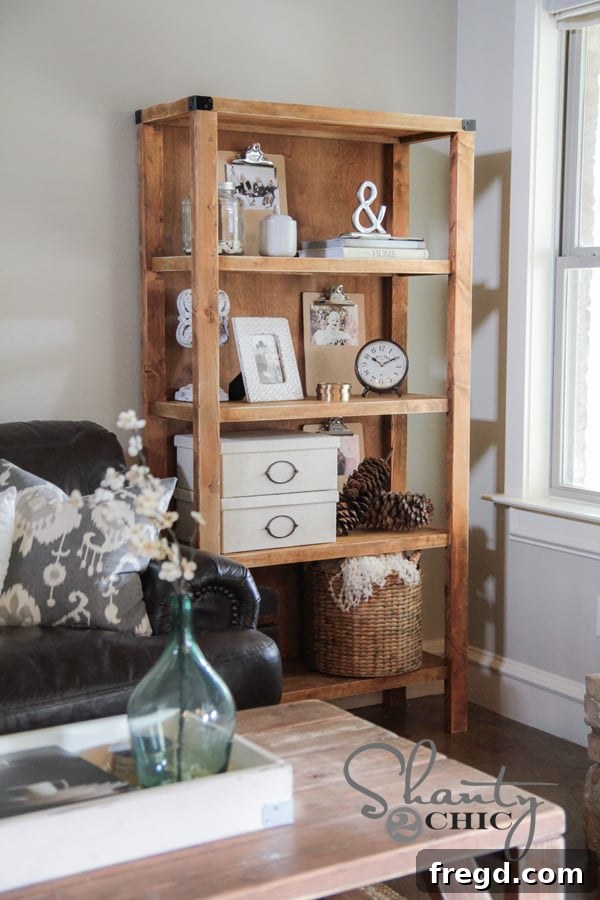
I am incredibly excited to unveil my latest furniture creation with you today. Like many homes, my living room features a blank wall next to the couch, a space I’ve always aimed to fill effectively. Its proximity to a window presented a unique challenge: how to add significant height and visual interest without obstructing the precious natural light. My solution, after much deliberation, was to construct an open-concept bookcase. This design choice not only allows sunlight to stream freely into the room but also provides the vertical presence and display capacity I desired. For this special project, I had the pleasure of teaming up with my good friend, the renowned woodworking expert Ana White, to bring you this stunning Pottery Barn-inspired bookshelf.
Isn’t it absolutely charming? I truly believe it fits the space flawlessly, offering both practical storage and a beautiful aesthetic. Here, I’ll walk you through some of my personal tips, tricks, and insights gathered during the build. For those ready to dive deeper, you can find the full set of free, detailed plans conveniently on Ana White’s website!
The Appeal of an Open Bookshelf: Design and Functionality
Choosing an open bookshelf was a deliberate design decision, born from the desire to maximize both aesthetics and practicality. The challenge of a blank wall beside a window is common in many homes; solid furniture can often make a room feel darker and more confined. An open-concept design elegantly sidesteps this issue. Its airy structure allows natural light to permeate the space, maintaining a bright and inviting atmosphere. Furthermore, the vertical lines of a tall open bookcase draw the eye upwards, enhancing the perception of ceiling height and adding a sense of grandeur without overwhelming the room. Beyond its light-enhancing qualities, this style of bookshelf is perfect for showcasing cherished decorative items, a curated collection of books, or vibrant houseplants, transforming a simple storage unit into a personalized art display. It’s a versatile piece that adds character, warmth, and an organized elegance to any living area.
Essential Tools for a Seamless Bookshelf Build
A successful woodworking project, especially one as rewarding as building your own furniture, hinges on having the right tools. For this Pottery Barn-inspired bookshelf, I relied on a selection of trusted equipment that significantly streamlined the process. Let’s explore these indispensable tools:
1. The Rigid 12″ Sliding Miter Saw: Your Precision Cutting Powerhouse
My Rigid 12″ Sliding Miter Saw was an absolute cornerstone of this project. Having recently upgraded from a 10″ model, I can attest to the transformative power of this tool. Its larger blade capacity and sliding functionality allow for cutting much thicker and wider lumber with exceptional precision and ease. While it represents a more significant investment, the accuracy, versatility, and sheer power it offers are unmatched. For anyone serious about tackling furniture builds, intricate trim work, or other demanding woodworking tasks, a high-quality sliding miter saw like this is an invaluable addition to your workshop, promising to elevate the quality and efficiency of your craft.
2. The Kreg Jig: Mastering Hidden Pocket-Hole Joinery
If you’re delving into furniture building, allow me to introduce you to a tool that will quickly become your new favorite: the Kreg Jig. This ingenious device simplifies the creation of strong, durable, and discreet pocket-hole joints. Rather than relying on unsightly visible screws or complex traditional joinery, the Kreg Jig enables you to drill angled pilot holes into one piece of wood, which then connects securely to another using specialized self-tapping screws. The result is an incredibly robust joint that is easy to assemble and, more importantly, can be hidden from view, contributing to a professional and clean finish. It’s truly a game-changer for DIY furniture projects, drastically improving both the speed and quality of your work. For those new to this phenomenal tool, my friend Ash and I created a concise video tutorial available here to help you get acquainted!
3. Ryobi AirStrike Cordless Brad Nailer: Power and Portability
For tasks requiring quick and precise fastening, such as attaching trim pieces or the back panel, my Ryobi AirStrike Nailer proved invaluable. This cordless brad nailer delivers all the power and efficiency of a traditional pneumatic nailer but without the need for an air compressor or cumbersome hoses. It runs on the same versatile 18V battery system as my drill, offering unparalleled convenience and portability. Its ease of use and freedom from cords significantly sped up the assembly process, allowing for swift and secure attachment of components, making it a favorite tool in my workshop.
4. Ryobi Corner Cat Sander: Crafting the Perfect Distressed Finish
To achieve that sought-after charming, slightly worn, and antique look, the Ryobi Corner Cat Sander was the ideal tool. Its compact, triangular sanding pad is specifically designed to reach into tight corners and along edges, enabling precise and controlled distressing. This capability allowed me to gently sand away small amounts of stain from strategic areas, mimicking the natural wear and tear that gives vintage furniture its character. This tool is essential for adding an authentic, aged aesthetic that perfectly complements the Pottery Barn style.
Materials: The Building Blocks of Your Bookshelf
Beyond the right tools, selecting quality materials is fundamental for a durable and aesthetically pleasing bookshelf. Here’s a breakdown of the primary materials I utilized:
- Lumber: The specific cuts and dimensions are thoroughly detailed in Ana White’s plans. For the main structural components, common pine boards or similar inexpensive yet sturdy lumber are typically ideal.
- PureBond Plywood: For the back panel of the bookcase, I highly recommend using 1/4″ PureBond Plywood. Readily available at Home Depot, PureBond is celebrated for being formaldehyde-free, making it a safer and healthier choice for indoor furniture. An added bonus is that many Home Depot locations offer cutting services, allowing you to have your plywood cut to precise dimensions before you even leave the store, saving you time and effort.
- Wood Stain: I experimented with a new Rust-Oleum stain color called “Wheat.” This particular shade provides a beautiful, warm, and classic finish that closely resembles the much-loved “Early American” shade that was unfortunately discontinued.
- Stainable Wood Putty: Absolutely essential for neatly filling all pocket holes and any minor imperfections in the wood, ensuring a flawlessly smooth surface that will accept stain evenly for a professional look.
- Unique Hardware: For an unexpected and charming detail, I sourced metal brackets from the roofing section of Home Depot. They are incredibly affordable and contribute a distinct industrial-chic accent that perfectly aligns with the desired Pottery Barn aesthetic.
- Spray Paint: To give the metal brackets a sleek, uniform appearance, I used Rust-Oleum Painter’s Touch Canyon Black spray paint.
- Screws: A variety of Kreg pocket hole screws were used, specifically 1.25″ for shelf attachments and appropriate sizes for the 1.5″ and 3/4″ pocket holes. Additionally, black drywall screws were used to securely attach the painted hardware.
Step-by-Step Construction: Bringing Your Vision to Life
With your tools sharpened and materials gathered, it’s time to embark on the exciting building process. Remember, precision in every step is crucial for achieving a sturdy, beautiful, and professional-looking bookshelf.
Step 1: Achieving Precise Cuts
The initial phase of construction involved meticulously making all the necessary lumber cuts as detailed in Ana White’s comprehensive plans. This is where my Rigid 12″ Sliding Miter Saw truly proved its worth, ensuring that every piece of wood was cut to exact specifications. Accuracy at this foundational stage cannot be overstated, as it prevents misalignments and complications later on. Always take your time here; the old adage “measure twice, cut once” is your best friend.
Step 2: Drilling Pocket Holes for the Frame
The Kreg Jig played a pivotal role throughout the assembly. For the main structural frame pieces, including the vertical uprights and horizontal supports, I drilled 1.5″ pocket holes. The strategic placement of these holes is paramount: the goal is to position them so they are completely hidden from view once the bookshelf is fully assembled, ensuring a clean and polished appearance. The accompanying images illustrate the careful planning involved in locating each pocket hole for optimal concealment.
Step 3: Preparing the Bookshelf Components
For the bottom edges of the individual shelf pieces, I adjusted my Kreg Jig to drill 3/4″ pocket holes. This difference in depth is important, as it ensures that the screws used are perfectly sized for the wood thickness, providing optimal holding power without risking the screw pushing through the surface. Such attention to detail in joinery is what elevates a DIY project from amateur to professional grade.
Step 4: Assembling the Main Bookcase Structure
Once all the required pocket holes were precisely drilled, I began the exciting process of assembling the core structure. My method involved building one complete side of the bookcase first: I attached all the shelf pieces to one of the vertical frames using 1.25″ pocket hole screws. This approach simplifies alignment and ensures each shelf is perfectly level before integrating the second frame. With the first side solidly constructed, I then carefully attached the second vertical frame, essentially creating a robust sandwich for the shelves. A crucial detail here was orienting the back frame so that any exposed pocket holes faced the rear of the unit, keeping them completely out of sight from the front and sides.
After the main structure was fully assembled and all the joints were securely fastened, I performed a thorough inspection of the bookcase’s top surface. At this stage, it was important to fill any visible pocket holes or minor imperfections with stainable wood putty. This step is absolutely critical for creating a seamlessly smooth and uniform surface that will readily accept stain or paint, contributing significantly to the overall professional finish of the piece.
Step 5: Adding Side Trim and the Back Panel
To further enhance the aesthetic appeal and give the bookshelf a truly finished and custom look, I meticulously attached decorative trim pieces to its sides. This is where my Ryobi AirStrike Nailer truly excelled, making the task of fastening the trim quick and precise, all without the cumbersome setup of an air compressor. These subtle trim details add depth, definition, and a polished edge to the overall design.
Next, I moved on to securing the 1/4″ PureBond Plywood back panel. Having Home Depot cut the plywood to size beforehand was a huge time-saver and ensured a perfect fit. Using the convenience of my nailer, I effortlessly attached the plywood to the back frame of the bookcase. This step is not just for aesthetics; it provides crucial structural rigidity, preventing the bookcase from racking, and offers a clean, solid backdrop for the items you’ll display, preventing them from falling off the back.
The Art of Finishing: Staining and Distressing Your Bookshelf
Now comes the most satisfying part of any woodworking project: bringing out the natural beauty of the wood and infusing the bookshelf with its unique character through staining and distressing!
Applying the Stain for a Rich Tone
For this bookshelf, I selected a gorgeous new Rust-Oleum stain color called “Wheat.” This particular shade is a fantastic find, as it beautifully emulates the classic, warm tones of the beloved “Early American” stain that was unfortunately discontinued. The application process is refreshingly simple: using a brush, apply an even coat of stain, allowing it a short time to penetrate the wood fibers. Then, carefully wipe off all excess stain with a clean cloth. This technique ensures a consistent color saturation and prevents any blotchy or uneven areas. Once the first coat was thoroughly dry, I proceeded to the next step, which adds so much character.
Distressing for an Authentic Antique Feel
To achieve that charming, gently worn, and authentically antique aesthetic that truly sets this piece apart, I turned to my Ryobi Corner Cat Sander. I lightly sanded the edges and corners of the bookcase, focusing on areas that would naturally show wear over time. This subtle distressing technique strategically removes a small amount of stain from these prominent points, creating the illusion of years of natural use and age. It instantly imbues the bookshelf with depth and character, giving it that coveted vintage appeal often associated with high-end, artisan furniture pieces.
Adding Unique Industrial-Chic Hardware
For the hardware, I opted for an unconventional yet incredibly effective choice: simple metal brackets discovered in the roofing section of Home Depot. Not only are they exceptionally affordable, but they also contribute an unexpected industrial-chic accent that perfectly complements the Pottery Barn style I was aiming for. To transform their raw appearance, I painted them with a single, even coat of Rust-Oleum Painter’s Touch Canyon Black spray paint, giving them a sleek and unified finish.
After allowing the paint to cure completely, I securely attached these stylish brackets to the bookcase using black drywall screws. The striking contrast of the dark metal against the warm “Wheat” stained wood is simply adorable and unequivocally elevates the entire piece, adding a final touch of bespoke craftsmanship.
Styling Your New Bookshelf & The Grand Reveal
The final, exhilarating step was to style and dress up the newly built bookshelf, then capture its beauty in photographs! This is the stage where your personal creativity truly shines. Arrange your favorite books, cherished decorative objects, vibrant plants, and captivating art pieces to reflect your unique taste and personality. An open bookshelf offers an incredible canvas for creative expression, allowing you to curate a dynamic display that not only organizes your belongings but also significantly enhances your home’s overall aesthetic.
Here are a few more captivating shots of the finished Pottery Barn-inspired open bookshelf, proudly gracing its new spot in the living room:
Final Thoughts & Your Next Steps
I sincerely hope you adore this Pottery Barn-inspired bookshelf as much as I do! It’s more than just a piece of furniture; it’s a testament to the immense satisfaction that comes from creating something beautiful and functional with your own hands. The journey of DIY is incredibly rewarding, and with the right guidance, anyone can achieve truly amazing results.
As a reminder, for the complete and free building plans for this “Henry Bookshelf” project, be sure to visit Ana White’s site. Her meticulously detailed instructions are an invaluable resource, ensuring a smooth and successful build for every DIY enthusiast.
If you found this tutorial inspiring and helpful, please consider sharing it with your friends, family, and fellow DIY enthusiasts! Pin it to your craft boards, share it on your social media channels, and help spread the joy of creating beautiful, handmade home decor.
Thank you so very much for stopping by and joining me on this creative adventure. Happy building, and I look forward to seeing what you create!
~Whitney