
Hey friends! Happy you are here! To keep up with all of our DIY projects from start to finish, be sure to follow us on Instagram and Pinterest!
Transforming Our Loft: Creating a New Bedroom for a Growing Family
Home renovation projects are often born out of necessity, but they also offer an incredible opportunity to reimagine your living space to better suit your family’s evolving needs. Over the past week or so, our home has been the center of a significant transformation, one that addresses a common challenge many growing families face: the need for more bedrooms. When we first built our home five years ago, our family consisted of three wonderful children, and at the time, we thought our family was complete. Our upstairs layout reflected this, featuring individual rooms for my oldest girls, a versatile ‘bonus room’, and an open loft area. This loft, visible from the downstairs living space, initially seemed like a great feature, adding an airy, open feel to our home.
Adapting Our Home for a Growing Family
Life, as it often does, had a delightful surprise in store for us. A few years later, after navigating the joyous chaos of three toddlers, the idea of expanding our family once more became incredibly appealing. We were blessed with two more children, bringing our total to five! This wonderful addition quickly brought into sharp focus the need to re-evaluate and optimize our living space. Our first step in this journey was converting the bonus room into a dedicated bedroom for my oldest girls, a project you may recall from some of my earlier posts.
This transformation provided them with a comfortable and private space to share, alleviating some of the immediate space crunch. However, with five children now calling our house home, it became clear that more proactive space planning was essential. Our open loft, while charming in concept, was becoming increasingly dysfunctional. What started as a craft space, then evolved into a playroom, eventually devolved into a catch-all storage area for toys and general clutter. I often found the kids happily playing in their rooms, leaving a visible, sometimes overwhelming, mess in the loft for everyone downstairs to see. The lack of privacy and defined purpose made it less of an asset and more of a headache.
The Loft Conversion Decision: Function Over Form
The realization hit me: it was time to close in the loft. This wasn’t a decision taken lightly, as I genuinely loved the open feel the loft provided. However, in the ongoing battle between aesthetic appeal and practical functionality, function decidedly won this round. Our primary goal was to create a new, private bedroom, providing much-needed space for one of our children. The key challenge, and an exciting design opportunity, was to ensure that the newly enclosed space looked completely intentional and seamlessly integrated from both the interior of the new room and the exterior view from downstairs. We wanted the transformation to enhance, not detract from, our home’s overall design.
An Invaluable Helping Hand: Meet Bapa, “The Bomb”
Taking on a project of this magnitude requires more than just enthusiasm; it demands skill, experience, and often, a lot of help! I was incredibly fortunate to have my stepfather, affectionately known as Bapa (or ‘The Bomb’ for his exceptional building prowess), by my side. Bapa is not only one of my favorite people and an amazing grandfather to my kids, but he also happens to be one of the most talented builders and handymen I know. His expertise is truly unparalleled; he built our current home and even Ashley’s new house!
Having Bapa’s guidance and hands-on assistance was invaluable. His deep understanding of construction, combined with his meticulous approach, ensured that every step of this loft conversion was executed with precision and a long-term vision. If you’re a local DFW resident contemplating a remodel or new build, please don’t hesitate to email us – I’d be happy to share his contact information. He truly is the best around!
The Loft Conversion Process: From Open Space to Private Retreat
While every home and renovation project is unique, I want to walk you through the decisions and steps we took during our loft conversion. My hope is that our journey will spark some inspiration for your own space planning and DIY home improvement endeavors. We aimed for a solution that was both aesthetically pleasing and highly functional.
Phase 1: Demolition and Initial Framing
The first critical step was to close off the open area over the stairs. Our design approach involved making the new wall inside the room flush with the existing wall, while the wall facing the stairs would be slightly recessed. This subtle recess would allow us to retain some of the original framing at the bottom, creating an interesting feature wall from the stairwell perspective. The initial task involved removing the existing railing, a process that required a bit of careful demolition. With some strategic tugging and hammering, the entire railing structure was successfully lifted away, revealing the open expanse that would soon become a solid wall.
Looking up from downstairs after the railing was removed certainly gave a sense of the scale of the project, a slightly daunting but exciting glimpse into the future possibilities.
Constructing the Recessed Wall
To achieve the desired recessed effect on the stair-facing side, we opted for 2×3 studs instead of the standard 2x4s for this specific section. This choice was crucial for maintaining the specific depth we wanted. We began by securely installing the sole plate and top plate, followed by the side studs. Every connection was reinforced with strong wood glue and driven home using Bapa’s trusty Ridgid framing nail gun, powered by our air compressor. This meticulous approach ensures the structural integrity and longevity of the new wall.
A key detail in our framing technique was setting the studs back by precisely 1/2 inch from the room’s existing wall line. This foresight ensures that once the 1/2-inch sheetrock is applied, the new wall within the room will sit perfectly flush, creating a seamless and polished finish.
Here’s a look at the other side of this initial framing, showcasing the clear separation and the foundation for the new room.
Following the initial structural framework, we proceeded to install the remaining vertical studs. Given our use of 2x3s for this particular section, we strategically placed the studs closer together than typical 2×4 framing to ensure adequate support and stability. This detail is crucial for creating a robust wall that will stand the test of time.
As an extra touch of thoughtful craftsmanship, Bapa incorporated what we affectionately call ‘Brooks blocks’ into the framing. Named after my youngest little guy, Brooks, these additional support blocks were added with the humorous (but practical!) thought that extra reinforcement is always a good idea with energetic kids around. You can spot these clever additions from one side of the wall. In a truly heartwarming moment, the kids also created a time capsule to hide within the framing – a secret treasure for future discoverers. Hayden, for whom this room is destined, added her own special touch by tucking in a plastic horse, ensuring a piece of her childhood magic would be forever part of her new space. This personalization truly makes the room feel like hers from the very beginning.
Framing the Door and Finishing Walls
Once the primary wall was sheetrocked, our focus shifted to framing the additional wall that would house the new door, connecting the bedroom to the upstairs hallway. For this section, we returned to using regular 2×4 studs, as the specific recessed design wasn’t necessary here, and the added depth of the 2x4s provided standard robust support for a door frame.
Here’s a perspective shot looking out from what will soon be Hayden’s new room, through the framed doorway and into the hallway. It’s exciting to see the space truly taking shape and imagine the everyday flow of the home once the project is complete.
Drywall Installation and Finishing Touches
With the framing complete and secure, it was time for the next major step: installing the sheetrock (drywall). This phase rapidly transforms a skeletal structure into defined rooms. Once the sheetrock was meticulously cut and fastened to the studs, we moved on to the crucial steps of taping and bedding the walls. This involves applying joint tape over the seams and screws, followed by multiple layers of joint compound (mud), carefully sanded smooth between coats. This process is essential for creating perfectly seamless walls, ready for paint and trim. It’s a testament to patience and attention to detail, resulting in a flawless finish.
Tools That Made a Difference
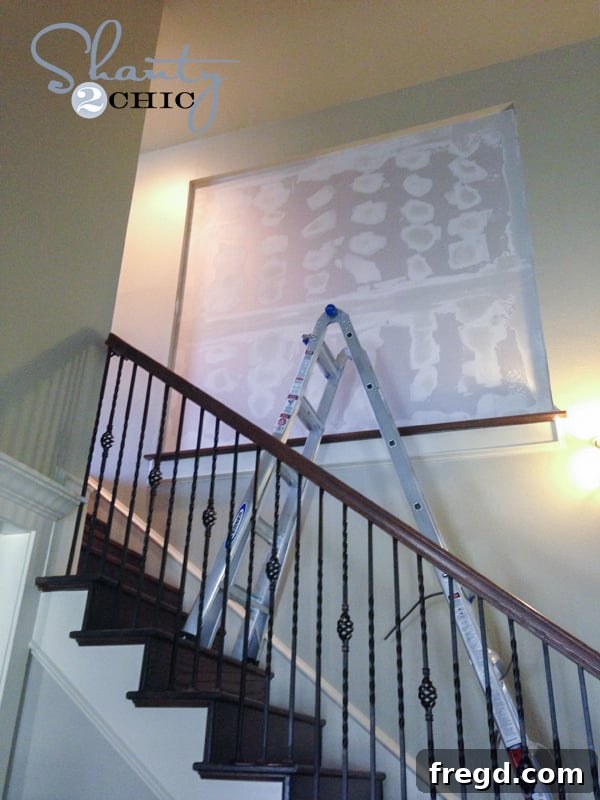
No DIY project is complete without the right tools, and for this loft conversion, one particular item stood out: our incredible multi-ladder. This ingenious piece of equipment is truly a game-changer, acting as three ladders in one! Its ability to adjust the legs to different lengths made working on the stairs incredibly safe and efficient. It’s super sturdy and versatile – a real lifesaver for tackling awkward angles and varying heights. We picked it up at The Home Depot, and it’s quickly become one of our most valued tools. Who knew such a simple yet brilliant design could make such a difference?
Envisioning the Finished Space: A Bright Future for the New Bedroom
I am beyond excited about the potential of this newly enclosed space! It’s absolutely drenched in natural light, thanks to its position and, particularly, the charming dormer window. This feature, combined with the unique ceiling lines and wall angles, creates a wonderfully cozy yet airy atmosphere. These architectural details will lend themselves beautifully to creative design choices, making this room truly special and full of character.
One of the most exciting plans we have in the works is to build a custom daybed right here, perfectly nestled under the dormer. Imagine a cozy nook, ideal for reading, lounging, or hosting sleepovers. We’re already developing free plans for this built-in daybed, and I absolutely cannot wait to share them with you, along with the full reveal of the completed room!
I often wonder, who else out there is in the same boat? The decision to prioritize function over form sometimes comes with minor trade-offs. In our case, enclosing the loft meant sacrificing a little natural light in our downstairs living room. However, this small compromise feels entirely worth it when weighed against the significant gain: a beautiful, functional, and much-needed new bedroom upstairs. Would you make the same choice? For us, it’s a clear win-win. We’ve added incredible value and comfort to our home, and my goal now is to ensure both the interior of the new room and the exterior view from downstairs are equally stunning. Stay tuned for the complete transformation!
~Whitney