
Elevate Your Home Decor: Crafting and Hanging Rustic Chalkboards with Custom Wooden Clips
There’s nothing quite as satisfying as completing a DIY home decor project, especially when the final touches bring a unique charm and personal touch to your living space. Today, I’m thrilled to share the culmination of one such project: getting these beautiful rustic chalkboards proudly displayed on the walls!
While the chalkboards themselves are fantastic, I must admit, I’m absolutely smitten with the innovative way I chose to hang them. It’s a small detail that makes a huge difference, adding a custom flair that truly elevates the entire look.
The Inspiration: Those Charming Unfinished Wooden Clips
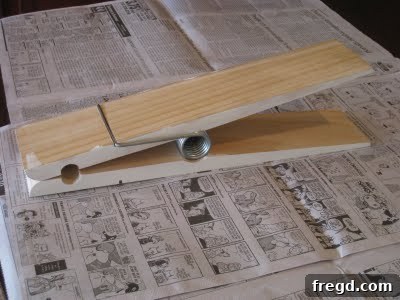
Have you ever found yourself wandering the aisles of a craft store like Hobby Lobby, only to stumble upon those wonderfully massive, unfinished wooden clips? They’re often tucked away in the unfinished wood section, and their undeniable cuteness just begs for a purpose. You pick them up, admire their potential, and then put them back down, wondering what on earth you could possibly do with them.
Well, I’ve had that exact experience countless times as I strolled through the unfinished wood aisle. These clips were always on my radar, but it wasn’t until I began planning the display for my rustic chalkboards that inspiration struck! Suddenly, these charming clips finally had a destiny, and it was going to be a beautiful one.
Transforming the Clips: A Step-by-Step Guide
To achieve the perfect rustic, aged look that would complement my chalkboards, I embarked on a simple yet transformative process for these wooden clips. The key was layering different finishes to create depth and character.
Step 1: Disassembly and Base Coat
First, I carefully disassembled each clip. This crucial step ensures that every surface can be evenly coated and provides access to the edges for distressing later. Once separated, I applied a beautiful base coat of Rustoleum American Accents Heirloom White spray paint. This soft, creamy white provides an ideal foundation for a vintage aesthetic. Remember to apply spray paint in thin, even coats in a well-ventilated area for the best finish and allow adequate drying time between coats.
Step 2: Distressing for an Authentic Look
Next, to achieve that desirable aged, worn appearance, I distressed the edges of the newly painted clips. Using my trusty 3M Sanding Block with 80-grit sandpaper, I gently but firmly sanded along the edges and raised areas. The 80-grit is perfect for creating visible wear and exposing the raw wood underneath, mimicking years of natural wear and tear. This technique instantly adds character and depth, transforming a plain painted surface into something with a story.
Step 3: Adding Warmth with Stain
With the distressed edges now exposed, it was time to introduce some warmth. I carefully painted Minwax Red Mahogany stain onto these newly sanded edges. The rich mahogany tone seeped into the exposed wood, creating a beautiful contrast against the Heirloom White base. This step accentuates the distressing and adds another layer of authentic, antique charm. Be sure to wipe off any excess stain quickly with a clean rag to avoid dark blotches and ensure a smooth blend.
Step 4: Glazing for Depth and Finish
To further enhance the aged effect and tie all the layers together, I gave them some love with Ralph Lauren Smoke Glaze. The method for glazing is simple yet effective: paint it on, then wipe it off. This process settles the glaze into the recessed areas and distress marks, darkening them slightly and adding incredible depth and a subtly smoky, antique patina. It softens the contrast between the white paint and the mahogany stain, creating a harmonious, vintage finish.
Step 5: Reassembly
Finally, with all the finishes applied and thoroughly dried, I carefully put the clips back together. And voilà! They were transformed from simple unfinished wood into exquisite decorative pieces, ready to be put to their unique purpose.
Ahh! I absolutely adore how they turned out, and they were perfectly ready for their starring role!
Innovative Hanging: Time to Display!
Now for the creative part of actually hanging the chalkboards and integrating these decorative clips. This method creates a visually appealing “suspended” look without relying on the clips for structural support.
Step 1: Preparing the Chalkboards
To securely hang each chalkboard, I attached two large saw-tooth hangers to the top corners of the back. Ensure they are evenly spaced and level for stable hanging. A small hammer can quickly tap these into place.
Step 2: Adding the Twine Detail
Next, I used my handy Easy Tacker to staple the ends of two pieces of natural twine to the top corners of the chalkboard, just above the saw-tooth hangers. The key here is to pull the center of the twine up to create an inverted ‘V’ or pointed shape. This not only adds to the rustic aesthetic but also provides a functional point for the decorative clips later on. The length of the twine should be considered based on how high you want the clips to appear above the chalkboard.
This creates an appealing, slightly relaxed loop that gives the clips something to interact with visually.
Step 3: Preparing and Positioning the Decorative Clips
Now for the truly charming part! I also added smaller saw-tooth hangers to the back of each of the newly customized wooden clips. This is crucial for hanging the clips independently on the wall. After hanging the chalkboard securely on the wall using its saw-tooth hangers, I then carefully positioned and hung each decorative clip directly above the chalkboard, ensuring they were centered and aligned with the twine. Once hung, I simply clamped them down on the top of the twine, allowing them to playfully “hold” the twine. This creates the illusion that the clips are supporting the chalkboard, but in reality, they are merely decorative elements enhancing the display.
IMPORTANT NOTE: The chalkboard itself is securely hanging on the wall via its own hangers, not directly from the decorative clips. The clips are hung separately and simply clasp onto the twine for visual effect, ensuring stability and longevity of your display.
The Completed Rustic Chalkboards: A Focal Point for Any Room
The result is a set of beautifully rustic chalkboards that are not only practical but also serve as a strong focal point in their respective rooms. The customized wooden clips add such a fantastic, unique twist and perfectly complement the rustic, farmhouse feel of the chalkboard surfaces. They transform a simple organizational tool into a piece of art.
As you can see from the images, they’re already being put to good use! Whether for daily reminders, grocery lists, inspirational quotes, or even a rotating art display, these chalkboards blend functionality with undeniable style. They can instantly elevate a kitchen, add charm to a home office, provide a creative outlet in a child’s room, or create a welcoming message in an entryway.
Ready to Create Your Own Rustic Chalkboards?
I truly love the way these chalkboards turned out, and I believe these custom clips are the perfect finishing touch. If you’re inspired to create your own rustic chalkboards to pair with these unique hanging clips, and you missed my detailed tutorial on crafting the chalkboards themselves, you can find it
HERE
!
This project is a fantastic way to add personalized charm and practical organization to your home. Give it a try and enjoy the satisfaction of a beautiful, custom DIY creation!