
Hey wonderful friends!
I hope this message finds everyone thriving and enjoying life! On my end, it’s been a whirlwind of building and creating over the past few weeks. With my older children enjoying some quality time with their grandparents recently, I seized the opportunity to dive deep into some serious project work around the house. The quiet moments truly allowed me to be incredibly productive, tackling tasks that had been on my list for a while.
Dreaming of Playroom Perfection: Our DIY Storage Unit Inspiration
Many of you likely recall seeing Ashley’s fantastic rendition of Pottery Barn’s Cameron Wall Unit, which she expertly crafted for her playroom last year. It was an absolute showstopper, and from the moment I saw it, I was completely captivated. Her design resonated with me deeply, sparking an idea for a similar, yet slightly more tailored, solution for our new playroom. While I adored her spacious setup, our specific loft area, designated as the new playroom, required something a touch more compact and perfectly scaled to fit its cozy dimensions. The goal was to achieve that sophisticated, organized aesthetic of a high-end furniture piece, but with the personal touch and immense satisfaction that only a DIY project can provide.
Laying the Foundation: Plans and Preparations for Our Custom Storage
To bring this vision to life, I turned to the incredibly talented Ana White for her meticulously detailed plans. I utilized her comprehensive guide for the open cubby base, which forms the sturdy foundation of the unit, offering versatile storage and display options. Complementing this, I also followed her ingenious blueprint for the hutch with doors, designed to sit atop the base, providing concealed storage for toys, games, or any playroom clutter. This combination allowed for a balanced mix of open shelving and hidden compartments, perfect for maintaining an organized yet inviting playroom environment. The loft space, which previously felt underutilized, was practically pleading for a functional storage solution, and this week, I dedicated myself to making it happen. The excitement of transforming a blank wall into a hub of organization and style was truly motivating, and I couldn’t wait to see the plans come to life.
Material Selection: Opting for MDF for a Smooth Finish
For this extensive project, I made the deliberate choice to work with 3/4″ MDF (Medium-Density Fiberboard). This material is a fantastic option for furniture building, especially when a smooth, paintable surface is desired. At approximately $30 per sheet, it’s a cost-effective alternative to solid wood, and for this entire storage unit, I only needed two sheets. Before heading to Lowe’s, my talented partner, Ash, meticulously drew out all the necessary cuts on the MDF sheets. This detailed planning made the initial cutting process incredibly efficient. I simply had the kind folks at Lowe’s rip the large sheets into more manageable boards, allowing me to easily transport them home in my car. Once back in my workshop, I made all the smaller, more intricate cuts using my own saw, ensuring precision where it mattered most. For those who might not have access to their own woodworking tools, both Lowe’s and Home Depot typically offer cutting services. However, a crucial tip is to always double-check their measurements as they cut. While convenient, their cuts may not always be as precise as what a dedicated DIYer might achieve at home, so vigilance is key for a seamless build.
Speedy Assembly: Brad Nailer and Wood Glue for a Sturdy Structure
The assembly phase of this project was remarkably quick, a testament to the efficiency of modern woodworking tools. I primarily relied on my trusty brad nailer, loaded with 1 1/4″ brads, in conjunction with Gorilla wood glue. This combination creates an incredibly strong and durable bond, ensuring that the entire storage unit is super sturdy and built to last. The brad nailer holds the pieces securely in place while the wood glue dries, creating a joint that is virtually unbreakable. This method not only saved a significant amount of time but also resulted in a clean, professional finish with minimal visible fasteners. It’s truly amazing how quickly these large components came together, transforming flat sheets of MDF into a functional, multi-tiered storage system.
Painting MDF: A Love-Hate Relationship and Priming Secrets
Now, let’s talk about painting MDF. I’ll be completely honest with you all: I actually taped off certain areas that I knew would be hidden from view once the unit was assembled. Why, you ask? Because, simply put, I have come to realize that I absolutely dread painting MDF. It’s a challenge! MDF has a tendency to soak up paint like a sponge, especially on its cut edges, often requiring multiple coats to achieve a smooth, even finish. I thought it was important to share this personal revelation with you, my fellow DIY enthusiasts, as it’s a common experience. However, with the right technique, the results can be stunning.
The secret to a successful paint job on MDF lies in proper priming. I meticulously applied one generous coat of a high-quality primer – specifically, the same primer I successfully used on my laundry room cabinets. This primer is designed to seal the porous surface of the MDF, preventing excessive paint absorption and creating a uniform base for the topcoats. After the primer had thoroughly dried and was lightly sanded, I proceeded with two coats of Valspar Antique Homestead Lace in a beautiful satin finish. This color is wonderfully subtle and elegant, perfect for a playroom. For the detailed edges and corners, I carefully cut in with a brush, ensuring crisp lines. For the broader, flat surfaces, a 4-inch Whizz roller proved invaluable, allowing for quick, even application and a smooth, professional-looking finish. Despite my personal aversion to painting MDF, the final result makes all the effort worthwhile, yielding a durable and beautiful surface.
Custom Door Designs: Elevating the Look with Bead Board
A significant modification I made to Ana’s original plan was in the construction of the doors. Instead of simply using solid MDF panels, I opted for a more customized, farmhouse-inspired look. For the stiles and rails (the vertical and horizontal framing pieces), I chose 1×4 poplar boards. Poplar is an excellent choice for paint-grade applications as it’s stable, smooth, and accepts paint beautifully. For the door fronts themselves, I incorporated bead board panels. This adds a charming, traditional texture and visual interest that elevates the overall aesthetic of the unit. Furthermore, to tie the design together and add another layer of detail, I also used bead board to back the bottom cubbies, ensuring a cohesive look both inside and out. This subtle yet impactful change really distinguishes the piece and adds character. Below, you can see the doors just after assembly, eagerly awaiting their coat of primer and paint.
And here they are, carefully arranged and patiently drying after their fresh coats of paint. The waiting period is always the hardest part of any painting project, but crucial for a flawless, durable finish.
Hardware Installation: Hinges, Magnets, and Knobs for Functionality and Style
Once every component was completely dry and cured – a critical step to prevent scuffs and ensure paint longevity – I moved on to the exciting stage of attaching the doors and adding the final hardware elements. This is where the unit truly starts to take on its finished personality.
Selecting and Customizing Hinges
For the hinges, I sourced a simple yet effective style from Lowe’s. They were incredibly budget-friendly, costing around $1.50 for a pack of two. While functional, their original finish didn’t quite match the aesthetic I envisioned for the knobs. To create a cohesive look and add a touch of sophistication, I spray painted them with Rust-Oleum Hammered bronze spray paint. This not only provided a beautiful, textured finish but also perfectly complemented the bronze tones of the knobs I had chosen. A little customization like this can make a significant difference in the perceived quality and style of a DIY piece.
Here they are, securely attached to the doors, ready to provide smooth operation for years to come. The hammered bronze finish truly adds a custom, high-end feel.
Implementing Magnetic Closures
To ensure the doors remained neatly closed and secure, especially in a busy playroom environment, I installed simple yet effective magnet closures, also purchased from Lowe’s. These were exceptionally affordable at about $1 apiece, proving that functionality doesn’t have to break the bank. They provide a satisfying click when closed and hold the doors firmly, preventing them from swinging open accidentally.
And here’s a closer look at them, expertly attached at the top interior of the doors, providing that crucial secure closure without being visible from the exterior, maintaining the clean lines of the unit.
Adding the Finishing Touch: Knobs
The final detail, the knobs, truly ties everything together and adds a touch of personality. I was fortunate enough to have a gift card to Target, which I happily used to purchase these adorable little beauties. At approximately $11 for the entire set, they were an incredible find, proving that stylish hardware doesn’t always come with a hefty price tag. Their design perfectly complements the overall aesthetic of the unit, adding a hint of charm and making the doors easy to open and close. These small details are often what transform a functional piece into a cherished item.
The Grand Reveal: Our Beautifully Organized Playroom Storage
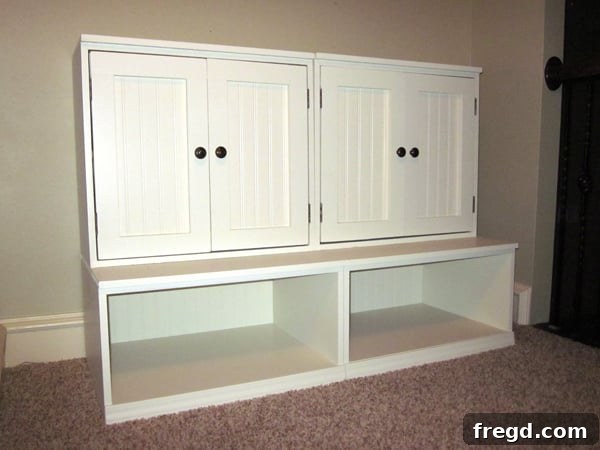
And that, my friends, was essentially it! Once all the components were complete, painted, and the hardware was installed, the final step was simply to stack the hutch neatly onto the cubby base. While I’m a bit bummed that I waited until evening to capture these photos, making them perhaps “less than beautiful” due to the lighting, they still convey the immense satisfaction and transformation this project brought. The unit now stands proudly in our loft, a beacon of organization and style. Despite the late hour, I couldn’t resist sharing the immediate joy of seeing it all come together, fulfilling the storage needs of the playroom perfectly.
Take a closer look at those charming bead board panels on the bottoms of the open cubbies. This subtle detail adds so much character and a touch of classic craftsmanship, making the unit feel truly bespoke and not just another mass-produced piece of furniture. It’s these thoughtful modifications that truly elevate a DIY project from good to exceptional, demonstrating how personal touches can transform a functional item into a beloved part of your home décor.
And do you see all that wonderful blank space stretching up above the unit? It’s practically calling out for creative expression! That’s right, it’s officially craft time in the playroom, and I’m already envisioning some charming decorations and perhaps even some additional functional elements to fill that vertical expanse. Beyond that, I have some truly fun and innovative plans for practical storage solutions within the bottom cubbies. I actually stumbled upon a brilliant idea from another talented blogger who linked to one of our parties a few months ago. I bookmarked it immediately, knowing it would be perfect for a project like this, and I’m incredibly excited to finally put it into action. You’ll just have to wait patiently for that reveal, though – consider it a tantalizing teaser for an upcoming post!
The Nitty Gritty: Cost Breakdown and Unbeatable Savings
Now, for the question on everyone’s mind – the bottom line: how much did this entire DIY Pottery Barn-inspired storage system truly cost? I am thrilled to report that I spent just around $130 for the complete unit. It’s important to note that this figure doesn’t include the cost of paint, as I fortunately had plenty of leftover primer and Valspar paint from a previous home improvement project (a common occurrence for avid DIYers, I’m sure!).
Initially, $130 seemed like a substantial amount for a DIY endeavor. However, any lingering doubts vanished the moment I decided to conduct a quick comparison. Purely for my own reassurance and to truly appreciate the value of my efforts, I hopped onto Pottery Barn’s website to price out a similar setup. What I discovered was nothing short of astonishing. For an exact configuration of their Cameron Wall Unit – featuring an open cubby base and a hutch with doors – the price tag was just shy of $700, and that’s before factoring in the often-exorbitant shipping costs. If we conservatively round up the total with shipping, we’re looking at an investment easily approaching $800.
Suddenly, my $130 project felt not only incredibly reasonable but like an absolute steal! The satisfaction of knowing I built a high-quality, customized piece of furniture for a fraction of the retail price is immense. This comparison perfectly highlights the incredible savings and personal reward that DIY projects offer, transforming costly aspirations into achievable realities for your home. Yes, I feel significantly better – and incredibly proud!
Looking Ahead: More Storage Solutions and Weekend Fun!
I sincerely hope you all love this new playroom storage unit as much as I do! It’s transformed the space, bringing both order and style. My next project on the list is to tackle those complementary storage boxes for the cubbies, which I believe will add another layer of functionality and visual appeal. I promise to be back very soon to share the details and progress on those as well.
In the meantime, I wish you all a fantastic weekend filled with joy, relaxation, and perhaps a little DIY inspiration of your own! Thank you so much for following along on this building journey and for all your incredible support. Happy crafting!
~Whitney