
DIY Drop Cloth Curtains: An Affordable & Stylish Bathroom Window Transformation
Welcome back, fellow DIY enthusiasts! If you’ve been following along, you know I’m currently in a delightful “phase” focused entirely on window coverings. It’s a journey that often leads to unexpected discoveries and incredibly satisfying projects. Today, I’m thrilled to share a recent triumph: transforming a challenging bathroom window with custom, budget-friendly curtains that look anything but cheap.
The Quest for Perfect Bathroom Window Coverings
My bathroom boasts a beautiful, generously sized 4-foot window that overlooks the backyard. When we designed the house, I absolutely loved the idea of having such a grand source of natural light in a space that truly benefits from it. Sunlight flooding into a bathroom creates an inviting, airy, and refreshing atmosphere, making mornings brighter and evenings more serene. My initial vision for this expansive window was elegant custom shutters – a classic choice for privacy and light control. However, that dream quickly met the harsh reality of budget constraints. The quote for shutters came back even higher than the cost of the window itself! Naturally, that was a non-starter.
In response to the budget setback, I opted for a DIY Roman shade, which served as a perfectly adequate, albeit temporary, solution. What was intended as a quick fix ended up lasting a remarkable two years. It did the job, providing privacy and some light diffusion, but it never quite captured the aesthetic charm or the “wow” factor I truly desired for such a prominent window.
A Spark of Inspiration: The Power of Budget-Friendly Finds
The turning point arrived during a casual stroll through Lowe’s. There, I stumbled upon a stack of incredibly affordable wood brackets, priced at just a couple of dollars each. Sometimes, all it takes is one small, inexpensive item to ignite a whole new wave of creative energy! My mind immediately started buzzing with possibilities. I instantly recalled the charming ruffled curtains I had crafted for my laundry room – a project that had turned out beautifully and brought so much character to that often-overlooked space. I knew a similar approach, adapted for the bathroom, could be exactly what this window needed.
The vision began to crystallize: elegant, yet rustic, ruffled curtains that offered both privacy and a soft, diffused light, all while keeping costs incredibly low. The idea of transforming plain, practical materials into something truly special is at the heart of DIY, and this project was shaping up to be a perfect example. I was eager to get started and bring this fresh look to my bathroom.
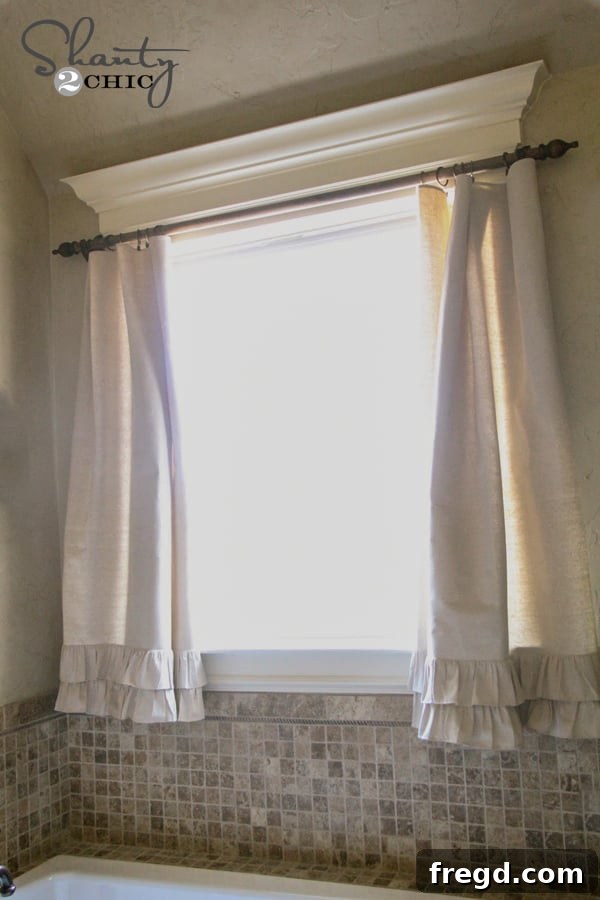
Here’s a sneak peek at the finished curtains:
Materials You’ll Need for Your DIY Drop Cloth Curtains
One of the most satisfying aspects of this project is just how inexpensive it was to bring to life. Here’s a detailed breakdown of the materials I gathered, highlighting their incredible affordability:
Essential Hardware for Your Curtain Rod
-
Wood Brackets: I found these gems for around $2 each at Lowe’s. Their simplicity and raw wood finish make them incredibly versatile, perfect for staining or painting to match any decor style. These humble brackets are the foundation of this budget-friendly curtain rod system, proving that you don’t need to spend a fortune to get a custom look.
-
Finials: A set of decorative finials, also from Lowe’s, cost approximately $3. Finials add a polished, finished look to any curtain rod, turning a simple piece of wood into a sophisticated fixture. These are the same style I’ve used on other projects, like my apothecary cabinet and photo displays, which helps to maintain a cohesive design aesthetic throughout my home. Their understated elegance complements the rustic charm of the drop cloth fabric perfectly.
-
Wood Closet Pole: For the curtain rod itself, I used a piece of wood closet pole. You can purchase this by the foot, typically around $1 per foot, making it an incredibly economical choice. Given my window is 4 feet wide, the closet pole provides the necessary sturdiness without bowing. For smaller windows (under 4 feet), dowel rods can also be a suitable and equally affordable alternative. The raw wood offers an excellent surface for staining to achieve your desired finish.
The Fabric of Choice: Drop Cloths
-
Heavy-Duty Drop Cloth: The star of the show is an ordinary painter’s drop cloth, which cost approximately $12. Drop cloths are a DIY decorator’s secret weapon for many reasons: they are incredibly inexpensive, durable, and offer a wonderful natural texture that provides a casual yet sophisticated look. Their neutral color also makes them a perfect canvas for custom dyeing or staining if you desire a different hue. For this project, I loved the inherent, understated elegance of the natural canvas. The size I chose was generous enough to allow for plenty of fabric to create beautiful ruffles and ensure adequate fullness for the window.
Finishing Touches & Tools
-
Dark Mahogany Stain: To unify the wooden components and give them a rich, custom appearance, I used a dark mahogany stain. This deep, warm tone instantly elevates the look of the inexpensive wood, providing a sophisticated contrast to the light, natural canvas of the drop cloth. You can, of course, choose any stain or paint color that complements your existing bathroom decor.
-
Basic Tools: You’ll need anchors and drywall screws for secure installation, a measuring tape, a sewing machine (or fabric glue for a no-sew option), scissors, and an iron. These are standard tools for most DIY home projects and ensure a professional finish.
Step-by-Step Guide: Crafting Your Ruffled Drop Cloth Curtains
With all materials gathered, it’s time to bring this vision to life. The process is straightforward and incredibly rewarding, even for novice DIYers.
1. Preparing Your Wooden Components
-
Staining: I began by staining all the wooden pieces – the brackets, the closet pole, and the finials – with the dark mahogany stain. Apply the stain evenly, following the wood grain, and allow sufficient time for each coat to dry completely. Depending on the desired depth of color, you might need two or more coats. Ensure proper ventilation during this process and wear gloves to protect your hands. The drying time is crucial for achieving a durable, beautiful finish, so resist the urge to rush this step.
2. Customizing Your Drop Cloth Fabric
-
Cutting the Drop Cloth: While the stained wood pieces were drying, I started on the curtains. For this window, I needed two panels. I cut the drop cloth to the desired length, making sure to add extra allowance for hemming the top and bottom, and for creating the ruffles. A good rule of thumb for curtain length is to have them just barely skim the floor or windowsill, depending on your preference. For fullness, each panel should ideally be 1.5 to 2 times the width of your window section.
-
Creating Ruffles: I cut about a foot off the bottom of the drop cloth to use for my ruffles. This saves material and ensures a cohesive look. The ruffle method I employed for these curtains is the same technique I used for my laundry room curtains, which proved to be both simple and effective. It involves gathering strips of fabric and attaching them in layers to create a soft, cascading effect. If you’re looking for detailed instructions on creating those perfect ruffles, you can find them HERE. Essentially, you’ll hem the main panels, then create strips of fabric, gather them using a basting stitch, and sew them onto the curtain panels in rows. This adds incredible texture and a touch of farmhouse chic to the plain drop cloth.
3. Assembling and Installing Your New Curtains
-
Mounting the Brackets: Once all the stained wood was dry and the curtain panels were sewn, it was time for installation. I used anchors and drywall screws to securely attach the wooden brackets to the wall above my bathroom window. Proper placement is key here; measure carefully to ensure the brackets are level and spaced appropriately for your window’s width. The anchors provide essential stability, ensuring your curtain rod can safely bear the weight of the fabric.
-
Hanging the Panels: Next, I threaded the finished drop cloth panels onto the stained closet pole. Adjust the ruffles and folds to ensure an even and aesthetically pleasing drape. Once the panels were in place, I rested the pole onto the installed brackets.
-
Attaching the Finials: Finally, I screwed the decorative finials into both ends of the closet pole, securing the rod in place and adding that last touch of elegance. This prevents the curtains from sliding off the rod and completes the custom look.
The Stunning Result: A Transformed Bathroom Oasis
And just like that, the bathroom window was completely transformed! The rich mahogany stained wood provides a beautiful, sturdy framework, while the ruffled drop cloth curtains add a soft, textural element that perfectly complements the natural light. They diffuse the harsh sunlight, creating a warm, inviting glow, and offer complete privacy without making the room feel dark or enclosed. The transformation is remarkable, especially considering the minimal financial investment.
The new curtains breathe fresh life into the bathroom, moving it far beyond the temporary Roman shade. It’s truly amazing what a bit of creativity, some inexpensive materials, and a little elbow grease can achieve. This project not only solved a practical need but also significantly enhanced the overall aesthetic of the space, proving that stylish home decor doesn’t have to break the bank.
What’s Next? More DIY Adventures on the Horizon
And speaking of transformation, did you happen to notice that large, decorative “scrolly thing” on the left side of the window in some of the photos? Well, that’s officially my next revamp project! This successful curtain endeavor, with its simple ruffles and budget-friendly charm, has completely re-energized my inspiration. I have big, exciting plans for that entire wall – this was just the beginning. Stay tuned for more creative updates!
Embrace Your Inner DIY Enthusiast!
I hope this tutorial inspires you to tackle your own window treatment challenges with creativity and confidence. Don’t let high prices deter you from achieving the home decor of your dreams. With a little imagination and a trip to your local hardware store, you can create custom pieces that are both functional and incredibly stylish. The satisfaction of stepping back and admiring a project you’ve completed yourself is truly unparalleled.
Happy Friday, and happy crafting!
~Whitney