
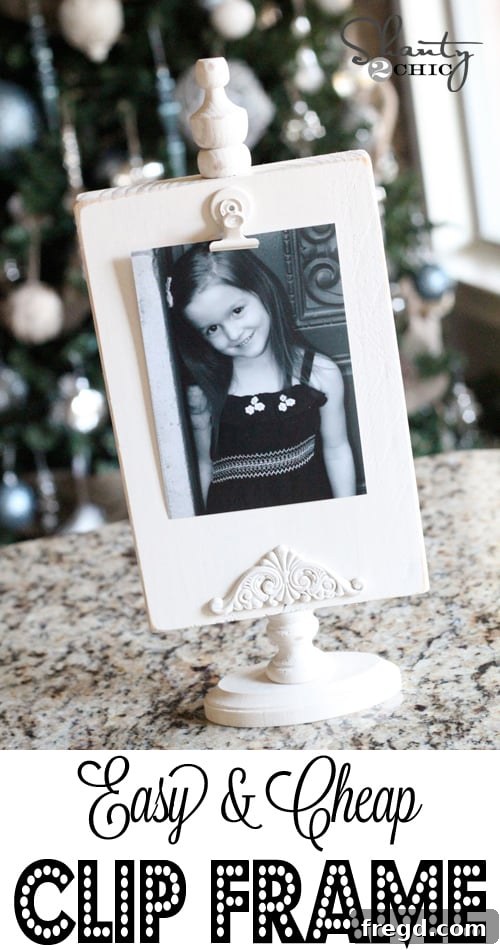
Craft Your Own Rustic Clip Frame Display: The Ultimate Handmade Gift Idea
Hey there, fellow crafters and DIY enthusiasts! Are you searching for a fantastic project that’s not only incredibly rewarding but also makes for an absolutely perfect gift? Whether it’s for your beloved neighbors, dedicated teachers, cherished friends, or dear family members, this rustic clip frame display is a surefire hit. It’s a beautifully simple, highly versatile, and wonderfully budget-friendly way to showcase memories, important notes, or delicious recipes. Get ready to transform basic supplies into a charming piece of functional decor. Let’s dive in and create something truly special!
Behold Your Next Masterpiece: The Finished Rustic Display
This charming project results in a super simple yet elegant way to display photos, favorite recipes, important memos, or even little notes of inspiration. Its rustic appeal blends seamlessly with various home decor styles, from farmhouse to modern vintage, making it a versatile addition to any room. Imagine your favorite snapshots, handwritten recipes, or daily affirmations beautifully organized and prominently displayed.
Why Choose This DIY Clip Frame Project?
In a world of mass-produced items, a handmade gift carries a unique warmth and personal touch that simply can’t be replicated. This DIY rustic clip frame isn’t just another craft project; it’s an opportunity to create something meaningful, practical, and beautiful. Here’s why this project should be at the top of your crafting list:
- Unmatched Versatility: Imagine a single display that can hold anything from precious family photos and sentimental postcards to handy grocery lists, daily reminders, or your go-to dinner recipes. This clip frame adapts to your needs effortlessly, making it perfect for the kitchen, office, living room, or entryway.
- Personalized Charm: Each display you create will carry a piece of your personality. With endless possibilities for customization in terms of paint colors, distressing techniques, and embellishments, you can tailor each piece to the recipient’s taste or perfectly match your own home aesthetic. It’s a truly unique item that reflects your creativity.
- Incredibly Budget-Friendly: Crafting beautiful home decor or thoughtful gifts doesn’t have to break the bank. We’ll show you how to source materials smartly, making this project surprisingly affordable, especially when you craft a few at a time. This makes it an ideal choice for holiday gifting, teacher appreciation gifts, or creating multiple decor pieces for different spaces.
- Beginner-Friendly: Don’t let the elegant finished product intimidate you! This project is designed to be accessible for crafters of all skill levels. With clear, step-by-step instructions and readily available materials, you’ll be amazed at what you can achieve, even if you’re new to DIY.
- The Joy of Creation: There’s immense satisfaction in bringing an idea to life with your own hands. This project offers a wonderful creative outlet, a chance to unwind, and the immense pride of gifting or displaying something you’ve poured your effort and love into.
Gathering Your Crafting Essentials
One of the best aspects of this DIY display is that all the necessary supplies are readily available at common craft and hardware stores. You might even have some items lying around your workshop or garage! Sourcing your materials is the first exciting step. Let’s get your toolkit ready with everything you’ll need to bring this project to life:
Detailed Material List:
- Wood Ovals: You’ll start with some simple wood ovals that will form the sturdy base of your display. I found mine at Hobby Lobby for a mere $0.50 a piece, making them incredibly affordable. If ovals aren’t available, or if you prefer a different look, consider other flat wooden shapes like squares, circles, or even small rectangular plaques.
- Small Candlesticks: A bag of small wooden candlesticks is essential for creating the stand that elevates your display. I picked up a bag from Hobby Lobby for $2.99. These often come in multi-packs, making them an economical choice for this project. Look for simple, unadorned designs that can be easily painted to match your chosen aesthetic.
- E6000 Adhesive: This industrial-strength, clear-drying glue is perfect for securely attaching the wood and candlestick components. Its powerful, permanent bond ensures your display remains stable and durable over time. You could also use a strong wood glue or construction adhesive as an alternative.
- Large Wood Piece (2x8x8): This will serve as the main board for attaching your clips and displaying your items. I sourced a 2x8x8 piece of lumber from Lowe’s. Here’s a fantastic tip: if you don’t own a saw or prefer not to cut wood yourself, most major hardware stores like Home Depot or Lowe’s offer cutting services. You can simply ask them to cut your lumber into convenient 11-inch pieces right at the store – talk about easy and convenient! The exact dimensions can be adjusted based on how many clips you plan to use or the overall size you envision for your finished display.
- Decorative Scrollies: To add a touch of elegant detail, I used cute little wooden scrollies (my professional term for these charming embellishments!) from Hobby Lobby, priced at $1.99 for a package of two. These small wooden accents can instantly transform a simple piece of wood into something more ornate and visually appealing. Feel free to explore other decorative elements like small wood appliques, stencils, or even hand-painted designs.
- Finials: These decorative toppers add a refined, architectural finish to the top of your display. I discovered some fantastic finials at Lowe’s, available at $1.86 for a pair. I love using these on many of my projects because they instantly elevate the look of any piece, giving it a polished, custom feel. There’s a wide variety of shapes and sizes available, so choose ones that best complement your chosen style.
- Clips: The functional heart of your display! These will hold your photos, recipes, or memos. I found a pack of four clips at Walmart for $1.88. These can be simple spring clips, classic bulldog clips, or even decorative wooden clothespins – whatever best suits your style and securely holds your items.
- Gorilla Glue Epoxy: This two-part epoxy is excellent for attaching the metal clips to the wood, providing an incredibly strong and lasting bond that withstands regular use. It typically sets quickly, making your crafting process efficient.
- Spray Paint (Rust-Oleum Painter’s Touch): For finishing, I used Rust-Oleum Painter’s Touch. I recommend “Heirloom White” for a classic, soft, shabby chic look and “Canyon Black” for a bolder, more rustic statement. Choose colors that perfectly complement your home decor or the recipient’s style. Don’t be afraid to experiment with different finishes like matte, satin, or even metallic for a unique touch.
- Sanding Block: An essential tool for distressing the edges, giving your finished product that desirable “shanty,” weathered, or vintage look. Fine-grit sandpaper or a sanding sponge also works wonderfully for this technique.
Your Step-by-Step Guide to Crafting This Rustic Display
Now that you’ve gathered all your supplies, let’s get those creative juices flowing! Follow these straightforward steps to assemble your beautiful and functional clip frame display. Each step is designed to be clear and easy to follow, ensuring a successful crafting experience.
Step 1: Building the Sturdy Base
Begin by taking one of your wood ovals and a small candlestick. Apply a generous, even amount of E6000 adhesive to the top of the wood oval where you want the candlestick to sit. Carefully center the candlestick on the oval and press firmly. This forms the foundational base of your display. It’s crucial to allow this assembly sufficient time to dry completely. E6000 can take several hours to fully cure, so patience here will ensure a strong, stable base that can support the rest of your creation.
Step 2: Preparing the Main Display Board
Next, you’ll prepare the large wood piece that will serve as the primary board for holding your clips and displaying your chosen items. If you purchased a full 2x8x8 piece of lumber, you’ll need to cut it down. For these specific displays, I cut my wood into convenient 11-inch pieces. This size provides ample space for a few clips while remaining compact enough for various placements on shelves, desks, or mantels. As mentioned earlier, if you don’t have a saw or prefer not to cut the wood yourself, simply ask for this service at Home Depot or Lowe’s when you purchase the lumber. They can easily make these cuts for you, saving you time and effort.
Step 3: Adding Elegant Embellishments
Now for a touch of decorative flair! Take your cute wooden scrollies and your E6000 glue. Apply a small but sufficient amount of glue to the back of each scrollie and firmly press it onto the bottom edge of your 11-inch wood piece. This adds an immediate aesthetic upgrade. I experimented with two displays, positioning the scrollies in different directions to showcase how a simple change in orientation can alter the overall aesthetic and create unique variations. This step is where you can truly infuse your personal style; consider other small wooden cutouts, stencils, or even pyrography (wood burning) for truly unique designs.
Step 4: Uniting Base and Board
Once the glue holding the candlestick to the oval base is completely dry and cured, it’s time to attach the main display board. This connection is crucial for the overall stability of your display. Apply a generous amount of E6000 to the top of the candlestick. Carefully center the 11-inch wood piece on top of the candlestick, pressing down firmly to ensure good contact and a secure bond. Make sure it’s straight and level. Again, allow ample time for the glue to dry thoroughly before moving on to the next steps. You can use clamps or place heavy objects gently on top to hold it in place while drying, if necessary, to prevent shifting.
Step 5: Crown Your Creation with Finials
Finials add a sophisticated touch and elegantly complete the top of your display. I found these great finials at Lowe’s, and they’re a personal favorite for many of my projects due to their classic appeal and affordability. To make attaching them easier and ensure they sit perfectly straight without splitting the wood, I highly recommend drilling a small pilot hole into the top center of your main wood piece. While not strictly mandatory, this step significantly speeds up the process and ensures a cleaner finish. Once the pilot hole is drilled, apply a dab of E6000 or wood glue to the finial’s base and screw or press it firmly into place. Ensure it’s straight and allow it to dry completely.
Step 6: Attaching the Functional Clips
Now for the most functional part of your display: the clips! These are what will hold your cherished photos, beloved recipes, or important memos. I sourced my clips from Walmart, where they were an economical $1.88 for a pack of four. For maximum holding power and durability, I highly recommend using Gorilla Glue Epoxy. This two-part adhesive creates an incredibly strong, long-lasting bond, ideal for metal-to-wood applications. Mix the epoxy according to the package directions, apply a small amount to the back of each clip, and firmly press them into place on your main wood board. Consider spacing them evenly or arranging them creatively depending on what you plan to display. Allow the epoxy to fully cure, which usually takes much less time than E6000 but still requires patience for optimal strength.
Step 7: The Grand Finale: Painting and Distressing
Your display is now fully assembled and structurally sound, ready for its aesthetic transformation! Take your creations to a well-ventilated area, preferably outdoors or in a garage with open doors. I sprayed both of my displays with Rust-Oleum Painter’s Touch. For one, I used “Heirloom White” for a classic, soft, shabby chic look, and for the other, “Canyon Black” for a dramatic, bold rustic finish. Apply several thin, even coats of spray paint, allowing sufficient drying time between each application to prevent drips and ensure a smooth, professional-looking finish. Once the paint is completely dry to the touch, grab your sanding block. Gently “shanty” or distress the edges and any raised areas of the wood. This technique strategically exposes a bit of the natural wood or previous layers of paint, giving it that sought-after aged, farmhouse, or shabby chic character. Experiment with how much you sand to achieve your desired level of distress. The result is a beautifully unique piece with authentic charm!
Here’s how they turned out – simply stunning, offering both classic elegance and rustic charm!
Customization Ideas to Make It Truly Yours
While the rustic distressed look is undeniably charming, the true beauty of DIY lies in its potential for endless customization! Here are a few inspiring ideas to personalize your clip frame display, ensuring it perfectly matches your style or the recipient’s:
- Color Palette & Finish: Beyond Heirloom White and Canyon Black, consider vibrant blues for a coastal feel, soft pastels for a nursery, bold metallics like gold or copper for a touch of glamour, or even a natural wood stain to highlight the grain. Experiment with matte, satin, or glossy finishes.
- Decorative Flair: Instead of or in addition to scrollies, unleash your creativity! Try stenciling intricate patterns, adding small wooden cutouts of stars, hearts, or animals, attaching faux flowers or burlap accents for a true farmhouse vibe, or even incorporating metal charms or buttons.
- Size & Scale Variations: Don’t limit yourself to an 11-inch board. Experiment with different dimensions for your main wood piece. A longer board could accommodate more clips, creating a stunning gallery wall display, while a smaller, single-clip piece might be perfect for a desk, bookshelf, or as a unique place card holder.
- Clip Varieties: While the classic metal clips offer a timeless look, consider using decorative wooden clothespins (which you can also paint to match!), larger bulldog clips for chunkier items, or even magnetic strips if you embed small metal plates into the wood for a different display method.
- Thematic Displays: Create a holiday-themed display with festive colors and small ornaments, a birthday-themed one with party hat clips, or a kitchen-specific board for recipes with fruit-shaped embellishments. The possibilities are truly endless!
Budget-Friendly Crafting: Get More Bang for Your Buck!
I hope you love these displays as much as I do! They are not only fun and easy to make, but best of all, they are incredibly CHEAP! If you want to make these for just $5 a piece, you’ll find that crafting four of them at once is the most economical approach. Why? Because many of the supplies, like the small candlesticks, decorative scrollies, and packs of clips, come in bags or multi-packs. By dividing the initial cost of these multi-item packages across multiple projects, you significantly reduce the per-item expense. This smart purchasing strategy is fantastic for crafting thoughtful gifts for a group, decorating different rooms in your home, or even selling at craft fairs without overspending on materials.
The Perfect Gift for Any Occasion
These rustic clip frame displays are genuinely thoughtful and practical gifts for almost anyone on your list, showcasing that a handmade item truly comes from the heart. This year, I’ll be giving several to my kids’ teachers as a heartfelt thank you for their hard work and dedication throughout the year. They can use them to display student artwork, important notices, or even a cherished family photo at their desk, adding a personal touch to their classroom. My mom, who is also my wonderful neighbor, might just get one too – it’s a lovely way to show appreciation and enhance her home decor! They also make fantastic housewarming gifts, unique birthday presents, or a special way to celebrate a friendship or any festive occasion.
This project is perfectly timed for the upcoming holiday season, offering a unique opportunity to create personalized Christmas gifts that truly convey warmth and care. Imagine the delight on their faces when they receive a gift made especially for them!
A big thank you to Miss Kari for hosting and inspiring us!
This is just the first of three exciting photo display ideas I’ll be sharing with you this week! Stay tuned for more creative inspiration and simple DIY projects!
~Whitney