
Craft Your Own Personalized Wood Chargers: An Easy & Affordable DIY Guide
Welcome, fellow DIY enthusiasts! We’re thrilled to bring you another exciting project today – a simple yet elegant way to elevate your dining experience and add a personal touch to your home decor. If you’re looking for an affordable, customizable, and beginner-friendly woodworking project, you’ve come to the right place. These DIY personalized wood chargers are not just stunning; they’re incredibly versatile, perfect for holiday gatherings, everyday meals, or as thoughtful handmade gifts.
Transform Your Table with Custom Wood Chargers
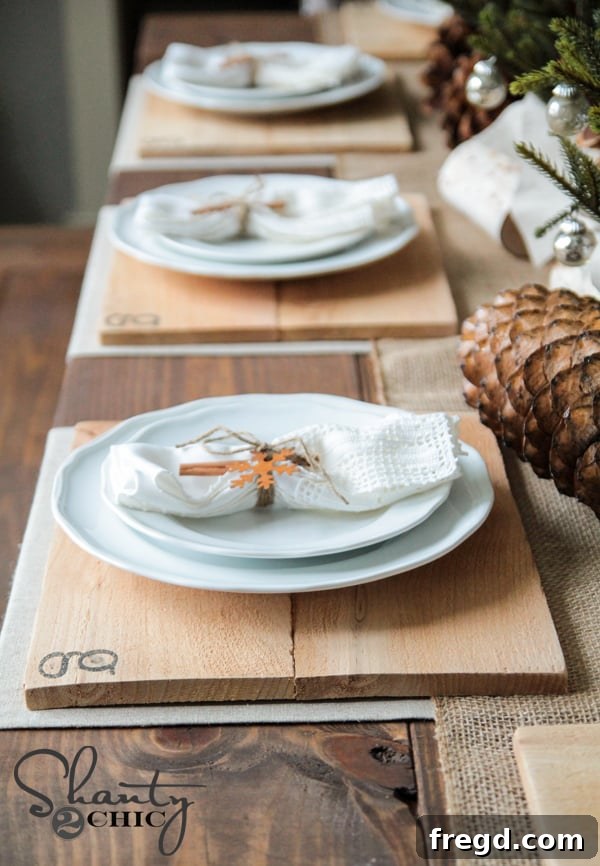
I absolutely adore how these rustic wood chargers turned out! I wanted to craft something special for my dining room that felt both festive for Christmas and chic enough to use throughout the year. The beauty of these chargers lies in their timeless appeal and the ability to customize them. Imagine a set of eight, each stamped with a unique initial, making an unforgettable housewarming or wedding gift. For less than $15, you can create a full set of these charming DIY wood chargers!
Each charger measures approximately 14 inches by 11.25 inches, providing ample space to elegantly frame your dinner plates. The natural grain of the cedar fence pickets brings an organic warmth to any table setting, complementing various decor styles from farmhouse to modern minimalist. Whether you’re hosting a grand dinner party or enjoying a casual family meal, these chargers will make every occasion feel a little more special. Plus, the satisfaction of saying “I made these!” is truly priceless.
Personalization: Make It Uniquely Yours
The customization aspect is what truly sets these chargers apart. I chose to personalize mine with a ‘G’ for my family’s last name, adding a touch of bespoke charm to my dining setup. However, the possibilities are endless! Imagine gifting a newlywed couple a set with their shared initial, or creating individual chargers for each family member with their own first initial. You could even use small symbols, holiday-themed stamps for seasonal decor, or abstract patterns to match your aesthetic. This simple step transforms a functional item into a cherished piece of personalized art.
The beauty of this project is its accessibility. These chargers are incredibly straightforward to make, proving that beautiful home decor doesn’t require advanced woodworking skills or a huge budget. In fact, if you’re just starting your DIY journey, this project is an excellent introduction to using a Kreg Jig – a tool I wholeheartedly recommend. It truly is one of the best tools for anyone looking to build simple, sturdy wood projects. Once you try it, you’ll wonder how you ever lived without one!
Your Essential Supply List for DIY Wood Chargers
Before diving into the building process, let’s gather all the necessary materials and tools. One of the best aspects of this project is that it requires only a few basic items, most of which are readily available at your local hardware or craft store. The cost-effectiveness is unbeatable, especially when considering the quality and personalized touch of the final product.
Materials:
- 3 – 5/8″ x 6″ x 8′ cedar fence pickets: These boards are fantastic for this project. Not only are they budget-friendly (around $3.50 per board), but cedar is also naturally resistant to rot and insects, making it durable for home decor. Its beautiful grain adds a rustic, natural charm to your chargers. These dimensions will provide enough material to create approximately 8 chargers with minimal waste.
- Wood Initial Stamp: Look for a clear, crisp stamp at your local craft store like Hobby Lobby, or online retailers. Choose a size that will be prominent but not overwhelming on your charger.
- Black Ink Pad: A good quality black pigment ink pad will ensure a sharp, long-lasting impression. Pigment inks are generally more opaque and fade-resistant than dye-based inks, making them ideal for wood surfaces.
- 1″ pocket hole screws: These specialized screws are designed to work perfectly with your Kreg Jig, creating strong, hidden joints.
- Wood glue (optional, but recommended as an alternative): If you don’t have a Kreg Jig, or prefer extra reinforcement, wood glue can be used in conjunction with clamps to join your boards.
Tools:
- Kreg Jig: This tool is a game-changer for woodworking beginners and experts alike. It creates strong pocket-hole joints quickly and efficiently, making assembly a breeze. While not strictly mandatory (wood glue is an alternative), it significantly simplifies the process and results in a more robust and professional finish.
- Miter Saw or Circular Saw: For making precise cuts to your cedar pickets. Safety first: always use appropriate safety gear and follow manufacturer instructions when operating power tools.
- Measuring Tape and Pencil: For accurate measurements before cutting.
- Cordless Drill: Essential for driving in pocket hole screws.
- Ryobi Corner Cat Sander (or any orbital sander/sanding block): For smoothing out rough edges and surfaces.
- Medium-grit sandpaper (e.g., 120-grit) and Fine-grit sandpaper (e.g., 220-grit): For a smooth, ready-to-finish surface.
Step-by-Step Guide to Crafting Your Wood Chargers
Let’s get started on bringing these beautiful chargers to life! The process is broken down into easily manageable steps, ensuring even novice woodworkers can achieve professional-looking results. Remember, patience and attention to detail are key to a successful DIY project.
Step 1: Making Precise Cuts
Accuracy in cutting is crucial for a seamless final product. Each wood charger will be constructed from two pieces of cedar picket. Start by carefully measuring and marking your boards.
For each charger, you will need two pieces of board, each cut at 14 inches long. Since you’re aiming for a set of eight chargers, you’ll need a total of sixteen 14-inch pieces. Take your time with this step, ensuring all cuts are straight and consistent. Using a miter saw will provide the cleanest and most accurate cuts, but a circular saw with a guide can also work effectively. Always double-check your measurements before making the final cut.
Step 2: Assembling Your Chargers with a Kreg Jig
Now comes the fun part: joining your wood pieces! As previously mentioned, the Kreg Jig is an invaluable tool for this step, creating strong and invisible joints. If you haven’t used one before, you’ll be amazed at how simple and effective it is.
To connect the two 14-inch pieces for each charger, you’ll use your Kreg Jig. First, set your Kreg Jig to the appropriate depth setting. Since our cedar boards are 5/8″ thick, you’ll want to use the smallest setting on your Kreg Jig. This ensures that the pocket holes are drilled correctly and the screws will create a flush, strong joint without poking through the front of the board.
Drill two 5/8″ pocket holes along one of the 14-inch boards. These holes should be strategically placed to ensure maximum stability and a secure connection. Typically, one hole near each end of the board works well. Once the pocket holes are drilled, align this board with a second 14-inch board. Apply a small amount of wood glue along the edge where the two boards meet (this step is optional but provides extra strength and helps prevent future separation). Then, using 1″ pocket hole screws, secure the two boards together with your cordless drill. Make sure the surfaces are flush as you drive in the screws to create a smooth, flat charger. The bottom of each finished charger will display these discreet pocket holes, while the top surface remains perfectly smooth for your personalized stamp.
If you don’t own a Kreg Jig, don’t worry! You can still achieve a sturdy connection using wood glue and clamps. Apply a generous bead of wood glue along the edge of one board, press the two boards together, and clamp them securely. Allow the glue to dry completely according to the manufacturer’s instructions, typically for at least 24 hours. While this method requires more drying time, it will still yield a beautiful and functional charger.
Step 3: Achieving a Smooth Finish
With the construction complete, it’s time to refine your chargers. A smooth finish not only feels good to the touch but also ensures your personalized stamp will adhere cleanly and evenly. Before adding your initial, sand the front, back, and all edges of each charger.
I used my Ryobi Corner Cat Sander for this, which quickly smoothed out any rough spots and softened the edges, giving the chargers a professional, finished look in just a few minutes per piece. If you don’t have a power sander, a simple sanding block and medium to fine-grit sandpaper will work just as well. Start with a medium-grit (around 120-grit) to remove any imperfections, then follow up with a fine-grit (around 220-grit) for a silky-smooth surface. Pay extra attention to the corners and edges to prevent splinters and give them a slightly rounded, more refined feel. Wipe away any dust with a clean cloth before moving to the next step.
Step 4: Adding Your Personal Touch
This is where your wood chargers truly become unique! The personalization step is quick, easy, and incredibly impactful. I opted for a black pigment ink pad and a charming wood stamp with my last initial, which I found for around $3 at Hobby Lobby – a fantastic deal for such a custom touch.
To apply your initial, simply dab your wood stamp onto the black pigment ink pad, ensuring an even coating of ink. Then, carefully position the stamp on the bottom portion of each charger and press down firmly and evenly. Hold it for a few seconds to allow the ink to transfer cleanly to the wood. Lift the stamp straight up to avoid smudging. Practice on a scrap piece of wood first if you’re nervous, and remember that slight imperfections can add to the rustic, handmade charm. The black ink provides a striking contrast against the natural cedar, making your initial pop beautifully.
And just like that, your personalized wood chargers are complete! You’ve successfully crafted a beautiful, functional, and custom piece of home decor with your own hands.
Displaying Your Beautiful New Chargers
Once your ink has dried, it’s time to set your table and admire your handiwork! These wood chargers instantly elevate any tablescape, adding warmth, texture, and a personalized touch that store-bought items simply can’t replicate. I absolutely love seeing them dressed up on my dining table, ready for guests or a quiet meal at home.
These chargers are not only incredibly fun to make but also astonishingly budget-friendly. Creating an entire set for under $15 makes this project even more satisfying and makes them a perfect option for inexpensive, high-impact home improvements or gift-giving. The natural beauty of the wood, combined with the personal touch of an initial, ensures these chargers will be a conversation starter at any meal.
Beyond the Basics: Customization & Care Tips
While the simple stamped initial provides a classic, rustic look, don’t feel limited! You can further customize your wood chargers to match any decor style:
- Stain or Paint: For a different look, consider staining your chargers before stamping to enhance the wood grain, or paint them in a color that complements your dining room. Make sure to choose wood-safe stains or paints.
- Sealing: To protect your chargers from spills and wear, especially if using them regularly, apply a food-safe wood sealant or a clear coat of polyurethane. This will increase their longevity and make them easier to clean. Always ensure the ink has dried completely before sealing.
- Other Embellishments: Instead of stamping, you could try wood burning, stenciling, or even painting intricate designs for a truly unique look.
- Seasonal Themes: Swap out the initial for holiday-themed stamps (like snowflakes, hearts, or pumpkins) to easily adapt your chargers for different seasons and celebrations.
To care for your wood chargers, simply wipe them clean with a damp cloth after use. Avoid submerging them in water or using harsh chemicals, which can damage the wood and the ink. With proper care, these beautiful pieces will grace your table for years to come.
Share Your Creations & Explore More DIY Inspiration!
We absolutely love seeing what you create! If you’ve been inspired to make your own personalized wood chargers, please share your photos with us. Don’t forget to pin this project to your Pinterest boards so others can discover this fantastic DIY idea too!
This project is part of our special “12 Days of Christmas” series, where we share a new DIY craft or home decor idea each day. Make sure to follow us on Instagram to keep up with all our latest projects and behind-the-scenes fun! We’re constantly sharing tips, tricks, and inspiration for making your home beautiful on a budget.
Also, be sure to check out the other incredible 12 Days of Christmas posts from our talented friends in the DIY community:
Catch Up on Our Previous “12 Days of Christmas” Projects:
Day 1 – DIY Blanket Ladder
Day 2 – DIY Bow Picture Frame
Day 3 – DIY Stocking Holders
Day 6 – DIY Wood Tray
Thanks for joining us on this creative journey! Happy crafting!
~Whitney