Build Your Own Stylish 4-Door Media Console: The Ultimate DIY Guide
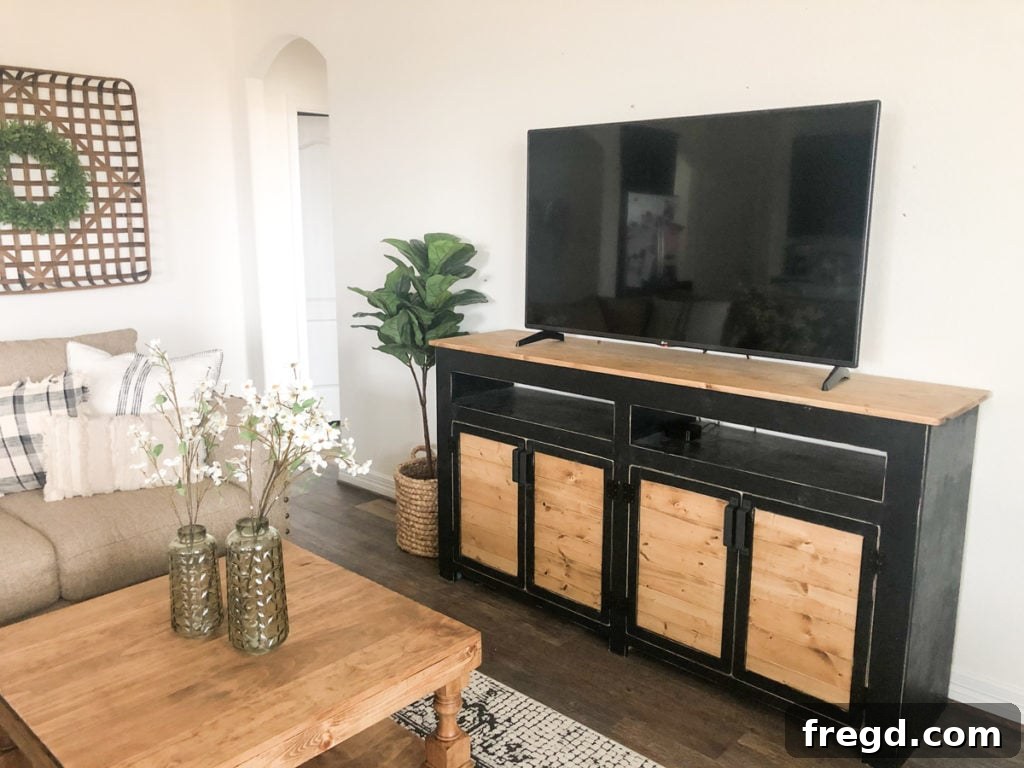
Are you tired of clutter around your television? Do you dream of a sleek, organized space for your entertainment components? Look no further! We recently embarked on a fantastic woodworking project, transforming a relative’s living room with a custom-built piece of furniture – a gorgeous and highly functional 4-door media console. This isn’t just any TV stand; its versatile design means it can seamlessly fit into various rooms, from a cozy living area to a spacious dining room, serving as a buffet or storage cabinet. The joy of crafting something beautiful and practical with your own hands is truly rewarding, and we’re thrilled to share how you can recreate this stunning DIY 4-door media console yourself!
A well-designed media console is more than just a place to put your TV. It’s a central hub for your home entertainment, offering ample storage for media devices, gaming consoles, movies, and even decorative items. Our design focuses on clean lines and a modern aesthetic, ensuring it complements contemporary interior styles while providing robust functionality. Imagine having all your cables neatly tucked away, remote controls easily accessible, and your living space feeling effortlessly tidy. This project is perfect for intermediate DIYers looking to elevate their woodworking skills and create a piece that looks custom-made for their home.
Before diving into the build, we highly recommend getting your hands on the detailed plans. They provide precise measurements and cut lists, making the entire process smoother and more efficient. Having these plans ensures you have all the information you need right at your fingertips, helping you avoid mistakes and achieve professional-looking results.
Click HERE to get the free plans!
Essential Tools and Materials for Your DIY Media Console
Embarking on a woodworking project requires the right tools and materials. For this media console, you’ll primarily be working with plywood and solid pine/whitewood boards, utilizing pocket hole joinery for strong, hidden connections. Safety should always be your top priority, so ensure you have appropriate personal protective equipment (PPE) like safety glasses, hearing protection, and gloves.
Recommended Tool List:
- Circular Saw or Table Saw: For making precise, straight cuts in plywood and boards.
- Miter Saw: Ideal for accurate cross-cuts on your face frame pieces.
- Pocket Hole Jig (e.g., Kreg Jig): Essential for creating strong, concealed joints.
- Drill/Driver: For pilot holes, driving screws, and assembling.
- Brad Nailer or Finish Nailer: For attaching the face frame, back panel, and decorative trim.
- Wood Glue: For reinforcing all joints.
- Clamps: Various sizes to hold pieces securely while glue dries and screws are driven.
- Tape Measure, Pencil, and Speed Square: For accurate marking and ensuring squareness.
- Orbital Sander and Sandpaper (various grits): For preparing surfaces for finishing.
- Safety Glasses, Hearing Protection, and Dust Mask.
Material List:
- 1x4x8 Pine or Whitewood Board (1 piece)
- 1x4x6 Pine or Whitewood Board (1 piece)
- 1x3x6 Pine or Whitewood Board (1 piece)
- 1x2x6 Pine or Whitewood Boards (3 pieces)
- 1x2x4 Pine or Whitewood Boards (5 pieces)
- 3/4″ thick Hardwood Plywood Panels (2 pieces, 48″ x 96″) – for the main body and shelves.
- 1/2″ thick MDF (1 piece, 24″ x 48″) – for door panels.
- 1/2″ thick MDF (1 piece, 24″ x 24″) – for additional door panels or trim. (Alternatively, you can use more 3/4″ hardwood plywood for doors if preferred.)
- 3/4″ thick Laminated Project Panel (1 piece, 18″ x 72″) – for the console top.
- 1/4″ thick Hardwood Plywood Sheet – for the back panel.
- 1.25″ Pocket Hole Screws
- 1.25″ Brad Nails or Finish Nails
- 1″ Staples or Brad Nails
- Wood Glue
- Door Hinges (8 total for 4 doors)
- Cabinet Pulls/Knobs (4 total for 4 doors)
- Paint and/or Wood Stain
- Optional: Barnwood planks for door accents.
When selecting your plywood, look for hardwood varieties like oak, birch, or maple plywood for greater durability and a smoother finish. For the face frame, pine or whitewood boards are economical and take paint or stain well. Consider having your hardware store rip the large plywood sheets into more manageable 16-inch strips. This not only makes them easier to transport home but also simplifies subsequent cross-cuts, especially if you’re working with a circular saw.
Step-by-Step Construction: Building Your Media Console
1. Constructing the Console Body
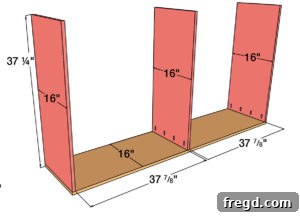
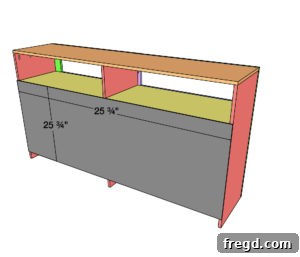
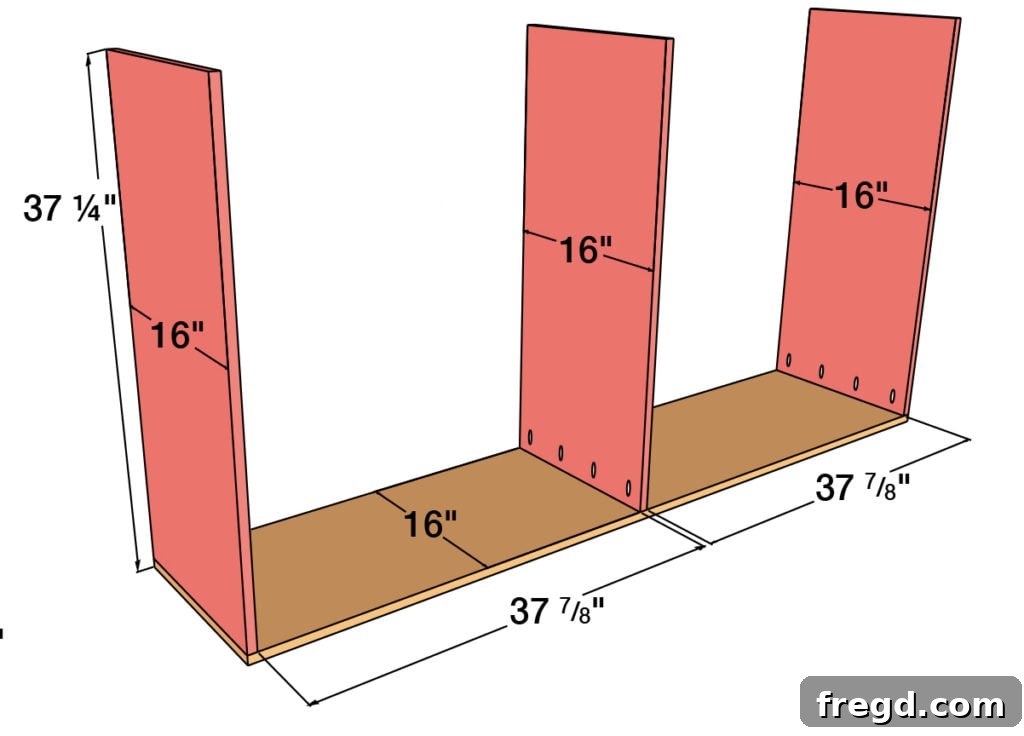
The foundation of your media console is built from 3/4” hardwood plywood. Begin by cutting your plywood pieces according to the provided plans. This includes the bottom horizontal panel and the three vertical divider panels. Precision is key here; take your time to ensure all cuts are straight and accurate. Any inaccuracies now will compound as you progress.
Using your pocket hole jig, drill 3/4” pocket holes along the edges of the vertical panels that will connect to the bottom horizontal panel. It’s crucial to orient these pocket holes correctly: on the two outside vertical panels, ensure the pocket holes are facing inwards. This strategic placement means they will be completely concealed within the cabinet once assembled, creating a clean, professional look. Apply a generous bead of wood glue to the mating edges before securing the vertical panels to the longer horizontal panel with 1.25” pocket hole screws. Use clamps to hold the pieces firmly in place while you drive the screws, ensuring a tight and square connection.
2. Installing the Interior Shelving
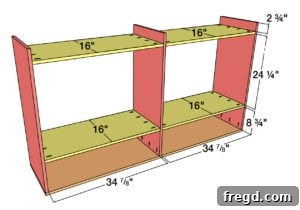
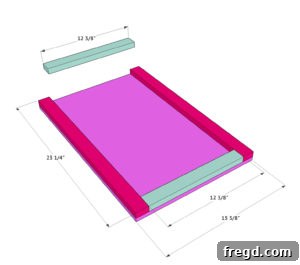
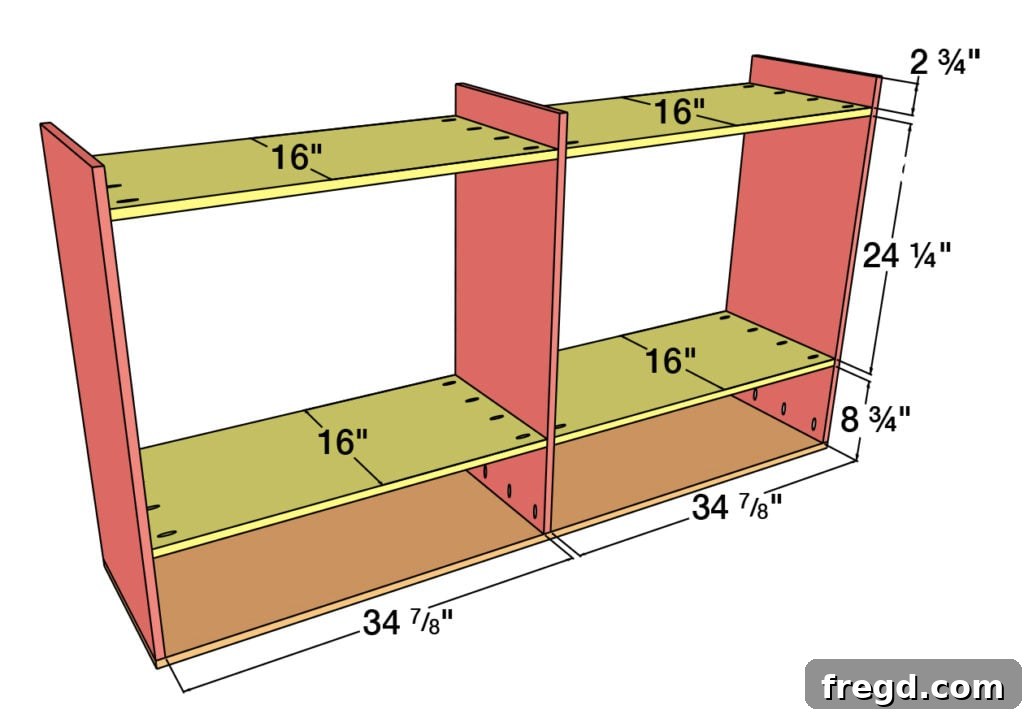
Once the main body framework is solid, it’s time to add the interior shelves. These shelves provide essential storage and divide the console into functional compartments. Cut all shelf pieces to equal lengths as specified in the plans. Accuracy here is vital, not just for aesthetics but also to ensure proper alignment for the doors that will be attached later. If your shelves are not level and square, your doors may not hang correctly or close smoothly.
Drill 3/4” pocket holes on the underside of each shelf piece. When you attach these shelves, the pocket holes should be facing upwards, which will become the bottom side of the shelf once the cabinet is standing upright. This method ensures the pocket holes are hidden from view when looking into the cabinet. Apply wood glue along the edges where the shelves meet the vertical dividers and secure them with 1.25” pocket hole screws. Use a level and a square to verify that each shelf is perfectly horizontal and perpendicular to the vertical panels before tightening the screws. This precision will pay dividends in the final look and functionality of your console.
3. Crafting and Attaching the Face Frame
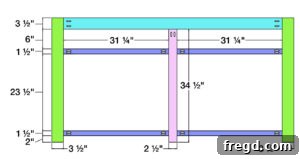
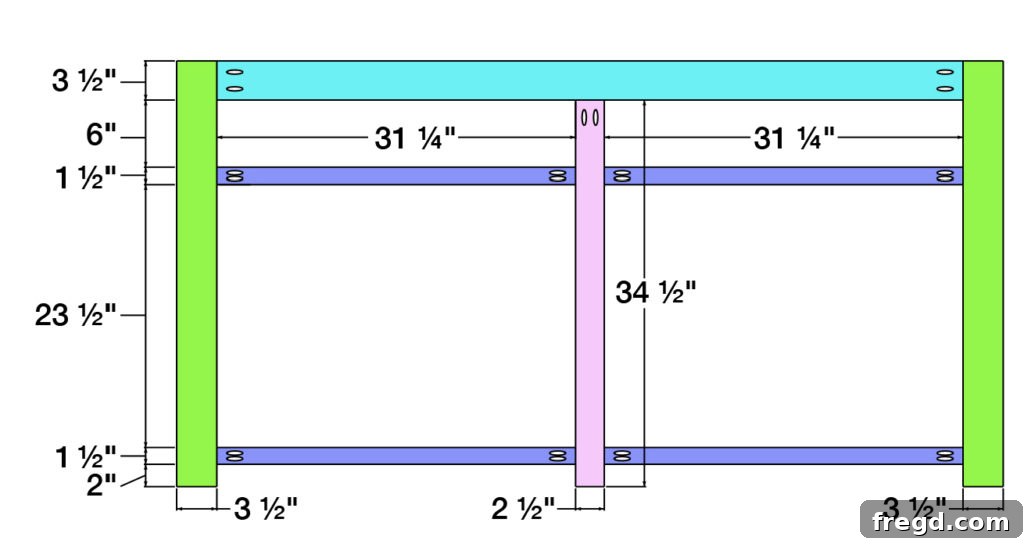
The face frame is a critical component that adds structural integrity, provides a finished look, and serves as the mounting point for your doors. It’s typically built from solid wood boards, such as whitewood or pine, which are easy to work with and accept various finishes. Cut all the horizontal and vertical pieces for your face frame according to the plans. Ensure these cuts are extremely precise, as the face frame is often the most visible part of a cabinet.
Assemble the face frame by drilling 3/4” pocket holes on the back side of the horizontal pieces, where they will join the vertical pieces. These pocket holes should all face upwards, which will be the back of the assembled face frame, making them completely hidden once the frame is attached to the console body. Apply wood glue to all mating surfaces before joining the pieces with 1.25” pocket hole screws. Pay close attention to achieving perfectly flush joints and square corners. Any gaps or misalignments here will be very noticeable in the finished product.
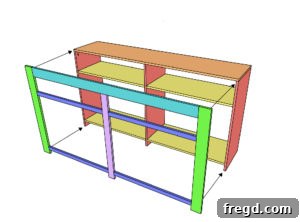
With the face frame assembled, it’s time to attach it to the main console body. This step significantly strengthens the entire structure and defines the openings for your doors. Apply a thin, even layer of wood glue to the front edges of the console body where the face frame will sit. Carefully align the face frame, ensuring it is perfectly centered and flush with the console’s edges. Secure it in place using 1.25” brad nails or finish nails. Drive these nails through the face frame and into the plywood body of the cabinet. Start by tacking it in a few spots to hold it, then add more nails every 6-8 inches for a robust connection. The combination of wood glue and nails provides excellent strength and prevents the face frame from shifting over time. This process also ensures that any previously exposed pocket holes on the main cabinet body are now concealed behind the face frame, maintaining the clean aesthetic.
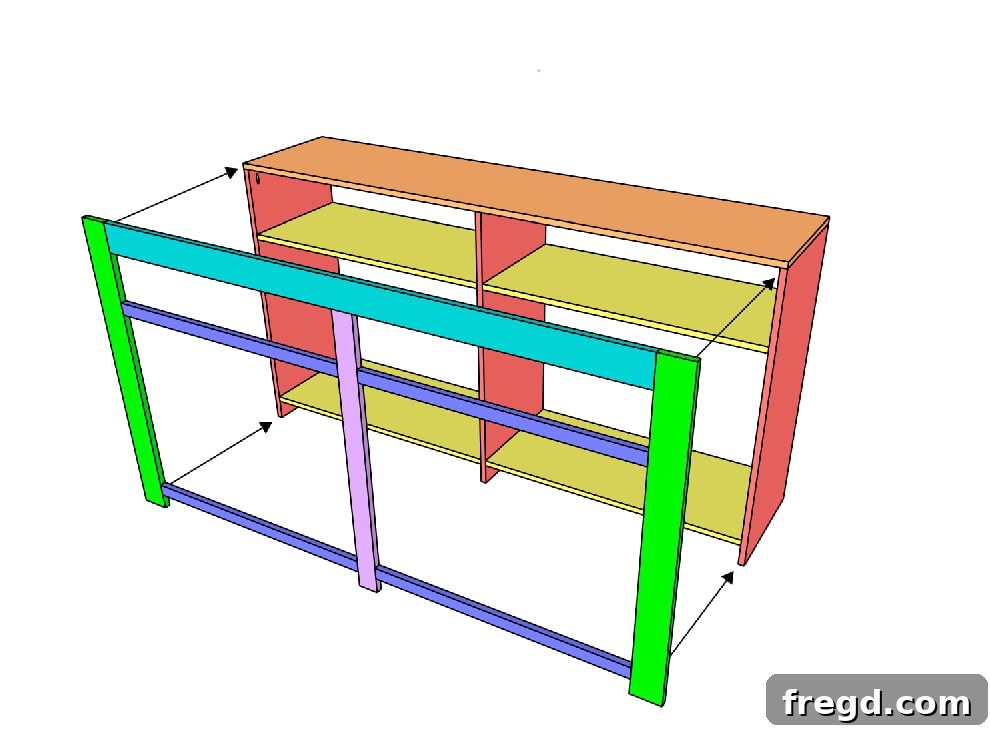
4. Installing the Back Panel
Adding a back panel to your media console serves several important purposes: it significantly enhances the rigidity of the cabinet, prevents dust from accumulating inside, and provides a finished look. For this project, we recommend using a 1/4” thick sheet of hardwood plywood. You can often have your hardware store cut this to the exact dimensions specified in your plans, saving you time and ensuring a perfectly square piece.
Before attaching, consider cutting out openings for cable management in the back panel. These can be simple circular holes or larger rectangular cutouts behind where your media devices will sit, allowing for easy routing of power cords and HDMI cables. Once any cable holes are made, apply wood glue to the back edges of the console body. Carefully position the 1/4” plywood panel, ensuring it is flush with all edges. Secure it with 1” staples or brad nails, spacing them approximately every 4-6 inches around the perimeter and along the vertical dividers. This creates a strong, enclosed structure for your media components.
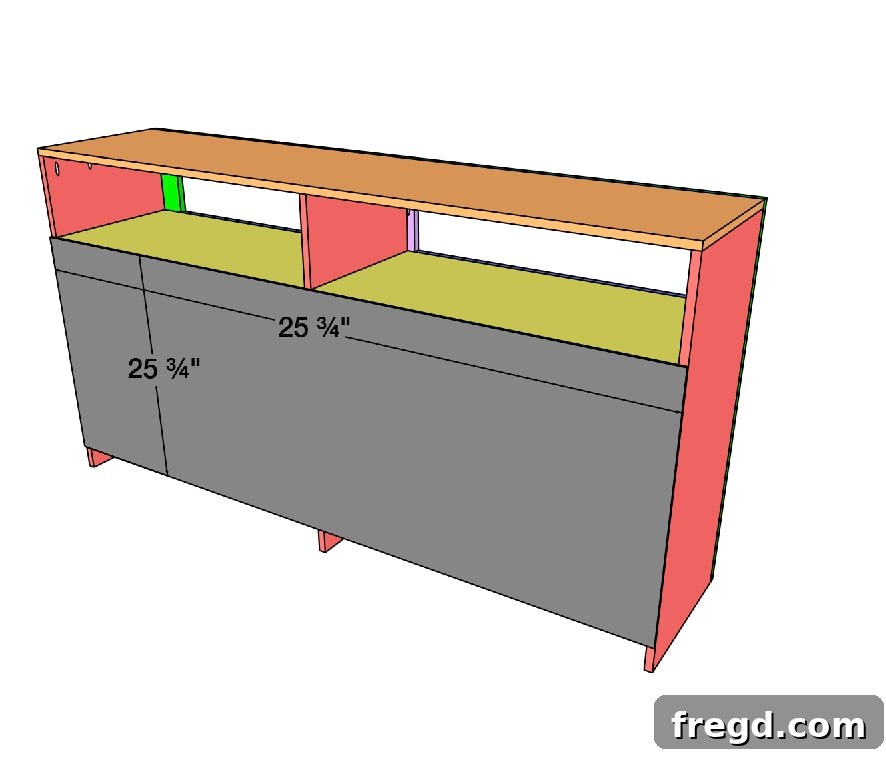
5. Building and Customizing the Doors
The doors are where your media console truly comes to life and where you can infuse a lot of personal style. You will build four identical doors for this cabinet. The core of each door is made from 1/2” MDF (Medium Density Fiberboard), chosen for its smooth surface and stability, which makes it ideal for painting. However, you could also use hardwood plywood for a natural wood grain look if you prefer to stain them.
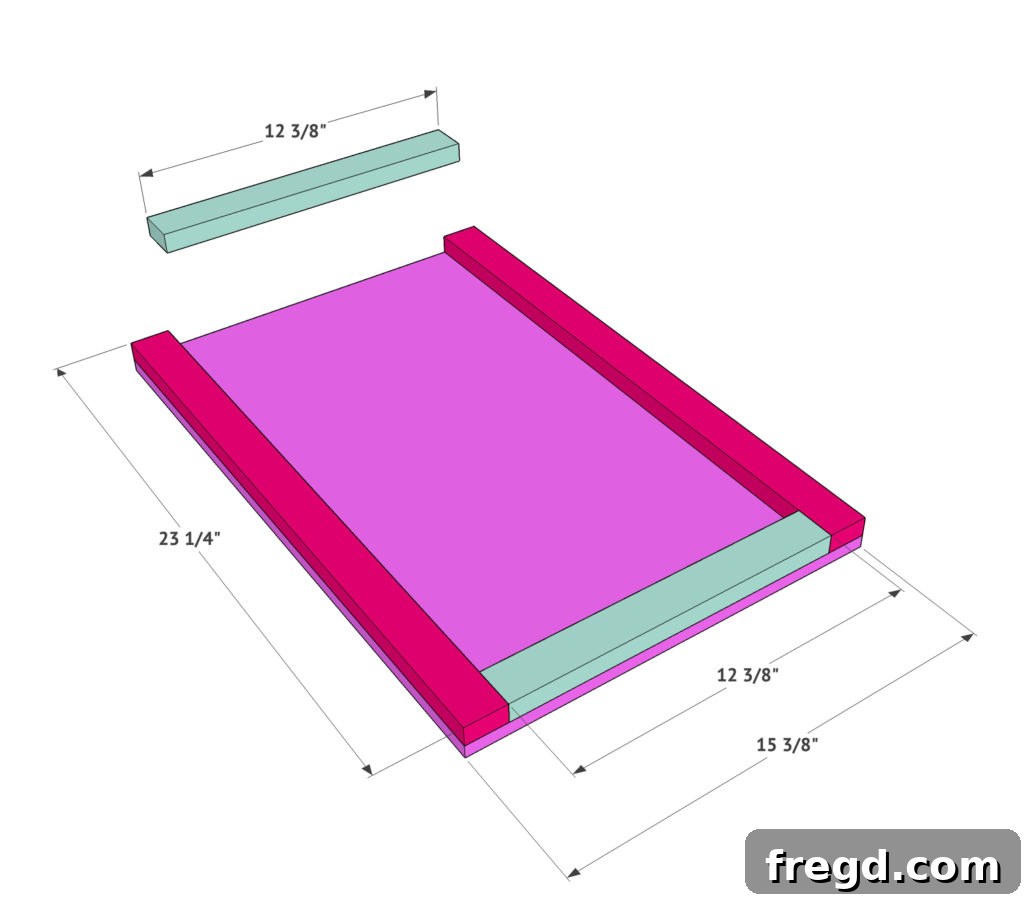
Cut the main door panels from the 1/2″ MDF. Next, cut the trim pieces that will frame the edges of each door panel, creating a classic shaker-style look. Apply wood glue to the back of each trim piece and carefully align them along the edges of the MDF panel. Secure them with 1.25” brad nails, ensuring the nails are driven straight to avoid splitting the MDF. Repeat this process for all four doors, striving for consistency in their construction. Once assembled, fill any nail holes with wood putty and sand smooth.
This is the exciting part where you can truly make the cabinet your own! For our project, we chose to add decorative barnwood planks to the center of each door for a rustic, textured look. You could paint the doors a bold color, stain them to match other furniture, or even rout a custom design into the MDF. Experiment with different finishes and styles to create a piece that perfectly matches your home decor.
6. Attaching the Console Top
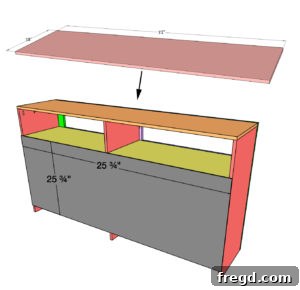
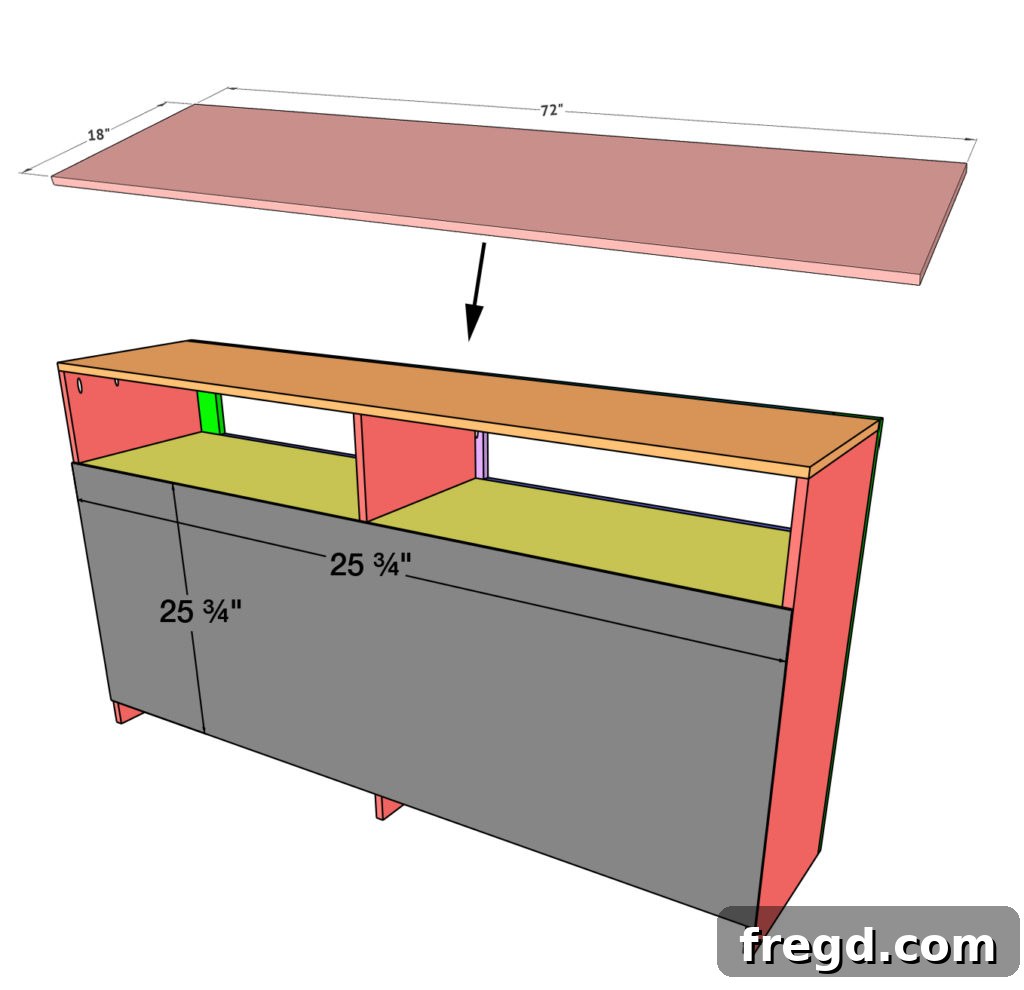
The top panel ties the entire media console together, providing a sturdy surface and completing the cabinet’s aesthetic. For this project, we used a 3/4” thick laminated project panel, chosen for its smooth surface and durability. If you plan to stain this panel, it is highly recommended to do so before attaching it to the console body. This prevents stain from accidentally bleeding onto your painted cabinet and allows for a cleaner finish, especially if you’re using contrasting paint and stain.
Once the finish on the top panel is dry, carefully center it on the top of the console body. Take measurements to ensure there is an equal overhang on all sides (front, back, and sides). Apply a strong bead of wood glue to the top edges of the console frame, then carefully lower the project panel into place. Secure it using 1.25” brad nails driven through the top panel and into the console’s top frame. Spacing the nails evenly (every 6-8 inches) will ensure a secure and long-lasting attachment. After the glue dries, you can fill any nail holes with wood putty and lightly sand for a flawless top surface.
Finishing Touches and Hardware Installation
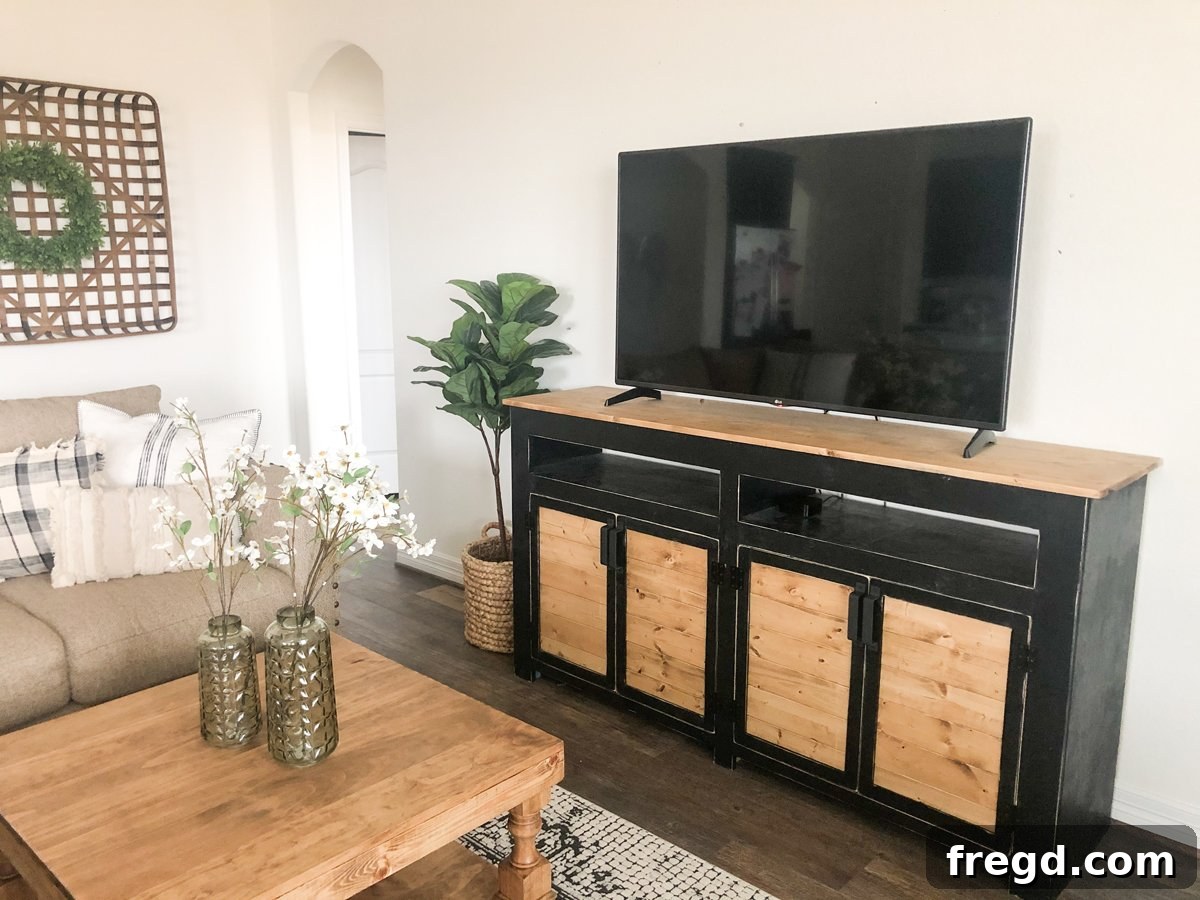
With the construction complete, it’s time for the finishing touches that will transform your raw woodworking project into a piece of elegant furniture. For our sister’s console, we opted for a sophisticated two-tone finish. The main body was painted a rich Tricorn Black by Sherwin-Williams, a timeless color that offers a modern, chic appeal. The barnwood planks on the doors and the top project panel were stained with Golden Oak Stain by Varathane, providing a beautiful contrast and highlighting the natural wood grain.
Once your paint and stain have thoroughly dried, it’s time to install the hardware. This includes attaching the hinges to all four doors and then mounting the doors to the console’s face frame. Precision in hinge installation is key to ensuring the doors hang straight, open smoothly, and close properly without binding. Adjust the hinges as needed to achieve perfect alignment. Finally, attach your chosen cabinet pulls or knobs to each door. These small details can have a huge impact on the overall look and feel of your custom media console.
You can find direct links to the specific hardware we used for this project, including the stylish metal pulls and durable door hinges. These links will help you source high-quality components that will stand the test of time and enhance your console’s design.
You can find a link to the metal pulls HERE!
You can find a link to the door hinges HERE!
For those interested in adding the barnwood plank detail to their doors, you can find the wood planks we used HERE!
Your Custom DIY 4-Door Media Console Awaits!
Congratulations! You’ve successfully built a beautiful and functional 4-door media console that rivals store-bought furniture, often at a fraction of the cost. This project not only provides a fantastic storage solution for your living room or any other space in your home but also leaves you with the immense satisfaction of having created something with your own hands. The customizability of this design allows you to tailor it perfectly to your aesthetic preferences, whether you prefer a modern, farmhouse, or traditional look.
This versatile console is more than just a place for your TV; it’s a statement piece, an organization hub, and a testament to your DIY spirit. Remember to check out the detailed plans and material list one last time to ensure you haven’t missed any details. We encourage you to share your finished projects with us and inspire others in the DIY community. Happy building!
Supply List
- 1 (1x4x8) Pine or Whitewood Board
- 1 (1x4x6) Pine or Whitewood Board
- 1 (1x3x6) Pine or Whitewood Board
- 3 (1x2x6) Pine or Whitewood Boards
- 5 (1x2x4) Pine or Whitewood Boards
- 2 (3/4″ thick) Hardwood Plywood Panels (48″ x 96″)
- 1 (1/2″ thick) MDF (24″ x 48″)
- 1 (1/2″ thick) MDF (24″ x 24″)
- 1 (3/4″ thick) Laminated Project Panel (18″ x 72″)
- 1/4″ thick Hardwood Plywood Sheet (for back panel)
- 1.25″ Pocket Hole Screws
- 1.25″ Brad or Finish Nails
- 1″ Staples or Brad Nails
- Wood Glue
- Door Hinges (8 total)
- Cabinet Pulls (4 total)
- Paint and/or Wood Stain
Instructions
-
The main body of this console is constructed using 3/4” hardwood plywood. For easier transport and handling, you can ask the hardware store to rip the large sheets into 16” wide strips. At home, you will make your shorter cross cuts. Attach the three vertical divider panels to the longer bottom horizontal panel using wood glue for strength and 1.25” pocket hole screws. Ensure that the 3/4” pocket holes are strategically placed on the inside faces of the two outer vertical panels, so they will be completely hidden from view once the console is finished.

-
Next, proceed to attach the shelf pieces within the console’s body. All these shelves should be cut to equal lengths as per the plans. It is crucial to line them up precisely and attach them perfectly square. This meticulous alignment is essential for ensuring that the doors will fit and operate correctly in a later assembly step. Secure each shelf using a combination of wood glue and 1.25” pocket hole screws, driven through 3/4” pocket holes on each piece. Make sure to orient the pocket holes so they are facing upwards; this way, they will be positioned on the bottom side of the cabinet’s shelves once the console is standing upright, effectively hiding them from view.
-
Now, construct the face frame for the cabinet. This frame is typically made from whitewood or pine boards, cut accurately to the specified dimensions. Attach each piece of the face frame together using wood glue for robust joints and 1.25” pocket hole screws, driven through 3/4” pocket holes. All pocket holes should be positioned to face upwards. This orientation means they will be on the back side of the face frame and will be completely concealed once the face frame is securely attached to the main console body, ensuring a clean and finished appearance.
-
Once the face frame is assembled, attach it to the console body. Apply wood glue to the front edges of the console where the face frame will sit. Secure the face frame firmly using 1.25” brad or finish nails, driving them through the face frame and into the plywood body of the cabinet. This connection not only adds structural integrity but also serves to hide any exposed pocket holes from the main cabinet assembly, creating a polished, professional finish.
-
Next, install the back panel of the media console. This panel should be a 1/4” thick sheet of hardwood plywood, cut to size. You can often have the hardware store make this cut for you to ensure accuracy. Apply wood glue to the back edges of the console body and carefully position the plywood panel. Attach it securely to the back and bottom edges of the cabinet using 1” staples or brad nails. This step adds rigidity to the console and encloses the back of the storage compartments.
-
Now, build the four identical doors for your cabinet. The primary material for the door panels is 1/2” MDF (Medium Density Fiberboard), though hardwood plywood can also be used if preferred. Cut the main door panels and then cut the trim pieces that will be attached to the edges of each panel, creating a decorative frame. Apply wood glue to the back of each trim piece and secure them to the door panel using 1.25” brad nails. This is your opportunity to personalize the look; you can paint the doors, add decorative elements like barnwood planks (as we did), or stain them to your desired finish.
-
Finally, attach the top project panel to the console. Carefully center this panel on the top surface of the console, ensuring an even overhang on all sides. Secure it using wood glue and 1.25” brad nails, driving the nails through the project panel and into the top frame of the console. If you intend to stain this panel, it is highly recommended to complete the staining process and allow it to dry thoroughly before attaching it to the cabinet, to prevent any stain bleed and ensure a clean finish.
-
For our project, we painted the console’s body with Tricorn Black by Sherwin-Williams and stained the barnwood planks and the top project panel using Golden Oak Stain by Varathane. After allowing all paint and stain to fully cure, proceed to attach all four doors using the chosen hardware (hinges and pulls). Ensure proper alignment and smooth operation of each door. Refer to our website for specific information and links to where you can find the stylish hardware used in this build.