
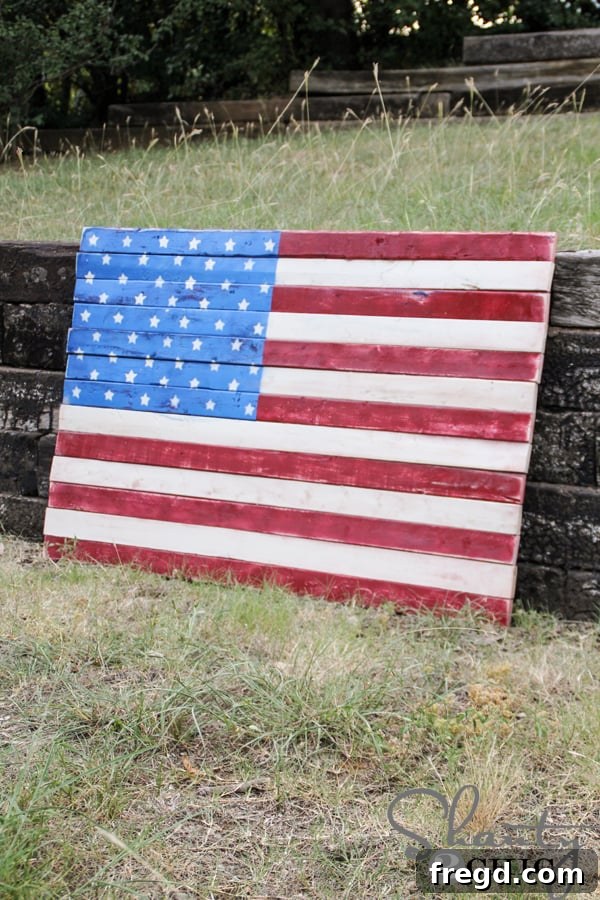
Happy Monday, fellow DIY enthusiasts! As the Fourth of July approaches, bringing with it a vibrant celebration of American spirit and freedom, there’s no better time to infuse your home with a touch of patriotic charm. That urge to create something meaningful, something that truly embodies the essence of this beloved holiday, led us to craft a project that we know you’ll adore: a stunning DIY Pallet American Flag. It’s more than just a decoration; it’s a heartfelt statement, a rustic tribute to the stars and stripes that stands out with its unique, handmade appeal.
We absolutely love how this Rustic Wood Flag turned out! Initially designed to elevate our outdoor 4th of July decor, its versatile appeal quickly became apparent. Imagine it gracing a child’s bedroom, adding character to a cozy study, or bringing a patriotic touch to a lively game room. Its distressed finish and reclaimed wood aesthetic blend seamlessly with various decor styles, from modern farmhouse to industrial chic. This project isn’t just for one holiday; it’s a timeless piece that you can proudly display year-round, celebrating American heritage every day.
What makes this DIY Pallet Flag project even better? It’s incredibly straightforward to build and remarkably inexpensive, costing roughly between $10 and $15 for materials. You can construct your very own beautiful patriotic display in about an hour, making it an ideal weekend craft or a quick afternoon endeavor. Forget complicated instructions or expensive tools; this guide is designed for everyone, from seasoned crafters to those just dipping their toes into the world of DIY wood projects. Let’s gather our supplies and get ready to create something truly special!
Essential Materials & Tools for Your DIY Pallet Flag Project
Before we dive into the creative process, it’s crucial to have all your materials and tools ready. This ensures a smooth and efficient build, allowing you to focus on the joy of creation. Here’s a comprehensive list of what you’ll need to make your own stunning Pallet Flag:
- Wood: 7 – 1×3 furring strips, each 8 feet long. These form the main body of your flag.
- Wood Scraps for Backing: 2 – 1×4 furring strip scraps, cut to 32 inches. These will secure your flag boards together from the back.
- Cutting Tool: A miter saw is ideal for precise, straight cuts. If you don’t own one, a miter box with a hand saw is an excellent, budget-friendly alternative for this project.
- Nailer: A brad nailer (cordless or pneumatic) is highly recommended for securely attaching the backing strips. Alternatively, a hammer and small finishing nails can be used.
- Paints:
- Colonial Red spray paint or acrylic paint (enough for 7 boards).
- Heirloom White spray paint or acrylic paint (enough for 6 boards).
- Brilliant Blue spray paint or acrylic paint (for the union field).
- White acrylic craft paint (for the stars).
- Painter’s Tape: For creating clean lines when painting the blue field.
- Star Stencil: You can purchase a star stencil or easily create your own from foam stars (like those found at craft stores) traced onto cardboard.
- Paint Brushes: Various sizes, including a small, firm brush for dry-brushing the stars.
- Distressing Tool: A Corner Cat tool for achieving a weathered look. Sandpaper (medium to fine grit) can also work effectively.
- Protective Finish: Spar Varnish (satin finish recommended), especially if your flag will be displayed outdoors.
- Measuring Tape and Pencil: For accurate measurements and marking cuts.
- Safety Glasses: Always wear appropriate safety gear when working with tools.
Step-by-Step Guide to Crafting Your Patriotic Pallet Flag
Step 1: Gathering and Cutting Your Wood
The foundation of your DIY American Flag Pallet begins with careful wood selection and precise cuts. Start by purchasing seven 1×3 furring strips, each measuring 8 feet in length. Furring strips are an excellent choice for this project due to their affordability and rustic appearance, perfect for achieving that desired weathered look. Take a moment to inspect each strip for any significant warping or damage before purchasing. While minor imperfections can add character, you want to ensure the wood is structurally sound for easy assembly.
Next, it’s time to make your cuts. From the 1×3 furring strips, you will need to cut 13 pieces, each precisely 47 inches long. This measurement is key to achieving the classic proportions of the American flag. We used a miter saw for these cuts, which allows for quick, accurate, and consistent results. If you’re new to woodworking or don’t own a power saw, don’t fret! A miter box and a hand saw are perfectly capable tools for this project, especially given the relatively thin profile of the furring strips. A miter box provides guides for straight and angled cuts, ensuring your pieces are uniform. Always remember to prioritize safety when operating any cutting tool; wear safety glasses and keep your hands clear of the blade.
After all 13 boards are cut, you’re ready for the next exciting phase: bringing the flag’s iconic colors to life. Take a moment to admire your neatly cut pieces; this careful preparation sets the stage for a professional-looking finish.
Step 2: Painting the Iconic Stripes
With your wood boards cut to size, it’s time to add the vibrant red and crisp white stripes that are synonymous with the American flag. This step is where your patriotic vision truly begins to take shape. For the red stripes, we selected “Colonial Red,” a rich and classic hue that provides excellent coverage and a timeless feel. You will need to paint seven of your 47-inch boards with this beautiful red. Lay them out in a well-ventilated area, and apply thin, even coats of paint. Two coats usually provide optimal coverage, ensuring a deep and consistent color.
For the white stripes, we opted for “Heirloom White,” a soft, slightly off-white shade that beautifully complements the Colonial Red and contributes to the rustic, vintage feel of the pallet flag. You will paint the remaining six boards with this color. Similar to the red, apply two thin coats for thorough coverage, allowing adequate drying time between each coat to prevent tackiness or smudges. Ensuring a smooth finish on these boards is important, as they will form the face of your flag.
Allow all painted boards to dry completely according to the paint manufacturer’s instructions. Patience here will pay off with a durable and beautiful finish. Once dry, you’ll have a stack of perfectly colored boards, ready to be assembled into your DIY American Flag masterpiece.
Step 3: Assembling the Flag Base
Once your painted boards are thoroughly dry, it’s time for the exciting step of assembling them into the flag’s familiar striped pattern. Begin by flipping the boards over so their unpainted backs are facing up. Carefully arrange them in an alternating pattern of red and white stripes. It’s crucial to ensure that you start with a red stripe at the very top and end with a red stripe at the very bottom, creating the traditional sequence of 7 red and 6 white stripes for a total of 13. Align the boards snugly next to each other, ensuring they are even at both ends to form a clean rectangular shape.
To secure these individual stripes into a single, cohesive flag, you’ll use your two 1×4 furring strip scraps, which you cut down to 32 inches earlier. These pieces will act as sturdy backing braces. Position one 1×4 strip approximately 4-6 inches down from the top edge of your assembled flag boards, running horizontally across all 13 stripes. Repeat this with the second 1×4 strip, placing it 4-6 inches up from the bottom edge. Ensure these backing strips are perpendicular to the flag boards and positioned evenly. Using a brad nailer, securely nail the 1×4 backing strips into each of the painted 1×3 boards. A brad nailer provides a strong hold with minimal visible holes from the front, making it ideal for this project. If you don’t have a brad nailer, small finishing nails and a hammer can be used, taking care to nail straight and avoid splitting the wood.
After both backing strips are securely attached, gently lift and flip your newly assembled flag over. You should now see the beautiful red and white stripes forming a solid, sturdy piece. Check that all boards are firmly in place and that the structure feels robust. This completed base is now ready for the addition of the iconic blue union field.
Step 4: Creating the Blue Union Field
With your red and white stripes assembled, the next step is to introduce the striking blue union field that will host our stars. Carefully flip your assembled flag back over so the painted side is facing up. The top seven red and white boards are where the blue field will be located. Using painter’s tape, mark off the area for your blue union. Measure 22 inches from the left edge of the flag and place a strip of painter’s tape vertically down across the seven top boards. Ensure the tape is firmly pressed down to prevent any paint bleed, creating a crisp, clean line. This precise measurement will ensure your blue field is proportionate to the rest of the flag.
For the blue, we chose “Brilliant Blue,” and it truly lives up to its name! This shade of blue is incredibly vibrant and adds a beautiful, rich contrast to the red and white. With the area taped off, apply the Brilliant Blue paint to the designated section. Again, multiple thin coats will yield the best results, preventing drips and ensuring a smooth, even finish. Allow each coat to dry to the touch before applying the next. Once your final coat of blue paint is applied and still slightly wet (or as soon as it’s dry enough not to smudge), carefully peel off the painter’s tape. This timing is important to get the cleanest lines possible. Revel in the satisfaction of seeing your flag’s three primary colors come together!
Step 5: Adding the Stars
Now for the iconic stars that complete our American Flag Pallet! There are several creative approaches to adding stars, but to achieve a slightly worn, authentic look, we opted for a simple stenciling method. We found perfect foam stars at Wal-Mart for only $1.88. Using the largest of these foam stars, we created a small, reusable stencil by tracing its outline onto a piece of cardboard and cutting it out. This allows for consistency while also imparting a handmade touch to each star.
To apply the stars, we used a dry-brushing technique with white acrylic paint. This method is fantastic for creating a faded or slightly imperfect appearance, adding to the rustic charm. To dry-brush, simply dab a very small amount of white acrylic paint onto your brush, then dab off almost all of it onto a scrap piece of paper or cardboard until the brush is nearly dry. Then, position your star stencil on the blue field and gently dab the almost-dry brush over the stencil. This technique prevents paint from bleeding under the stencil and creates a soft, textured star. Practice on a scrap piece of wood first to get a feel for the right amount of paint and pressure.
You will create a total of 9 rows of stars across the blue union field. The pattern for these rows alternates to give that classic star field look: 6 stars in the first row, 5 in the second, 6 in the third, and so on. The full pattern is 6, 5, 6, 5, 6, 5, 6, 5, 6. Take your time to space them evenly, eyeballing the placement for a natural, hand-stamped effect. Once all the stars are applied, allow the white paint to dry completely. The slight imperfections and varying intensities created by dry-brushing will make each star unique and contribute to the flag’s overall character.
Step 6: Distressing for Rustic Charm
To truly achieve that beautiful, weathered, and rustic aesthetic, distressing the flag is an essential final touch. This step adds depth and character, making your newly crafted piece look like a cherished antique. We used a “Corner Cat” tool for this, which is designed to quickly and easily scuff edges and surfaces. However, if you don’t have this specific tool, a piece of medium-grit sandpaper works wonderfully to achieve similar effects. You can also use steel wool for a slightly different texture.
Focus your distressing efforts along all the edges of the boards, both on the front and sides. Gently sand or scuff the corners and any raised areas to reveal hints of the natural wood underneath or to create a worn, faded look on the paint. Don’t be afraid to experiment; you can also lightly distress the flat surfaces of the boards to simulate years of natural wear and tear. The goal is to create subtle imperfections that enhance the flag’s handmade appeal, making it feel authentic and full of history. This step is entirely customizable, so distress as much or as little as you like to match your personal style and desired aesthetic. Once you’re satisfied with the distressed look, wipe down the flag with a clean cloth to remove any sanding dust.
Step 7: Protecting Your Outdoor Masterpiece
If your beautiful Pallet American Flag is destined for outdoor display, protecting it from the elements is a crucial final step to ensure its longevity and maintain its vibrant colors. We highly recommend using Spar Varnish, specifically in a satin finish, for this purpose. Spar Varnish is uniquely formulated to withstand harsh outdoor conditions, offering superior UV protection against sun fade, and excellent resistance to moisture, rain, and temperature fluctuations. It forms a durable, flexible film that moves with the wood, preventing cracking and peeling over time.
Apply two generous coats of Spar Varnish to all exposed surfaces of your flag, including the front, sides, and edges. Use a good quality brush, applying the varnish smoothly and evenly. Ensure you cover all the distressed areas as well, as these are points where the raw wood might be more exposed. Allow adequate drying time between coats as specified by the product manufacturer, usually several hours. The satin finish will provide a beautiful, subtle sheen that enhances the colors without being overly glossy, perfectly complementing the rustic aesthetic. Once the final coat is thoroughly dry and cured, your DIY Pallet Flag is ready to bravely face the elements and proudly display your patriotism for years to come.
That’s it! In just a few simple steps, you’ve transformed ordinary wood strips into a stunning, personalized piece of patriotic art. This quick and inexpensive project is not only a fun way to celebrate the Fourth of July but also a rewarding experience that results in a unique decor item for your home or garden.
We hope this detailed guide inspires you to create your own DIY Pallet American Flag. Whether it graces your porch, entryway, living room, or even becomes a cherished gift, it’s sure to be a conversation starter and a testament to your creativity. Happy Fourth of July! If you love this Rustic Wood Flag project, we’d be absolutely thrilled if you shared it on Pinterest or your favorite social media channels. Your pins help spread the joy of DIY and inspire others to create beautiful things!
~Ashley