
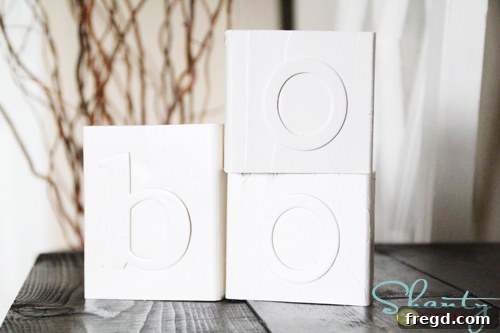
DIY Boo Blocks: Easy, Affordable Halloween Decor for Your Home
Happy Wednesday, fellow craft enthusiasts! The crisp air and vibrant colors of fall are just around the corner, and with them comes that undeniable urge to infuse our homes with seasonal charm. For many of us, the arrival of autumn signals the exciting prelude to Halloween! If you’re anything like me, you’re already itching to start decorating for all things spooky and spectacular. Good news: I’ve just wrapped up my first Halloween project of the season, and it’s everything you could wish for – incredibly easy, remarkably cheap, and refreshingly quick!
This year, let’s ditch the pricey store-bought decorations and embrace the satisfaction of creating something unique and personalized. Our featured project today, these charming “Boo Blocks,” perfectly encapsulate the spirit of DIY home decor. They are not only a delightful addition to your Halloween display but also a testament to how creative you can get with minimal effort and cost. Get ready to transform simple materials into captivating holiday accents!
Crafting Your Own Boo Blocks: The Ultimate Halloween DIY
These adorable “Boo Blocks” were brought to life using nothing more than humble scrap 2x4s and some versatile chipboard letters. The best part? I snagged the chipboard letters from Hobby Lobby for a mere $3 after a coupon! This goes to show that you don’t need a hefty budget to create impactful decor. The beauty of this project lies in its simplicity and the readily available materials, making it accessible for crafters of all skill levels.
What You’ll Need: Materials for Your Boo Blocks
Before diving into the steps, let’s gather our simple toolkit. This project is a fantastic way to utilize leftover materials from other home improvement projects or to pick up inexpensive supplies from your local craft or hardware store.
- Scrap 2×4 Wood: The foundation of our blocks. You’ll need a piece long enough to cut into three individual blocks for the letters B, O, O. Look for smooth, clean pieces.
- Chipboard Letters: “B”, “O”, “O” (or any other word you choose!). These lightweight, durable letters are perfect for adhering to wood. Don’t forget to check for coupons at your favorite craft store!
- Super Glue (or strong wood adhesive): For securely attaching the letters to the wood.
- Cream-Colored Spray Paint: Or any color that matches your Halloween or fall decor scheme. A satin or matte finish often looks great.
- Saw: To cut the 2×4 into individual blocks. A miter saw or even a hand saw will work.
- Sandpaper (optional): For smoothing any rough edges on your wood blocks.
- Measuring Tape and Pencil: For precise spacing and cutting.
- Protective Drop Cloth or Cardboard: For spray painting.
Step-by-Step Guide to Creating Your Boo Blocks
The process is genuinely straightforward, making it an ideal weekend project or even a quick evening craft session. Let’s break it down:
Step 1: Preparing the Wood Foundation
I began by selecting a smooth piece of 2×4 wood. The smoother the surface, the better your letters will adhere and the more professional your final product will look. If your scrap wood has any rough patches or splinters, a quick sanding can make a world of difference. Next, I carefully spaced out my chipboard letters – “B,” “O,” “O” – onto the length of the 2×4. This step is crucial for visualizing the final size of each block and ensuring even spacing. Once satisfied with the layout, I secured each letter to the wood with a few dots of super glue. This temporary hold allowed me to accurately mark where each cut needed to be made, ensuring the blocks would perfectly frame the letters.
Step 2: Cutting Your Blocks to Size
With the letters lightly glued in place as guides, I proceeded to cut the 2×4 into individual blocks. Each cut was made to perfectly fit around its respective letter, creating three distinct “Boo” blocks. Safety is paramount when using power tools, so always ensure you’re wearing appropriate protection and following manufacturer guidelines. If you’re using a hand saw, take your time for clean, straight cuts. After cutting, I removed the letters carefully (they were only lightly glued for positioning) and gave the edges of the newly cut blocks a quick smooth with sandpaper, ensuring there were no rough bits that could interfere with the paint or snag on surfaces.
Step 3: The Magical Transformation with Spray Paint
This is where the real magic happens! Once your wood blocks are cut and prepped, it’s time for painting. I opted for a lovely cream-colored spray paint, which provides a classic, versatile backdrop for the Halloween theme. The key to a smooth, even finish with spray paint is to apply multiple light coats rather than one heavy coat. This prevents drips and ensures full coverage. I applied two coats, allowing adequate drying time between each application, as directed on the spray paint can. The transformation from raw wood to polished decor is almost instantaneous and incredibly satisfying!
Step 4: Final Assembly and Securing the Letters
Once the paint is completely dry – and I mean *completely* dry, to avoid any smudging or sticky residue – it’s time to re-attach the chipboard letters. This time, use a more generous application of super glue or a strong wood adhesive to ensure the letters are firmly secured. Center each letter carefully on its respective block, press down gently, and allow ample time for the glue to cure according to the product’s instructions. And that’s it! Your custom “Boo Blocks” are ready to make their debut.
Styling Your Halloween Boo Blocks
Now for the fun part: displaying your handmade creations! These “Boo Blocks” are incredibly versatile and can be incorporated into various Halloween or fall vignettes around your home. Here are a few ideas:
- Mantlepiece Marvel: Arrange them on your fireplace mantle alongside mini pumpkins, faux spiders, cobwebs, and flickering LED candles for a classic spooky display.
- Shelfie Statement: Place them on an open shelf in your living room or entryway, perhaps nestled between a stack of themed books or a small autumnal plant.
- Tabletop Centerpiece: Use them as the focal point for your Halloween dining table or coffee table. Surround them with scatterings of candy corn, small decorative gourds, or even a witch’s hat.
- Window Sill Whimsy: Line them up on a window sill to greet visitors or to add a festive touch from both inside and outside.
- Entryway Welcome: Position them on an entryway console table with a bowl of treats for trick-or-treaters or a friendly skeleton figure.
Customize Your Boo Blocks: Endless Possibilities
While the cream and simple “BOO” design are wonderfully classic, the beauty of DIY is the freedom to customize! Consider these variations to make your blocks truly unique:
- Color Palette: Experiment with traditional Halloween colors like orange, black, purple, or even a distressed antique white for a vintage feel.
- Letter Embellishments: Once the paint is dry, you could add glitter, glow-in-the-dark paint, or even small adhesive gems to the chipboard letters for extra sparkle.
- Word Choices: Instead of “BOO,” why not create blocks that spell “SPOOKY,” “HAUNT,” “FALL,” or “TREAT”? This project is easily adaptable for any short word that fits the season.
- Distressed Look: For a rustic or aged aesthetic, lightly sand the edges and corners of your painted blocks to reveal some of the raw wood underneath. You can also apply a dark wax or glaze for an antique finish.
- Ribbons and Bows: Tie small coordinating ribbons around each block or create a single bow to attach to one of the blocks for an extra touch of charm.
Beyond Halloween: Versatile Wood Block Decor
The versatility of this wood block crafting technique extends far beyond Halloween. The very same principles can be applied to create personalized decor for any room or season. In fact, I loved how my “Boo Blocks” turned out so much that I immediately embarked on another similar project: creating “WASH” Blocks for my bathroom shelves!
These “WASH” blocks, using the same cost-effective 2x4s and chipboard letters, provide a delightful and personal touch to the bathroom. They add a curated feel to an often-overlooked space and complement the clean aesthetic perfectly. Imagine blocks spelling “HOME,” “LOVE,” “READ,” or even a family initial. This project opens up a world of possibilities for custom home accents that reflect your style and personality, all without breaking the bank.
Why Choose DIY Decor?
Embracing DIY projects like these “Boo Blocks” offers numerous benefits:
- Cost-Effective: Significantly cheaper than purchasing similar items from boutique stores.
- Personalization: You get to choose the colors, words, and finishes that perfectly match your home’s aesthetic.
- Sense of Accomplishment: There’s immense satisfaction in decorating your home with items you’ve created yourself.
- Eco-Friendly: A great way to use up scrap wood and other leftover craft supplies, reducing waste.
- Fun and Relaxing: Crafting can be a wonderful stress-reliever and a creative outlet.
These “Boo Blocks” and “WASH Blocks” are prime examples of how a simple idea, executed with a few affordable materials, can yield fantastic decorative results. They’re fun, they’re cheap, and they add that personal, handmade touch that truly makes a house a home. Don’t be afraid to experiment with different words, colors, and finishes to create pieces that are uniquely yours.
So, whether you’re gearing up for a ghoulish Halloween or just looking for a clever way to add charm to your everyday spaces, give this versatile wood block project a try. You’ll be amazed at what you can create!
Thanks so much for stopping by and happy crafting!
~Ashley