
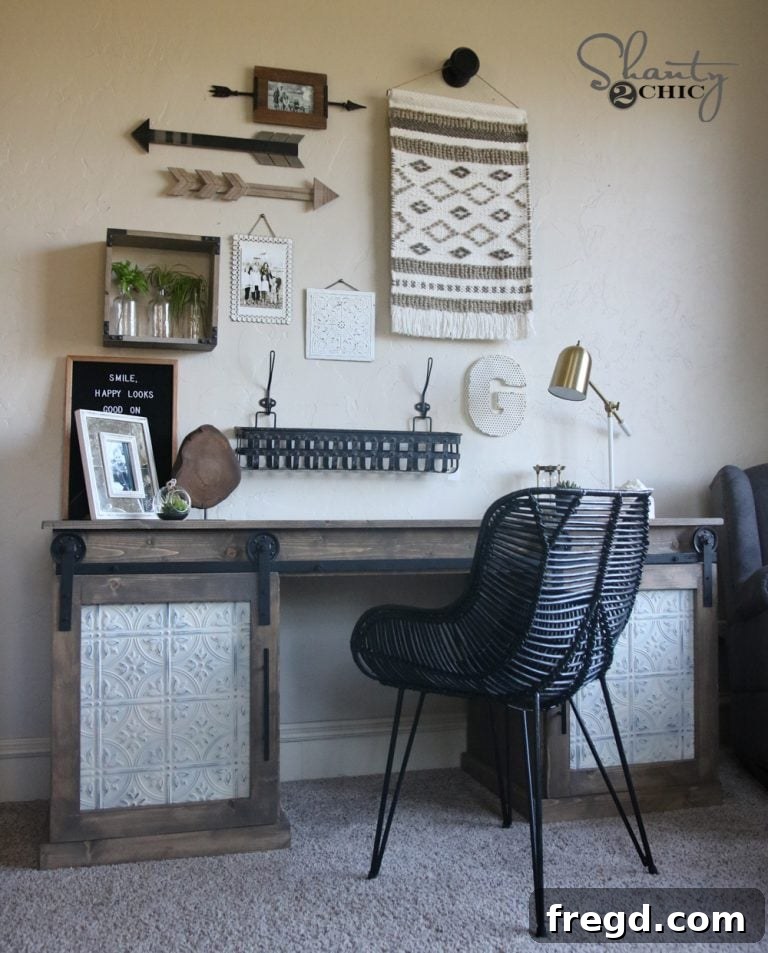
Welcome, DIY enthusiasts and home decor lovers! Today, I’m thrilled to unveil a project that has truly transformed my home office space: a stunning DIY Sliding Barn Door Desk. As someone who often finds their bedroom pulling double duty as a creative workspace, I desperately needed a desk that wasn’t just functional but also aesthetically pleasing and, most importantly, capable of concealing the inevitable clutter that accumulates with printers, papers, and various office supplies. This design was born out of that very need, blending rustic charm with smart storage solutions. The result is a gorgeous piece of furniture that brings a touch of farmhouse elegance to my room while keeping everything tidy and out of sight. Prepare to be inspired by this custom build!
Embarking on a custom furniture project like this DIY sliding barn door desk allows you to tailor every detail to your specific needs and aesthetic preferences. Whether you’re a seasoned woodworker or a beginner eager to learn, this project is incredibly rewarding. The beauty of a barn door desk lies not only in its charming, rustic appeal but also in its unparalleled functionality. Imagine having a dedicated space for your work, complete with ample storage for all your office essentials, seamlessly hidden behind stylish sliding doors. This innovative design helps maintain a clean, organized, and serene environment, even in the busiest of homes. It’s the perfect solution for creating a versatile and efficient home office nook without compromising on style. Don’t miss out on creating your own custom workspace! You can get the FREE PLANS and a comprehensive supply list to start building this magnificent piece right HERE!
Now, let’s dive deep into the fascinating process of constructing this DIY masterpiece. Building your own sliding barn door desk is an incredibly fulfilling journey, offering practical skills and a custom piece of furniture perfectly suited to your space. From selecting the right lumber to attaching the final hardware, each step contributes to the desk’s overall stability, functionality, and visual appeal. I’ll guide you through every essential stage, sharing tips and insights to ensure your project is a resounding success. Get ready to transform your workspace and add a touch of handcrafted elegance to your home.
Choosing Your Materials: The Foundation of Your Desk
For the primary construction of this sturdy desk, I opted for high-quality hardwood plywood. Specifically, I chose birch plywood, renowned for its smooth finish and impressive durability, making it an excellent choice for a frequently used piece of furniture like a desk. You can typically find 4×8 sheets of birch plywood at most large hardware stores, such as Home Depot. To make transport easier and safer, I highly recommend asking the store associates to rip the larger sheets into more manageable sections for you. This saves you the hassle of handling oversized panels and ensures straighter cuts. Once home, I tackled the precision cross-cuts myself using my reliable table saw, ensuring each component was perfectly sized according to the free plans.
The initial phase involved meticulously constructing the two side boxes that form the robust foundation of the desk. These boxes are designed to provide both structural integrity and concealed storage. To create strong, invisible joints, I utilized a Kreg Jig to make 3/4-inch pocket holes. Pocket hole joinery is a fantastic technique for DIY furniture projects, offering incredible strength and a clean appearance. I began by securely attaching the bottom panel of each box to the inside faces of both vertical side pieces. This crucial connection was reinforced using a combination of premium wood glue for maximum adhesion and 1.25-inch pocket hole screws, driven firmly into place. This method ensures a robust and long-lasting framework for your sliding barn door desk.
With the initial side box assembly complete, the next critical step was to integrate the internal shelf that significantly enhances the storage capabilities of our custom barn door desk. This shelf is strategically positioned 2.5 inches from the bottom edge of the side panel, creating a practical compartment within each desk leg. This precise placement ensures optimal use of space, allowing for the organized storage of various office supplies, files, or even smaller electronic devices. The shelf is secured using the same reliable combination of wood glue and pocket hole screws, ensuring it can withstand the weight of its contents over time. Attention to these details during construction is what elevates a simple desk into a highly functional and durable piece of home office furniture.
Following the construction of the individual side boxes, the next phase focuses on adding the essential support structures that will ultimately connect these boxes and provide a solid base for the desk’s top surface. These supports run along the top and back edges of each side unit. Their primary function is to brace the structure and provide attachment points for the desk’s main tabletop. These boards are securely fastened using 1.25-inch pocket hole screws, driven through the support boards and into the side panels. It is crucial at this stage to ensure that the pocket holes running along the length of these support boards are facing upwards. This specific orientation is vital because these upward-facing holes will be utilized later to firmly attach the desk’s main work surface, creating a seamless and sturdy connection. Precision here ensures a stable and professional-looking finished product, truly distinguishing your custom barn door desk.
Once you have successfully constructed both side units identically, the project moves to uniting these two independent structures into the complete desk frame. This is achieved by connecting them with a central support board positioned at the back of the desk. This crucial piece not only ties the two sides together but also adds significant rigidity and stability to the overall structure of your custom home office desk. During this attachment process, it’s imperative to ensure that all visible pocket holes are facing towards the back of the desk. This meticulous attention to detail guarantees a clean, professional finish on the front and visible sides of your desk, maintaining its aesthetic appeal and showcasing the quality of your woodworking. A stable, well-joined frame is essential for the longevity and functionality of your DIY sliding barn door desk.
With the main desk frame assembled, the next critical component to add is the face frame. This piece runs along the entire front of the desk, serving a dual purpose: it aesthetically frames the desk’s opening and, more importantly, provides the robust mounting surface for the barn door hardware. This front panel is essential for the smooth operation and secure installation of your sliding doors. Its precise alignment and secure attachment are key to the functionality and visual impact of your custom barn door desk. This element truly defines the unique character of this DIY project, allowing for the integration of the rustic sliding mechanism that hides your office essentials.
To ensure the face frame is incredibly sturdy and seamlessly integrated into the desk’s structure, I attached it using 1.25-inch pocket hole screws. These screws were meticulously driven through the desk’s side supports and into the top board of the face frame, creating a strong and discreet joint. This method not only provides exceptional holding power but also keeps the fasteners hidden, preserving the clean lines of your custom DIY desk. This meticulous approach to joinery is what gives your home office furniture a professional, factory-built feel, enhancing both its durability and visual appeal. Taking the time for these precise attachments will pay off in the longevity and stability of your sliding barn door desk.
Adding Architectural Detail: The Base Trim
With the main structure of the desk firmly in place, it was time to add the finishing touches that elevate its appearance and provide a sense of completeness: the base trim. This trim runs along the bottom perimeter of the desk, offering a polished, architectural look. For the corners, you have the flexibility to either miter them for a sleek, angled joint or simply keep them straight for a simpler, more modern aesthetic – the choice depends on your desired style. I attached all of these trim pieces with great care, using a combination of strong wood glue to ensure lasting adhesion and my 18-gauge brad nailer loaded with 1.25-inch brad nails. This combination creates a secure bond while leaving minimal, easily concealed nail holes, resulting in a clean and refined finish for your DIY sliding barn door desk.
Crafting the Iconic Barn Doors
Now for the star of the show – the sliding barn doors themselves! These doors are not only functional, providing elegant concealment for your storage, but also contribute significantly to the desk’s rustic charm. I began by constructing the rectangular frames for each door, again utilizing the robust and reliable method of 1.25-inch pocket hole screws. This ensures that each door frame is incredibly strong and square, crucial for smooth operation once the hardware is installed. Building these frames accurately is paramount, as they will define the shape and stability of your barn doors, making them a focal point of your custom home office desk.
For the unique inner panels of the barn doors, I opted for something truly special: faux tin. This choice adds an incredible amount of vintage character and texture, perfectly complementing the rustic farmhouse aesthetic of the desk. Faux tin panels are a fantastic way to introduce a distinctive element without the weight or cost of real tin. I sourced these charming panels online, and you can easily discover similar options by searching for “decorative faux tin panels” or directly see the exact ones I used HERE! This detail is what truly makes this DIY sliding barn door desk stand out, offering a custom look that’s both elegant and intriguing.
To further enhance the antique, distressed look, I painted the faux tin panels with Rust-Oleum Chalked paint in the color Linen White. Chalk paint is ideal for this application because it adheres beautifully, provides excellent coverage, and creates a soft, matte finish that is perfect for distressing. Once the paint had fully dried, which is essential for proper adhesion and durability, I used my corner cat sander to lightly distress the surfaces. This process involves gently sanding edges and raised areas to reveal hints of the underlying material or previous layers of paint, mimicking natural wear and tear. The result is a beautifully aged appearance that adds depth and character to each barn door panel, making your custom desk truly one-of-a-kind. This step transforms the ordinary into extraordinary, bringing an authentic farmhouse feel to your DIY home office furniture.
With the faux tin panels beautifully painted and distressed, it was time to integrate them into the barn door frames. To ensure maximum stability and a professional finish, I first bonded the decorative faux tin panels to sturdy 1/4-inch wood panels using a strong construction adhesive. This created a solid, reinforced insert for each door. Once the adhesive had cured, I then securely stapled these combined panels directly into the pre-built door frames. This method guarantees that the faux tin remains perfectly flat and firmly in place, preventing any warping or detachment over time. The result is a durable, visually striking barn door that will be a highlight of your custom desk, offering both privacy and rustic charm to your home office space.
The Finishing Touch: Staining and Hardware
To achieve a cohesive and rich aesthetic, I stained the entire desk, including the newly constructed barn doors, with Varathane Briarsmoke stain. This particular stain provides a beautiful, deep, smoky brown tone that perfectly complements the rustic and farmhouse-inspired design, highlighting the natural grain of the wood. Applying stain not only enhances the visual depth of the furniture but also provides a protective layer. It’s crucial to apply the stain evenly and allow ample time for it to dry thoroughly before proceeding to the next steps. Proper drying ensures the finish is durable and ready for the installation of hardware, bringing your DIY sliding barn door desk closer to completion.
After the stain had completely dried and cured, the exciting part of assembling the barn door hardware began. For those who prefer visual guidance, we have an excellent video tutorial detailing the standard installation process for barn door hardware, which you can conveniently watch HERE. This resource will walk you through the general steps for mounting the track and attaching the hangers to your doors. However, for this particular custom desk, I introduced a clever modification to the traditional barn door hardware. Instead of standard hangers, I opted to use heavy-duty garage door pulleys. This not only adds a unique industrial touch to the rustic design but also provides a surprisingly smooth and robust sliding mechanism for the smaller scale of the desk doors. This innovative approach is what makes DIY projects so rewarding, allowing for personalized touches that stand out.
The Grand Reveal: Your Completed DIY Barn Door Desk!
And there you have it – the magnificent DIY Sliding Barn Door Desk, all finished and ready to transform any space into a stylish and organized home office! I genuinely LOVE how this project turned out. The combination of the sturdy birch plywood, the rich Briarsmoke stain, and the unique faux tin barn doors creates a piece of furniture that is not only highly functional but also a true statement piece. It perfectly hides away printers, files, and all the usual office clutter, leaving a clean, inviting workspace. This desk proves that with a bit of effort and creativity, you can build custom furniture that meets your specific needs and enhances your home decor. It’s a testament to the beauty of DIY woodworking and the satisfaction of crafting something truly unique. Get ready to enjoy your new, custom-built home office solution!