
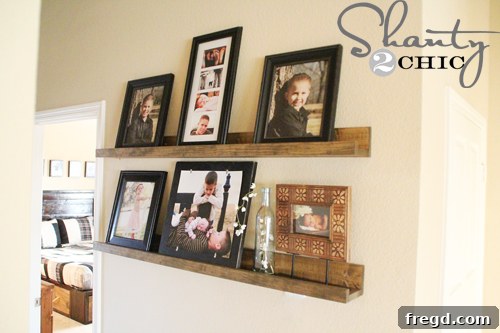
Happy Monday, fellow DIY enthusiasts! Today, we’re diving into a project that isn’t brand new to the crafting world, but one that I absolutely adore and can’t wait to share with you all. It’s a testament to how simple ideas can transform a space and bring immense satisfaction.
Transform Your Space: Build Stunning & Affordable DIY Floating Shelves in Under an Hour
If these charming, simple shelves spark a sense of familiarity, you’ve likely encountered their magic before. Perhaps you’ve seen Whitney’s fantastic version, which served as my initial spark of inspiration, HERE! She originally crafted them for her little boys’ room, and I was so captivated by their simplicity and elegance that I knew I had to create my own set. My goal? To bring life to a previously neglected, empty hallway wall upstairs.
The beauty of this project lies in its remarkable efficiency and affordability. Believe it or not, these shelves took me a mere 30 minutes to construct, and the total cost for two impressive units was an incredible $17! This isn’t just a DIY project; it’s a testament to budget-friendly home improvement that yields professional-looking results.
Why Choose DIY Floating Shelves?
In the realm of home decor, floating shelves are undisputed champions of versatility and style. They offer an open, airy feel, perfect for displaying cherished items, books, plants, or simply adding architectural interest to a room. But why go the DIY route when you can buy pre-made options?
- Unbeatable Affordability: As my experience shows, building your own shelves can drastically cut costs compared to purchasing them from a store.
- Customization: You dictate the size, finish, and exact placement, ensuring a perfect fit for your unique space and aesthetic.
- Beginner-Friendly: This particular design is an ideal starting point for anyone new to woodworking. It requires minimal tools and basic skills.
- Quick Gratification: Completing a project in such a short amount of time provides an immediate sense of accomplishment and satisfaction.
- Quality Materials: You get to choose the quality of wood, often resulting in a sturdier, more durable product than mass-produced alternatives.
Materials You’ll Need: Building Blocks of Beauty
For this project, I meticulously followed Whitney’s straightforward directions to a “T.” The material list is refreshingly short and accessible, making it perfect for a spontaneous weekend build. Here’s what you’ll need for two shelves:
- (2) White Wood 1×4 Boards @ 8 feet each: These will form the main body and top surface of your shelves. White wood is often chosen for its smooth finish and ease of painting.
- (1) Select Pine 1×2 Board @ 8 feet: This piece serves as the crucial support bracket that will mount directly to your wall, effectively making the shelves “float.” Select pine is a great choice for its clean appearance and strength.
- Wood Screws (1 1/4 inch or 1 1/2 inch): For attaching the 1x4s to the 1×2 and securing the 1×2 to wall studs.
- Wood Glue (Optional but Recommended): For extra durability when joining the wood pieces.
- Wood Filler (Optional): To fill any nail holes or imperfections before finishing.
- Paint or Stain: To match your home decor.
When purchasing your wood, take a moment to inspect each board for any warps, cracks, or significant knots. Selecting straight, blemish-free lumber will make the building process smoother and result in a more professional finish.
Tools for the Job: Simple & Effective
One of the most appealing aspects of this DIY floating shelf project is the minimal tool requirement. You don’t need a full workshop to achieve fantastic results. Here’s what you’ll want to have on hand:
- Saw: While a miter saw or circular saw offers precision and speed, the original inspiration mentioned a hand saw. If you do not have a power saw, a good quality hand saw is indeed the PERFECT tool for this project, especially for beginners. It’s affordable, portable, and you’ll find numerous uses for it around the house in the future. Make sure your blade is sharp for clean cuts.
- Measuring Tape: Essential for accurate measurements. “Measure twice, cut once” is the golden rule!
- Pencil: For marking your cuts and drill points.
- Drill/Driver: To pre-drill pilot holes (preventing wood splitting) and drive screws.
- Level: Absolutely crucial for ensuring your shelves are perfectly straight.
- Stud Finder: Highly recommended for safely and securely mounting your shelves into wall studs. This provides maximum stability and weight capacity.
- Sandpaper (various grits, e.g., 120 and 220): For smoothing out cuts and preparing the wood for paint or stain.
- Safety Glasses: Always protect your eyes when cutting or drilling.
Step-by-Step Guide: Building Your Dream Shelves
This project is designed for efficiency and ease. Follow these steps, and you’ll have beautiful, functional shelves in no time.
1. Measure and Cut Your Boards
- Determine Shelf Length: I cut all my boards to 47 inches, which was ideal for my hallway. Consider the length that best suits your wall space and what you plan to display.
- Mark Your Cuts: Use your measuring tape and pencil to precisely mark the desired length on your 1×4 and 1×2 boards. For each shelf, you will need two 1×4 pieces and one 1×2 piece of the same length. So, for two 47-inch shelves, you’ll need four 47-inch 1x4s and two 47-inch 1x2s.
- Make Your Cuts: Carefully cut along your marks using your chosen saw. If using a hand saw, take your time and maintain a steady hand for straight edges. For cleaner cuts, clamp your wood to a workbench.
2. Prepare Your Wood
- Sand Smooth: Once all your pieces are cut, it’s time to sand. Start with a coarser grit sandpaper (like 120-grit) to smooth out any rough edges or imperfections from cutting. Then, move to a finer grit (like 220-grit) for a silky-smooth finish. This is crucial for a professional look and for optimal paint or stain adhesion.
- Clean Dust: Wipe down all boards with a tack cloth or a damp rag to remove sanding dust.
3. Assemble the Shelf Body
This is where the magic of the “floating” design comes together. You’ll essentially be creating an L-shaped structure that will sit on top of the wall-mounted 1×2.
- Form the L-Shape: Take two of your cut 1×4 boards. Place one 1×4 flat on your work surface. Take the second 1×4 and place it on its edge, against the long edge of the first 1×4, forming an “L” shape. The edge of the vertical 1×4 should align perfectly with the surface of the horizontal 1×4. This creates a lip.
- Secure with Screws: Using your drill, pre-drill pilot holes along the top surface of the horizontal 1×4, into the edge of the vertical 1×4. Space them every 8-12 inches. Then, drive your wood screws through the pilot holes to firmly join the two 1×4 pieces together. For extra strength, you can apply a bead of wood glue along the joining edge before screwing. Repeat this process for your second shelf.
4. Finishing Touches (Paint or Stain)
- Apply Finish: Before mounting, it’s easiest to paint or stain your assembled shelves. Choose a color or finish that complements your existing decor. Apply thin, even coats, allowing proper drying time between each.
- Consider a Top Coat: If you plan to place items on your shelves that might cause wear, consider applying a clear protective top coat (e.g., polyurethane or a clear sealant) for added durability.
5. Install the Support Bracket (1×2)
This is the most critical step for a sturdy installation.
- Locate Studs: Using your stud finder, mark the locations of the wall studs along your chosen wall. Mounting into studs is vital for maximum weight capacity and stability. If studs aren’t where you need them, consider using heavy-duty drywall anchors specifically designed for shelves.
- Mark Placement: Hold one of your 1×2 support boards against the wall at your desired shelf height. Use your level to ensure it’s perfectly horizontal. Mark the drill points on the wall, corresponding to the stud locations or anchor points.
- Pre-drill and Mount: Pre-drill pilot holes through the 1×2 at your marked points. Then, secure the 1×2 to the wall using appropriate screws (long enough to penetrate the drywall and firmly engage the studs). Use your level one last time before fully tightening to ensure it’s still straight.
6. Mount the Shelves
- Slide into Place: Once the 1×2 support bracket is securely mounted to the wall, simply slide your assembled 1×4 “L-shaped” shelf body over the 1×2. The 1×2 should fit snugly into the void created by the “L” shape. The back of the shelf will rest against the wall, and the top of the shelf will cover the 1×2.
- Secure (Optional but Recommended): For added security and to prevent the shelf from shifting, you can drive a few finishing nails or screws from the top of the 1×4 shelf down into the 1×2 support. This also helps to firmly marry the shelf to its support structure.
Decorating Your New Shelves: Unleash Your Creativity
I absolutely LOVE the fresh, custom look my new shelves have brought to my once-boring hallway wall! They are incredibly fun to decorate and SO versatile. The possibilities are endless, and I’m already contemplating where else I can add these functional beauties in my home. Here are some ideas to inspire you:
- Hallway Gallery: Like mine, a hallway is perfect for displaying small frames, potted succulents, or curated trinkets that reflect your personality.
- Living Room Focal Point: Arrange books, decorative vases, candles, and framed art to create a stylish focal point above a sofa or console table.
- Bedroom Retreat: Ideal for bedside essentials, small lamps, cherished photos, or a stack of your favorite reads.
- Kids’ Room Organization: Display favorite toys, small books, or decorative items that add a playful touch while keeping clutter off the floor.
- Bathroom Elegance: Hold extra towels, decorative soaps, small plants, or bath salts for a spa-like feel. Ensure the finish can withstand moisture if placed near a shower.
- Kitchen Spice Rack/Display: Showcase a collection of herbs, small cookbooks, or artisan pottery.
Remember, the key is to strike a balance between aesthetics and functionality. Don’t overcrowd your shelves; leave some breathing room to allow each item to stand out.
Budget-Friendly Beauty: The $17 Miracle
Let’s circle back to the astonishing cost: $17 for two functional, stylish shelves. This is where DIY truly shines. Imagine trying to find comparable shelves at a retail store. You’d likely pay upwards of $50-$100 per shelf, depending on the material and finish. By investing a little time and effort, you get high-quality, custom pieces at a fraction of the price. This makes the project incredibly rewarding, knowing you’ve created something beautiful without breaking the bank.
Tips for a Smooth Build and Long-Lasting Shelves
- Safety First: Always wear safety glasses when cutting or drilling. Work in a well-ventilated area, especially when painting or staining.
- Precision Matters: Take your time with measurements and cuts. Accuracy in the beginning saves headaches later.
- Test Fit: Before screwing everything together, do a quick dry fit to ensure all pieces align correctly.
- Consider Weight: While these shelves are sturdy when properly installed into studs, be mindful of the weight you place on them. Avoid excessively heavy items.
- Patience with Finishing: Don’t rush the painting or staining process. Allow adequate drying time between coats for a durable and beautiful finish.
If you’re ready to try your hand at building, this really is the perfect project to start with! It’s incredibly easy, remarkably cheap, and refreshingly quick. The satisfaction of stepping back and admiring something you’ve created with your own hands is truly priceless. Where would you love to see these versatile shelves in your own home?
Thanks so much for stopping by and embarking on this DIY journey with me!
~Ashley