
Transform Your Bedroom: Build a DIY Floating Storage Nightstand
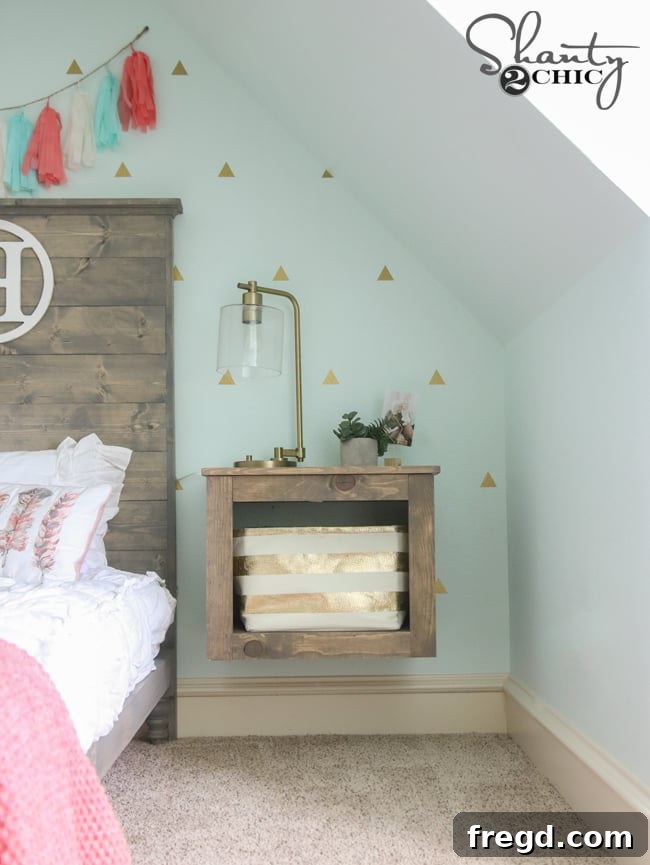
Hello, fellow DIY enthusiasts! We’re thrilled to share our latest and most exciting project with you today. While we’re bustling behind the scenes with new open-concept plans inspired by our recent HGTV episodes, we couldn’t wait to unveil this charming and highly functional piece. Following the successful twin platform bed we recently crafted for my 12-year-old daughter, the next essential addition was a unique and practical nightstand. What we envisioned and ultimately brought to life is this stunning DIY Floating Storage Nightstand – a perfect blend of style, utility, and space-saving design. Get ready to dive into a project that promises to elevate any bedroom!
Why Choose a Floating Nightstand? The Perfect Blend of Style and Function
Isn’t it absolutely adorable? Beyond its aesthetic appeal, this floating nightstand offers incredible benefits, especially for smaller spaces or rooms where you want to maintain a clean, uncluttered look. Its design allows for easy cleaning underneath and provides ample storage without occupying precious floor space. We specifically designed it to accommodate standard-sized baskets, ensuring you can find stylish storage solutions with ease. For instance, these gorgeous gold baskets were a fantastic find on Amazon, available in a spectrum of colors with the convenience of Prime shipping!
This project isn’t just about building a piece of furniture; it’s about customizing your space, adding a personal touch, and learning valuable woodworking skills. Whether you’re a seasoned DIYer or just starting, our comprehensive guide will walk you through every step. Let’s gather our tools and materials and embark on this exciting build!
Get Started: Download Your Free Plans!
As with all our projects, we believe in empowering you with all the resources you need. We’ll guide you through the entire construction process below with detailed instructions and photographs. To make your build even smoother, you can also download and print the FREE, comprehensive plans for this floating nightstand by clicking right HERE or using the button provided in the plans section. These plans include precise measurements and diagrams to ensure your success.
Materials and Tools You’ll Need
Before we begin cutting and assembling, let’s talk about the foundation of this sturdy nightstand. The main shell or box of this piece is constructed using 3/4″ hardwood plywood. We frequently sing the praises of this material for its durability, stability, and beautiful finish. You can typically find large 4’x8′ sheets at your local home improvement store. A helpful tip: most stores, like Home Depot, offer cutting services. Have them rip the large sheets down to more manageable sizes that will fit comfortably into your car. Once home, we make the smaller, precise cross cuts using our miter saws for a perfect fit.
Essential Tools for Precision and Speed
For most of my woodworking projects, especially those involving strong, hidden joints, my trusty Kreg Jig K5 model is indispensable. However, for this project, I opted to bring out the big guns: my Kreg Foreman. For those of you who appreciate the efficiency of pocket hole joinery, this tool is an absolute dream. I once timed myself and was able to make approximately 45 pocket holes in just one minute – it’s incredibly fast and consistent, making repetitive tasks a breeze and speeding up your build significantly.
The beauty of the Kreg Foreman lies in its simplicity and efficiency. After quickly setting the drill bit and clamp to your desired material thickness, you simply pull down the handle, and it precisely drills your pocket hole for you. This ensures perfectly angled holes every time, crucial for strong, invisible joints. I used this powerful tool to create 3/4″ pocket holes along the top edge of both side panels, which will later connect the base to the top of the nightstand. I also added pocket holes on each end of the base piece for secure attachment to the side panels.
Step-by-Step Construction: Assembling Your Floating Nightstand
Building the Core Structure: Side Panels and Base
With our plywood pieces cut and pocket holes drilled, it’s time to assemble the main structure. You’ll want to align the base piece precisely 2.5″ from the bottom edges of your side panels. This specific measurement ensures proper alignment with the face frame we’ll add later. For drawing accurate and straight lines, a speed square is an invaluable tool. It allows you to quickly mark perfect 90-degree lines, guaranteeing your joints are square and strong.
Once your lines are marked, apply a generous line of wood glue along the edge of the side panel where the base piece will attach. Wood glue isn’t just for adhesion; it significantly strengthens the joint, making the overall structure much more robust and durable. Then, align the base piece with your marked line. To hold these pieces securely in place while the screws are driven, I highly recommend using a Kreg right angle clamp. This clamp is designed specifically for pocket hole joinery, ensuring your pieces stay perfectly flush and square as you insert the 1.25″ pocket hole screws through the pre-drilled holes.
Once both side panels are securely attached to the base, you’ll start to see the fundamental structure of your floating nightstand take shape. It’s a very satisfying moment when the pieces come together, showcasing the strength and cleanliness of pocket hole joints.
Adding Internal Support
Next, we’ll add a small 1×3 support board along the front and top of the nightstand’s interior. This piece serves multiple purposes: it adds structural rigidity, provides an additional attachment point for the top, and helps define the opening for your storage baskets. Like the previous steps, this support board is attached using 3/4″ pocket holes and 1.25″ pocket hole screws, ensuring a clean and strong connection without visible fasteners.
Crafting the Face Frame for a Polished Look
The face frame is what gives your nightstand its finished, professional appearance. This entire frame is made from 1×3 lumber. The top and bottom pieces of the face frame require pocket holes on each end. These holes will be used to attach the face frame securely to the side panels of the nightstand’s shell. It’s crucial that these pieces are cut precisely and that your pocket holes are accurately placed for a seamless fit.
Once you have the individual components of your face frame assembled (often with glue and pocket screws, or brad nails at the corners), it’s time to attach it to the main shell of the nightstand. For this, I used a combination of wood glue for superior bonding and 1.25″ finish nails to provide immediate hold while the glue dries. The finish nails leave very small holes that are easily filled, contributing to a smooth, flawless finish.
Constructing and Attaching the Top
The top of the nightstand is made from 1×4 lumber, which offers a beautiful, planked aesthetic. Cut each piece to the specified size according to the plans. For a strong and seamless appearance, you’ll add 3/4″ pocket holes along the long sides of all but one of these boards. This allows you to join the planks together from the underside, leaving a smooth surface on top. Think of it like creating a small tabletop for your nightstand.
Join these 1×4 planks together using 1.25″ pocket hole screws. Ensure they are pulled tight for minimal gaps, creating a unified and sturdy top surface. Once the top is assembled, we’ll attach it to the main nightstand structure. To do this, I placed the nightstand upside down on top of the newly created planked surface. This allows for easy access to the pocket holes on the underside of the top, which you’ll use to attach it to the nightstand’s frame. Secure it with 1.25″ pocket hole screws and a line of wood glue for maximum strength and stability. This method hides all fasteners, maintaining the clean lines of the design.
The Finishing Touch: Staining for the Perfect Shade
Now for the exciting part – bringing your nightstand to life with color! For those of you who follow us on Instagram, you might have recently seen a photo I shared featuring Varathane’s latest stain collection. After careful consideration, I chose the beautiful shade “Briarsmoke” for this piece. This stain is readily available at most home improvement stores like Home Depot or conveniently online through Amazon.
Briarsmoke is truly a unique color – an almost exact match to the custom stain I created for her bed and several other recent projects. It’s the perfect cool brown with just a hint of grey, offering a sophisticated and contemporary look that complements a wide range of decor styles. To apply it, I used a brush, ensuring even coverage, then wiped off the excess stain after a couple of minutes. This technique allows the wood grain to shine through while achieving a rich, consistent color. Always test your stain on a scrap piece of wood first to ensure it’s the color and look you desire.
Secure Installation: Making Your Nightstand Float
The final and perhaps most crucial step is securely hanging your floating nightstand. This ensures both stability and safety. I used a 2×3 piece of lumber to create a sturdy cleat, or support, that attaches directly to the wall. It’s absolutely essential to locate your wall studs using a reliable stud finder. Once located, attach the cleat to the wall using 3″ wood screws (like Simpson Wood Screws or similar heavy-duty fasteners) driven directly into the studs. This provides a rock-solid foundation for your nightstand.
Once the cleat is firmly in place, the nightstand simply hangs on it. The support board you previously installed inside the nightstand will rest directly on this wall cleat. To ensure everything is incredibly secure, drive additional screws through the top and back of the nightstand itself, directly into the wall support. This creates a robust and stable floating installation that can safely hold your items for years to come.
The Finished Masterpiece: Styling Your New Storage Solution
And just like that, your DIY floating storage nightstand is complete and ready to adorn your bedroom! Here it is again, beautifully finished and perfectly styled.
The beauty of this project lies not only in its functionality but also in how easily it can be personalized to fit your unique style. The gold vinyl wall triangles provide a chic, geometric backdrop and can be found HERE! A sleek lamp adds essential task lighting and a touch of modern elegance, which you can find HERE! To complete the cozy aesthetic, a decorative feather pillow adds texture and comfort, available HERE! And for ultimate convenience and tidiness, her bedding is zipper bedding from Beddy’s – a brand two of my girls absolutely love for its amazing practicality and style.
The serene wall color, Embellished Blue by Sherwin-Williams, perfectly complements the warmth of the Briarsmoke stain and the pops of gold, creating a harmonious and inviting bedroom retreat. This floating nightstand truly ties the whole room together, offering both beauty and unparalleled storage efficiency.
We hope this detailed guide has inspired you to create your very own DIY Floating Storage Nightstand. It’s a rewarding project that adds significant value and style to any space. Thank you so much for stopping by and sharing in our passion for DIY! Please don’t hesitate to reach out if you have any questions at all about the build process or styling. Happy building!