
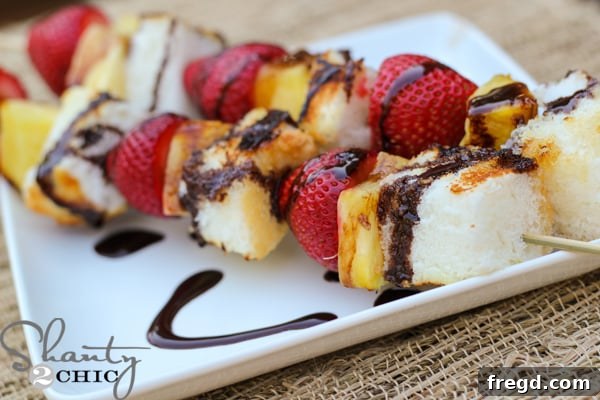
Grilled Fruit Skewers with Chocolate Drizzle: Your Ultimate Summer Treat
Imagine a vibrant, juicy, and subtly smoky treat that perfectly balances sweetness with a hint of tang. Look no further! These grilled fruit skewers with a decadent dark chocolate drizzle are not just a recipe; they’re an experience. Whether you’re planning a festive 4th of July barbecue, a relaxed backyard gathering, or simply craving a unique and delightful dessert, these skewers are guaranteed to impress your guests and satisfy your sweet tooth. We recently whipped up a batch, and let’s just say, they were an absolute sensation!
The Inspiration: A Summer Grilling Challenge
Our culinary adventure this month stemmed from an exciting challenge set by Reynolds Real Moms: to create something truly special for the peak of grilling season. We knew we wanted a recipe that was both innovative and incredibly easy to execute, ensuring that busy hosts could spend less time in the kitchen and more time enjoying their guests. The result? These delectable grilled fruit skewers that are as simple to prepare as they are delightful to devour. They embody the spirit of summer entertaining – fresh, flavorful, and fuss-free!
Why Grill Fruit? Unlocking New Flavors
Grilling fruit might sound unconventional to some, but it’s a game-changer! The high heat of the grill caramelizes the natural sugars in the fruit, intensifying their sweetness and creating a beautiful, slightly smoky flavor profile that you simply can’t achieve any other way. The edges develop a lovely char, adding depth and a subtle crispness to the otherwise soft and juicy fruit. This process not only enhances the taste but also transforms the texture, making it an irresistible addition to your outdoor cooking repertoire. Plus, it’s a wonderfully light and refreshing alternative to heavier desserts.
Gather Your Essentials: Simple Ingredients for Spectacular Skewers
One of the best aspects of this recipe is its straightforward ingredient list. You don’t need exotic items or complicated preparations. Most of these can be found at your local grocery store, making this a spontaneous treat perfect for last-minute party planning.
What You’ll Need:
- Fresh Strawberries: Opt for firm, brightly colored strawberries. Their natural sweetness and slight tartness provide a fantastic contrast against the grilled pineapple and cake. Ensure they are washed and hulled.
- Fresh Pineapple: Choose a ripe pineapple for the best flavor. Look for a sweet aroma at the base and a slight give when squeezed. Cut it into bite-sized chunks that are sturdy enough to skewer and won’t fall apart on the grill. The grilling process enhances its juicy, tropical notes.
- Angel Food Cake: For ultimate convenience, we love using ready-made angel food cake from the bakery section. It’s light, airy, and absorbs the flavors beautifully. Cut it into cubes roughly the same size as your fruit pieces. If you’re feeling ambitious, you could bake your own, but store-bought saves precious time!
- 1 Cup of Dark Chocolate Chips: The dark chocolate adds a rich, bittersweet counterpoint to the sweetness of the fruit and cake. High-quality chips will melt more smoothly and offer superior flavor.
- 1/4 Cup of Honey: Honey serves as the base for our glazing mixture, adding a touch of golden sweetness and helping the fruit caramelize beautifully on the grill.
- 1/2 of a Lime: Fresh lime juice is essential! It brightens the flavors, adds a zesty kick, and balances the sweetness from the honey and chocolate. Don’t skip this for that refreshing finish.
- 1 Package of Wooden Skewers: If using wooden skewers, remember to soak them in water for at least 30 minutes before grilling. This prevents them from burning on the grill and ensures your delicious creations stay intact. Alternatively, you can use metal skewers.
- 1 Sheet of Reynolds Wrap Foil for the Grill: This is our secret weapon for easy grilling and even easier cleanup. Its non-stick properties prevent the fruit from sticking, and it acts as a barrier, ensuring a spotless grill afterward. We’ll discuss its benefits in detail!
Crafting Your Grilled Masterpiece: Step-by-Step Instructions
Preparing these skewers is a straightforward process that anyone can master. Follow these simple steps for a dessert that looks and tastes gourmet, without the fuss!
- Prepare Your Skewers: If using wooden skewers, immerse them in water for at least 30 minutes. This crucial step prevents them from catching fire on the grill, allowing your fruit and cake to cook perfectly.
- Assemble the Skewers: Carefully thread a piece of strawberry, then pineapple, followed by a cube of angel food cake onto a skewer. Repeat this sequence two more times, ensuring each skewer has a balanced mix of all three components. Try to pack them gently but not too tightly, allowing heat to circulate.
- Whip Up the Honey-Lime Glaze: In a microwave-safe bowl, combine the 1/4 cup of honey and the freshly squeezed juice from half a lime. Heat this mixture in the microwave for about 30 seconds, or until the honey is warm and easily brushable. The warmth helps the honey become more fluid, making it easier to apply.
- Glaze Your Skewers: Using a pastry brush, lightly coat each side of the assembled skewers with the warm honey-lime glaze. This glaze not only adds an extra layer of flavor but also helps in the beautiful caramelization process on the grill.
- Prepare Your Grill with Reynolds Wrap: Line your grill grate with a sheet of Reynolds Grilling Foil. Position the dull side of the foil facing upwards, towards the food. This specific foil is designed with a non-stick coating on the dull side. Critically, use a fork or skewer to punch several holes all over the foil. These perforations are essential as they allow the flavorful juices to drip through and ensure proper heat circulation, giving you that authentic grilled taste while keeping the grill clean.
- Time to Grill: Preheat your grill to a low setting. Once the grill is ready with the foil in place, carefully arrange the prepared fruit skewers on the foil-lined grate.
- Cook to Perfection: Cook the skewers on low heat, turning them occasionally to ensure even browning and caramelization on all sides. This process usually takes about 8-12 minutes, depending on your grill’s temperature. Look for a light golden-brown color on the cake and a slight char on the fruit.
- Remove from Grill: Once the skewers have reached that perfect golden-brown hue and the fruit is slightly softened but still holds its shape, carefully remove them from the grill.
- Melt the Chocolate: While the skewers cool slightly, place the 1 cup of dark chocolate chips in a microwave-safe bowl. Microwave for 45 seconds. Stir well. If not fully melted and smooth, continue microwaving in 15-second intervals, stirring after each, until you achieve a glossy, pourable consistency. Be careful not to overheat the chocolate, as it can seize.
- Drizzle and Serve: Artfully drizzle the melted dark chocolate over the warm grilled fruit skewers. The contrast of the warm fruit and cake with the cooling chocolate is heavenly. Allow the chocolate to set for a minute or two, then serve immediately. Enjoy a few yourself before sharing with your delighted guests!
Effortless Cleanup: The Magic of Reynolds Wrap Foil
One of the unsung heroes of this recipe, and any grilling endeavor, is the Reynolds Wrap Foil for the Grill. We all love grilling, but dread the sticky, burnt-on mess that often follows. This is where the Reynolds Grilling Foil truly shines!
By lining your grill with this specially designed foil, you create a non-stick barrier between your food and the grates. All the sugary drippings from the fruit and honey fall onto the foil, not onto your grill. Once your delicious skewers are cooked and have been removed, and the grill has cooled down, cleanup becomes an absolute breeze. Simply lift the foil, crumple it up, and toss it in the trash. No scraping, no scrubbing, no sticky residue left on your precious grill grates. This means more time enjoying the company of your guests and less time on post-party chores. It’s a game-changer for stress-free entertaining!
Tips for the Perfect Grilled Fruit Skewers Every Time
- Fruit Selection: Always choose ripe but firm fruits. Overripe fruit might become too soft and fall off the skewers during grilling.
- Soaking Skewers: Don’t skip soaking wooden skewers! This step is vital to prevent them from burning.
- Don’t Overcrowd: Give your skewers space on the grill for even cooking and proper caramelization.
- Vary Your Fruit: Feel free to experiment! Peaches, plums, bananas, and even kiwi can be wonderful additions. Just ensure they are cut to a similar size for even cooking.
- Alternate Cakes: While angel food cake is fantastic, pound cake or brioche cubes can also be delicious alternatives, offering a richer texture.
- Spice It Up: A light dusting of cinnamon or a pinch of chili powder (if you like a sweet and spicy kick) can be added to the honey-lime glaze for extra flavor.
- Make Ahead: You can assemble the skewers a few hours in advance and keep them refrigerated. Glaze and grill just before serving for the freshest taste.
- Serving Suggestions: These skewers are delightful on their own, but they also pair wonderfully with a scoop of vanilla bean ice cream, a dollop of fresh whipped cream, or a sprinkle of toasted coconut flakes for an added tropical touch.
Why These Skewers Are a Summer Essential
These grilled fruit skewers hit all the right notes for summer entertaining. They are:
- Easy to Make: Minimal prep and simple grilling steps.
- Visually Stunning: The vibrant colors of the fruit and the elegant chocolate drizzle make for a beautiful presentation.
- Crowd-Pleasing: A universally loved combination of sweet, tart, and rich flavors.
- Versatile: Serve them as a light dessert or a unique appetizer.
- Relatively Healthy: Packed with fresh fruit, it’s a guilt-free indulgence compared to many heavier desserts.
- Cleanup Friendly: Thanks to Reynolds Wrap, post-grill cleanup is almost non-existent.
So, fire up your grill and get ready to create some unforgettable summer memories with these fantastic fruit skewers!
Beyond the Grill: More Summer Entertaining & DIY Inspirations from Shanty Sisters
Summer is the season for gatherings, celebrations, and adding those personal touches that make your home shine. As “The Shanty Sisters,” we believe that entertaining should be joyous and effortless, which is why we’re always on the lookout for creative projects that elevate your hosting game. If you’ve enjoyed making these grilled fruit skewers and are looking for more ways to infuse charm and functionality into your summer events, you’re in luck! We’ve got a treasure trove of easy DIY projects that are perfect for enhancing your entertaining space and wowing your guests.
From practical serving solutions to beautiful decorative accents, these tutorials will guide you through creating unique pieces that reflect your style. Click on the images below to explore detailed step-by-step guides for each project. Get ready to unleash your creativity and make your next gathering truly special!
DIY Chalkboard Serving Tray: Perfect for labeling appetizers, drinks, or leaving fun messages for your guests. This project adds a personalized and practical touch to any party spread.
Rustic Wood Shim Table Runner: Elevate your dining table with this charming, handcrafted table runner. It brings a touch of natural elegance to both indoor and outdoor settings.
Charming Mason Jar Centerpieces: Versatile and beautiful, these centerpieces can be adapted for any theme or occasion, adding a warm, inviting glow to your tablescape.
DIY Pottery Barn Inspired Table: Build a stylish and sturdy table that looks like it came straight from a high-end catalog, perfect for outdoor dining or an extra serving surface.
DIY Outdoor Cooler: Keep your beverages perfectly chilled and easily accessible with this fantastic DIY cooler project, a must-have for any outdoor gathering.
Happy Entertaining!
We hope this recipe for grilled fruit skewers brings joy and deliciousness to your summer events. With minimal effort and maximum flavor, they are truly a highlight for any celebration. From our kitchen to yours, enjoy the grilling season and the wonderful moments it brings!
~The Shanty Sisters