
DIY Fall Berry Wreath: Craft Your Own Stunning Autumn Decor
The crisp air, the vibrant hues of changing leaves, and the comforting scent of pumpkin spice – autumn is undeniably one of the most beloved seasons for many. As temperatures begin their welcome descent and nature transforms into a breathtaking palette of reds, oranges, and golds, it’s the perfect time to infuse your home with the warmth and charm of fall. What better way to welcome this glorious season than with a beautiful, handmade fall wreath gracing your front door?
Creating your own seasonal decor is not only a deeply satisfying creative outlet but also an excellent way to personalize your space and express your unique style. Forget expensive store-bought wreaths; with just a few simple materials and a dash of creativity, you can craft a stunning, high-quality wreath that truly captures the spirit of autumn. This project is so delightfully simple and quick, you’ll wonder why you haven’t tried it sooner!
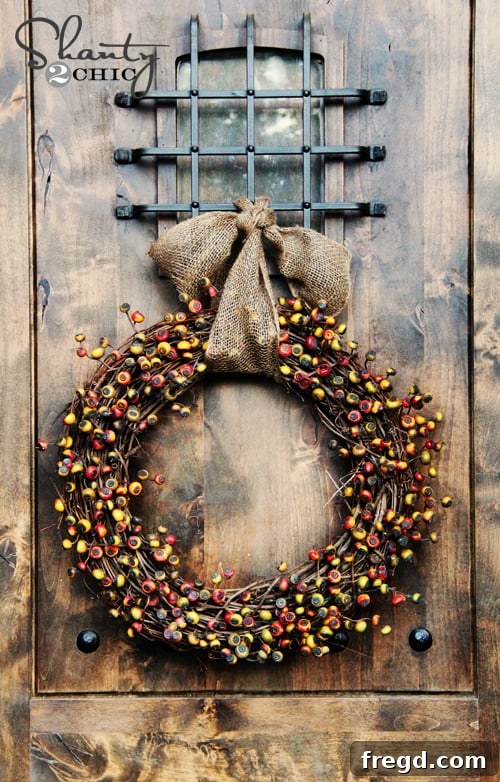
Behold Your Handmade Autumn Masterpiece!
Imagine the pride of displaying a gorgeous, custom-made wreath that perfectly complements your home’s aesthetic. This year, my fall wreath turned out absolutely beautifully, bursting with rich colors and textures that instantly evoke the cozy ambiance of the season. It’s a focal point that welcomes guests and brings a smile to my face every time I walk through the door. The best part? It looks far more intricate and expensive than it actually was to make!
This DIY fall berry wreath project is incredibly straightforward, even for crafting novices. It’s designed to be a quick yet impactful addition to your autumn decorating scheme. So, let’s gather our materials and get ready to transform a few simple items into a captivating display of fall beauty!
Gather Your Essential Supplies for a Gorgeous Fall Wreath
One of the many joys of this project is the minimal number of supplies required, most of which can be easily found at your local craft store. You’ll be surprised at how affordable and accessible it is to create such a charming piece of decor.
The Foundation: A Grapevine Wreath
Your journey begins with a natural grapevine wreath. These wreaths are fantastic because their rustic, intertwined branches provide a beautiful base that looks great even before embellishments are added. They also offer plenty of nooks and crannies to securely tuck in and glue your decorative elements. I managed to find mine for an incredibly reasonable price, typically around $3, at a craft store like Hobby Lobby. Grapevine wreaths come in various sizes, so consider where you’ll be hanging your wreath and choose a diameter that fits your space perfectly. For a standard door, a 18-inch to 24-inch wreath is usually ideal, offering a substantial presence without overpowering the entryway.
The Embellishment: Artificial Berry Stems
The heart of this wreath lies in the vibrant berry stems. The price of these stems can vary widely depending on the type, quality, and store. For this particular project, I invested in some beautiful berry stems that were about $3 each. While this might seem a bit pricey at first glance, the quality and realistic appearance of the berries were irresistible, and I knew they would make the wreath truly pop. I used eight individual stems to achieve a full and lush look. When selecting your stems, look for:
- Rich Autumn Colors: Think deep reds, burnt oranges, golden yellows, and even some hints of evergreen or rustic brown.
- Realistic Textures: Berries should look natural, and if there are leaves attached, they should have a convincing autumn tint.
- Variety (Optional): While I focused on berries for this wreath, you could also mix in small fall leaves, miniature faux pumpkins, or other autumnal elements if you desire more variety.
Craft stores like Hobby Lobby and Michael’s are excellent places to find a wide array of seasonal floral stems. Keep an eye out for sales, as these stores frequently offer discounts on their seasonal decor, allowing you to stock up on beautiful materials without breaking the bank.
The Tools: Pliers and Hot Glue
You’ll need a reliable pair of wire cutters or small pliers to trim your floral stems. Many artificial stems have wire inside, making them sturdy but requiring a good cutter to manage. These pliers will allow you to precisely cut the longer stems into smaller, more manageable pieces, which is key to filling out your wreath evenly and efficiently.
And, of course, a hot glue gun and plenty of glue sticks are indispensable for this project. Hot glue provides a strong, quick-drying bond that will keep your berry stems firmly in place on the grapevine wreath. Always exercise caution when using a hot glue gun to avoid burns.
Step-by-Step Guide: Crafting Your Easy Fall Berry Wreath
Now that you have all your materials, let’s dive into the fun part: assembly! This process is less about precise measurements and more about artistic intuition, making it a wonderfully relaxing and rewarding craft.
- Prepare Your Stems: Start by using your pliers or wire cutters to snip the longer berry stems into smaller, individual pieces. Aim for varying lengths – some shorter for filling in tight spots, and some slightly longer to give your wreath depth and dimension. Don’t be afraid to experiment; you can always trim more if needed. Having a good assortment of sizes will make the next step much easier.
- Plan Your Placement (Optional but Recommended): Before you start gluing, you might find it helpful to lay your trimmed berry pieces onto the grapevine wreath to get a rough idea of your desired arrangement. This allows you to visualize the fullness and balance of the design, ensuring you spread the colors and textures evenly. You can opt for a symmetrical look or a more organic, free-flowing design.
- Begin Gluing Your Berry Stems: This is where the “no science” part comes in! Start by applying a generous dot of hot glue to the end of a small berry stem. Then, carefully tuck and press the stem into the intricate branches of the grapevine wreath, starting from the inside edge. The natural twists and turns of the grapevine provide an excellent anchor for the stems.
- Work Your Way Around: Continue this process, working your way around the entire wreath. The goal is to fill in any empty spots you see, gradually building up the layers of berries until you achieve your desired fullness. Don’t worry about perfection; the beauty of a handmade wreath often lies in its slightly imperfect, organic feel.
- Add Layers for Depth: As you work, remember to vary the angles and depths at which you insert the stems. Some stems can be pushed further in, others kept closer to the surface, creating a lovely sense of texture and dimension. This layering technique prevents the wreath from looking flat and gives it a more professional, designer touch.
- Continuously Assess: Step back frequently to look at your wreath from a distance. This will help you identify any sparse areas that need more berries or areas where you might want to add a contrasting color or texture. Keep going until you are happy with the overall appearance.
This intuitive process makes the DIY experience truly enjoyable. There’s no right or wrong way, just your way! Embrace the creative flow, and watch your beautiful fall wreath come to life.
Finishing Touches and Displaying Your Wreath
Once your wreath is adorned with all its beautiful berry stems, it’s time to think about how you’ll display it. The right hanger can truly complete the look and ensure your masterpiece is securely showcased.
Crafting a Charming Hanger
For a rustic and charming touch, I found some lovely burlap garland at Hobby Lobby. Burlap adds a wonderful texture that perfectly complements the natural feel of the grapevine and berries. To create a hanger, simply cut a desired length of burlap – enough to loop over your door hook or nail, with some slack for an attractive drape. Thread one end of the burlap through the top section of your wreath, bring the ends together, and tie a sturdy knot. You can then trim the tails to your preferred length, allowing them to hang down or keeping them neat and short. If burlap isn’t your style, a festive autumn-colored ribbon (think deep red, forest green, or burnt orange) or even some floral wire wrapped in a complementary fabric could also work beautifully. Michael’s also carries a great selection of garlands and ribbons for this purpose.
Burlap garland is also incredibly versatile; I often use it for other seasonal decorations, like weaving it through my Christmas tree for a cozy, homespun feel. It’s an investment that pays off across multiple holidays!
Admire Your Handiwork: More Views of the Finished Wreath
Here are a few more glimpses of this easy-peasy fall berry wreath from different angles. Notice how the simple combination of grapevine and berry stems creates such a rich and inviting look. The textures and colors are truly captivating, making it a perfect statement piece for any entryway or interior wall.
The subtle sparkle of the berries catches the light, adding a dynamic element to the wreath. It’s these small details that elevate a simple craft into a cherished piece of home decor.
This angle highlights the fullness achieved by strategically placing the stems, ensuring a lush, abundant appearance that truly embodies the harvest season.
Beyond the Wreath: Extending Your Autumn Decor
I sincerely hope you adore this DIY fall berry wreath as much as I do! It’s such a joyful addition to seasonal decorating. The next step for me is to bring out all the pumpkins and gourds to adorn the entryway, ensuring they perfectly complement the vibrant colors of this new wreath. Creating a cohesive and welcoming autumn display is all about layering textures and colors, and a beautiful wreath is the perfect starting point.
There’s something incredibly satisfying about transforming your home for the seasons, and fall offers so many wonderful opportunities for cozy, inviting decor. From creating festive centerpieces to arranging autumnal vignettes on shelves and mantels, every handmade touch adds to the warmth and personality of your space.
Thank you so much for taking the time to explore this DIY project. I would absolutely love for you to share your own fall wreath creations! Feel free to pin this idea to your Pinterest boards or share it with friends who appreciate simple, beautiful crafts. Your support and enthusiasm inspire me to keep sharing more creative projects.
Happy crafting, and enjoy the beauty of the fall season!