
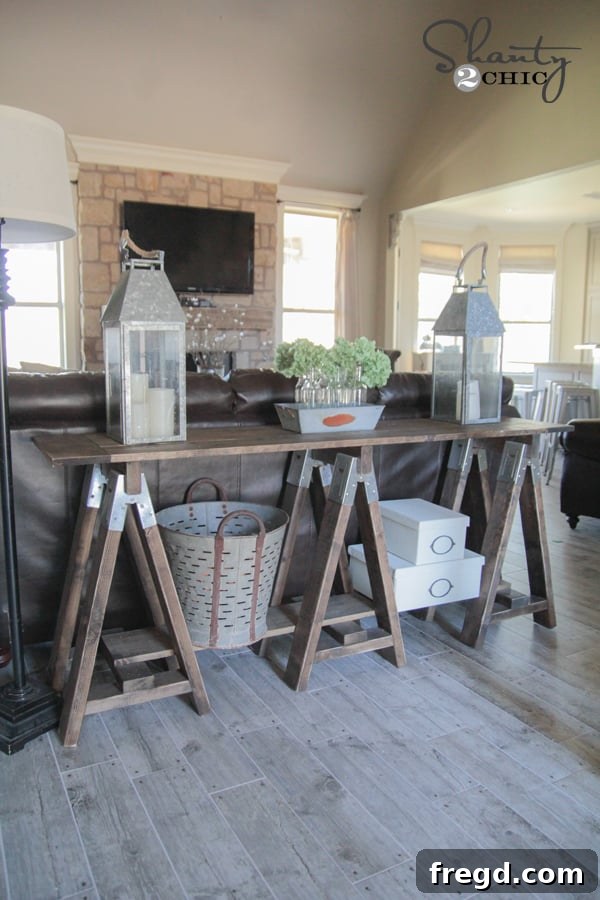
Craft Your Own Masterpiece: The DIY Sawhorse Console Table
Embark on an exciting journey to create stunning, functional furniture for your home! Today, we’re thrilled to unveil a custom-designed and built console table that perfectly marries rustic charm with modern versatility: the DIY Sawhorse Console Table. This piece has quickly become a beloved fixture, showcasing the beauty and satisfaction of handmade craftsmanship. Its elegant, slender profile and ample length make it an ideal addition to virtually any room, from a welcoming entryway to a stylish living room or a practical home office. Get ready to transform ordinary lumber into an extraordinary statement piece!
Not only will this guide walk you through every step of the construction process, but we’re also providing FREE printable plans to ensure your build is as smooth and straightforward as possible. These detailed plans, available by clicking the link or the button below, are your ultimate companion for this rewarding DIY project.
Why Choose a DIY Sawhorse Console Table?
In a world of mass-produced furniture, building your own sawhorse console table offers unique advantages. It’s not just about saving money; it’s about crafting a piece that perfectly fits your space, reflects your personal style, and provides immense satisfaction. Console tables are incredibly versatile, serving as an attractive focal point in hallways, behind sofas, or as a slim desk. The sawhorse design adds a touch of industrial-chic or modern farmhouse aesthetic, depending on your chosen finish. Moreover, using readily available materials like 2x4s keeps the cost incredibly low, making custom, high-quality furniture accessible to everyone. This project is ideal for both beginner and intermediate DIY enthusiasts looking to enhance their woodworking skills and add a unique touch to their home decor.
Gathering Your Materials: The Foundation of Your Build
The first crucial component for this project is a set of reliable sawhorse brackets. These clever pieces of hardware are designed to simplify the construction of a sturdy sawhorse base. You can typically find them in the hardware section of most home improvement stores, often near the pre-made sawhorses or lumber. They usually come in packages of two, which is perfect for creating the two bases needed for our console table. We’ll be using three sets, totaling six brackets, to ensure maximum stability and a robust structure for your table. Always prioritize quality brackets, as they are fundamental to the table’s strength and longevity.
The beauty of this project lies in its cost-effectiveness, largely thanks to the use of readily available 2×4 lumber. This common and inexpensive wood forms the backbone of our table’s structure. Following the detailed cuts provided in the plans, you’ll begin by creating the primary components of your sawhorse bases. Each individual sawhorse will require three boards, precisely cut to 27.5 inches each. Accuracy in these initial cuts is paramount for a professional-looking and stable final product. Take your time, measure twice, and cut once!
Assembling the Sawhorse Bases: Step-by-Step
The assembly process for the sawhorse bases is incredibly straightforward, even for those new to woodworking. The design of the sawhorse brackets makes this step intuitive and quick. Simply insert the ends of your pre-cut 2×4 boards into the bracket’s designated slots. These slots are engineered to hold the wood securely. Once the boards are seated firmly, use a wood screw to fasten them in place. This single screw per board provides the necessary stability, locking the lumber into the bracket and forming a robust leg for your table. Repeat this process for all three boards on each bracket until you have two complete sawhorse legs.
Once you’ve secured the initial three boards, each bracket will take on the characteristic “A-frame” shape of a sawhorse leg. This initial structure will be surprisingly stable even at this stage, giving you a clear visual of the table’s foundation taking shape. Ensure all screws are driven flush and tight, securing the integrity of each leg before proceeding.
To further reinforce the sawhorse structure and prepare it for the table’s top, you’ll need three additional smaller pieces of 2×4, each cut to 16.5 inches. These pieces are designed to fit into the “teeth” or clamping mechanism of the sawhorse brackets, effectively spreading the legs and locking them into their final open position. Gently fit these shorter boards into the designated slots, applying pressure until they clamp down firmly. This action provides lateral stability, making your sawhorse bases incredibly sturdy and ready to support the weight of the tabletop and anything you choose to display on it. Repeat this for both sawhorse bases.
Adding Essential Bracing and Structural Integrity
With the main sawhorse leg structures complete, the next step involves adding crucial cross-braces that will not only enhance the stability of your console table but also provide support for the future bottom shelf. For this, you will cut several pieces of lumber, each 12 inches long. A key detail for these pieces is the mitered cut: each end should be cut at a 14-degree angle. This specific angle ensures that the braces sit flush and provide optimal support when attached to the angled legs of the sawhorse bases. Precision with your miter saw here will result in clean, strong joints.
To attach these braces with professional-grade strength and aesthetics, we turn to pocket hole joinery. This technique creates incredibly strong, hidden joints, perfect for furniture building. Using a Kreg Jig K5 (or a similar pocket hole jig), set it to create 1.5-inch pocket holes. You will need to drill pocket holes on each of these 12-inch pieces. The Kreg Jig makes this process simple and consistent, ensuring that your screws drive into the wood at the correct angle for maximum holding power. Proper alignment in the jig, as shown in the images, is crucial for accurate pocket hole placement.
Once your pocket holes are drilled, it’s time to attach these braces to the sawhorse legs. Using 2.5-inch pocket hole screws, fasten each brace securely. These screws are specifically designed for pocket hole joinery, providing excellent grip and pull-out resistance. Position each brace precisely 3.5 inches from the bottom of the leg boards. This consistent spacing ensures the bottom shelf will be level and positioned correctly, creating a balanced and functional design. Double-check your measurements before driving in the screws to avoid any misalignments.
Next, you’ll need three more 2×4 pieces, each cut to 14 inches in length. These pieces will serve as additional supports directly beneath the bottom shelf, further strengthening its structure and ensuring it can hold various items without sagging. These supports are attached perpendicular to the previously installed leg braces, creating a grid-like foundation for the shelf.
For attaching these supports, a combination of Gorilla wood glue and 2-inch finish nails is ideal. The wood glue provides an incredibly strong bond, minimizing any potential movement, while the finish nails offer immediate holding power as the glue cures. Apply a thin, even bead of wood glue to the mating surfaces, then secure the boards with the finish nails. This dual-fastening method ensures long-term durability and a solid feel to your console table’s base.
For efficient and precise nailing, a cordless finish nailer like the Ryobi Airstrike is a game-changer. Its portability and lack of a hose or compressor make it incredibly convenient for projects like this, allowing you to work freely without being tethered to an air source. This tool drives nails cleanly and consistently, speeding up the assembly process significantly while maintaining a high level of craftsmanship. It’s a worthy investment for any serious DIYer.
Crafting the Bottom Shelf and Planked Tabletop
Now that the robust base structure is complete, it’s time to add the bottom shelf – a practical feature that provides additional storage or display space. For this, you will use two 1×4 boards, each cut to a length of 58 inches. Carefully align these boards side by side, ensuring they are perfectly even and flush. A combination of wood glue and finish nails will be used to secure them together and to the underlying supports. Apply wood glue generously along the edges where the two 1x4s meet and where they rest on the 2×4 supports, then use finish nails to secure them. While the photo of this specific step was missed, rest assured it’s a straightforward process that will quickly bring the bottom shelf to life.
The tabletop is arguably the most visually prominent part of your console table, and a planked top offers a beautiful, custom look. For this, we’ll again utilize the power of the Kreg Jig to create strong, seamless joints. Once you experience the clean, tight joinery achieved with pocket holes, you’ll find it indispensable for all your planked projects. It eliminates visible fasteners from the top surface and ensures that individual planks stay perfectly aligned, preventing warping or separation over time.
Begin by cutting your longer tabletop boards. These will be 1×6 lumber, cut to 59 inches long. The choice of 1×6 pine boards provides a classic, versatile aesthetic that can be stained or painted to match any decor style. For a wider table top, you might opt for more 1×6 planks.
Once your 1×6 planks are cut, use your Kreg Jig to drill 3/4-inch pocket holes along the long edges of two of these boards. These pocket holes will allow you to securely join the planks from underneath, creating a solid, cohesive tabletop without any visible screws on the surface. Additionally, drill two pocket holes on each end of every plank. These will be used to attach the breadboards, which will cap the ends of the tabletop and prevent warping.
Assemble the planked top by connecting the boards using 1.25-inch pocket hole screws. These screws are specifically designed to work with the pocket holes, drawing the planks together tightly for a strong, flush joint. While wood glue can add extra strength, it’s not strictly necessary for planked tops when using pocket holes, as the screws provide ample holding power and allow for wood movement. For those who prefer a cleaner process without the mess of glue, pocket hole screws alone offer a reliable and robust connection.
The final step for the tabletop is to add the breadboards. These pieces are not only aesthetically pleasing, giving the table a finished look, but they also serve a functional purpose by helping to stabilize the planks and prevent cupping or warping across the grain. It is highly recommended to measure the actual width of your assembled planked top before cutting your breadboards. Wood can have slight variations in width, so a precise measurement here ensures a perfect, tight fit. Once cut, attach the breadboards to the ends of the planked top using 1.25-inch pocket hole screws through the pre-drilled holes. This will complete your beautiful and sturdy tabletop.
Bringing It All Together: Final Assembly and Finishing
With both the base and the tabletop meticulously constructed, it’s time for the gratifying step of joining these two main components. To ensure a solid, long-lasting connection, apply a continuous bead of wood glue along the top edges of each sawhorse base where the tabletop will rest. This adhesive creates a strong bond that prevents any shifting or creaking over time. Immediately after applying the glue, carefully center your planked tabletop onto the bases. Once aligned, use 2-inch finish nails to secure the tabletop to the bases, driving them through the top surface and into the underlying 2x4s of the sawhorse structure. The combination of glue and nails provides exceptional stability.
The finishing touches are where your console table truly comes to life and reflects your personal style. For this project, a beautiful and popular choice is Varathane Wood Stain in the shade “Ash,” readily available at Home Depot. This stain provides a rich, elegant hue that enhances the natural grain of the wood. One of the many benefits of using sawhorse brackets in this design is their ease of finishing; if you happen to get a little stain on them, they wipe clean easily, eliminating the need for tedious taping off. Apply your chosen stain evenly, following the grain of the wood, and allow it to dry completely according to the manufacturer’s instructions. For added durability and protection, especially in high-traffic areas, consider applying a clear topcoat like polyurethane after the stain has fully cured. This will safeguard your table against spills, scratches, and everyday wear, ensuring it remains a beautiful piece for years to come.
Admiring Your Handiwork: The Finished Console Table
After all your hard work, patience, and attention to detail, the moment has arrived to behold your completed DIY Sawhorse Console Table. There’s an unparalleled sense of accomplishment that comes with stepping back and admiring a piece of furniture you’ve built with your own hands. This table, with its sturdy sawhorse base and elegant planked top, is more than just a functional item; it’s a testament to your creativity and skill.
Whether placed in your entryway adorned with decorative accents, behind a sofa grounding your living space, or as a functional desk in a home office, this console table will undoubtedly draw compliments. Its versatile design allows it to seamlessly integrate into various decor styles, from modern farmhouse to industrial chic or even a minimalist aesthetic, depending on your chosen finish and styling. The ample surface area provides space for lamps, books, photos, or seasonal decorations, while the lower shelf offers additional storage or display opportunities, keeping your space organized and beautiful.
We absolutely adore the final outcome and trust that you will too! The combination of practical functionality, aesthetic appeal, and the satisfaction of building something unique makes this DIY Sawhorse Console Table an exceptional addition to any home.
Unveiling the True Cost of DIY Excellence
One of the most compelling aspects of embarking on a DIY furniture project like this sawhorse console table is the incredible cost savings compared to purchasing a similar piece from a retail store. Let’s break down the expenses:
- Sawhorse Brackets: At approximately $7 for a set of two, and needing three sets in total, the cost for these essential components comes to just $21.
- Lumber: Utilizing common and affordable 2x4s and 1x6s, the total cost for all the wood required for the bases, supports, and tabletop is an astonishingly low $48.
This brings the grand total for your custom-built, high-quality sawhorse console table to under $70! Can you believe it? This price point is almost unheard of for a piece of furniture of this size and caliber. This demonstrates the immense value and financial wisdom in choosing to build it yourself. Imagine the satisfaction of telling guests that this beautiful and functional table was created with your own hands, for a fraction of the retail price!
As a little bonus detail, for those of you with a keen eye, you might have noticed the stunning new floors beneath the table. They are indeed a personal favorite and one of the best home improvement decisions made recently. These are elegant faux wood tiles from The Tile Shop, specifically the sophisticated Cottage Grey variety. They provide a beautiful, durable, and low-maintenance foundation for any room.
Your Journey to DIY Success Starts Now!
Thank you so much for joining us on this detailed walkthrough. We hope this guide has inspired you and provided all the necessary information to confidently tackle your own DIY Sawhorse Console Table. Remember, the beauty of DIY lies in the process as much as the finished product. Don’t hesitate to reach out if you have any questions at all – we’re here to help you every step of the way!
Happy building,
~Whitney
Ready to get started? Download the complete, free printable plans for this DIY Sawhorse Console Table by clicking HERE or by clicking the button below. These plans include detailed cut lists, diagrams, and measurements to make your build seamless and successful. Let’s create something beautiful together!