
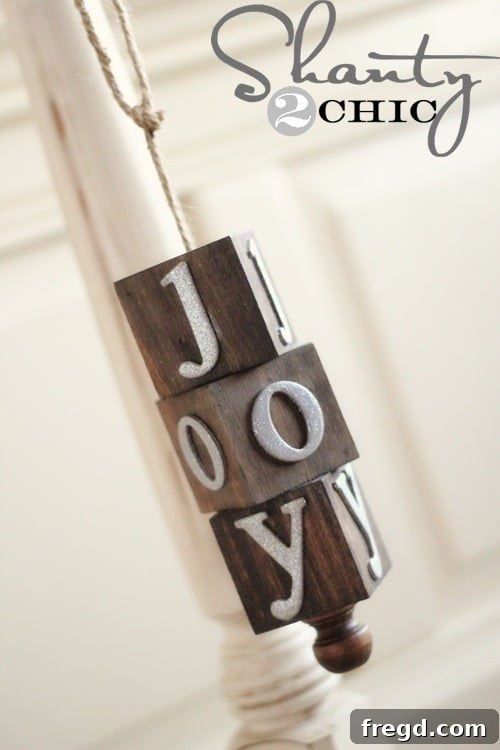
DIY Wooden Block Christmas Ornament: Craft Your Own Rustic Holiday Charm
The holiday season is a magical time of year, filled with warmth, joy, and the spirit of giving. What better way to infuse your home with festive cheer than by creating your own personalized decorations? Today, we’re thrilled to share our first Christmas decor project of the year: an incredibly easy, thrifty, and utterly charming DIY wooden block Christmas ornament!
This delightful craft project is perfect for adding a touch of rustic elegance to your Christmas tree, hanging whimsically from a doorknob, or even presenting as a heartfelt, handmade gift to a beloved teacher or friend. It’s a wonderful way to express your creativity and embrace the true spirit of the holidays. Get ready to transform simple materials into a cherished keepsake that will be treasured for years to come!
Why Choose a Handmade Wooden Christmas Ornament?
In a world increasingly dominated by mass-produced decorations, a handmade ornament stands out as a unique and personal statement. It carries a special story, infused with the care, effort, and creativity of its maker. This particular DIY wooden block ornament offers numerous compelling benefits that make it an ideal choice for your holiday crafting:
- Effortless Creation: This project is designed for crafters of all skill levels. You don’t need advanced woodworking knowledge or complex tools to achieve stunning results. Its simplicity makes it a relaxing and rewarding activity.
- Budget-Friendly Decor: Utilizing readily available and often discounted materials from craft stores, you can create high-quality, beautiful decor without overspending. This project proves that elegance doesn’t have to come with a hefty price tag.
- Limitless Personalization: The beauty of this ornament lies in its adaptability. While we’ve chosen “JOY,” you can easily select chipboard letters to spell out “PEACE,” “LOVE,” “NOEL,” or even family initials. This allows you to create truly bespoke pieces that reflect your personal style or the recipient’s preferences.
- Versatile Display Options: These charming blocks aren’t confined to the Christmas tree. They can adorn mantels, wreaths, banisters, or even serve as unique place settings for your holiday dinner table, adding a festive touch wherever they are placed.
- Enduring Quality: Crafted from sturdy wooden blocks, these ornaments are built to withstand the test of time, ensuring they become a beloved part of your holiday traditions for many seasons to come.
- Thoughtful Gifting: A handmade gift carries an extra layer of warmth and thoughtfulness. Presenting one of these personalized wooden ornaments to a teacher, neighbor, friend, or family member shows genuine care and appreciation, making it a truly memorable present.
Gathering Your Essential Supplies for This Festive Craft Project
Before you embark on your crafting journey, it’s crucial to ensure you have all your materials organized and ready. A well-prepared workspace not only makes the process smoother and more efficient but also significantly enhances the enjoyment of your DIY experience. Here’s a detailed breakdown of everything you’ll need to create your rustic wooden block Christmas ornament:
Detailed Materials List:
- Unfinished Wooden Blocks: For our “JOY” ornament, we utilized three plain, unfinished wooden blocks. The number and size of blocks can be adjusted based on the word or phrase you wish to spell. These are staple items found in the unfinished wood section of most craft stores, such as Hobby Lobby.
- Chipboard Letters: Choose chipboard letters that correspond to your desired word. For an ornament where letters are displayed on all four sides of each block (as with our example), you’ll need multiple sets. We purchased three packages of chipboard letters to ensure we had four “J”s, four “O”s, and four “Y”s. Keep an eye out for sales and coupons at craft stores—they often offer significant discounts, making this project even more economical!

- Finial Dowel Caps: A single package of unfinished wooden finial dowel caps will add a beautifully finished, decorative element to the top and bottom of your ornament. These are typically located near the wooden blocks and other unfinished wood components in craft stores.
- Wood Stain: Our preferred choice for achieving a rich, warm, and inviting finish is Rust-Oleum Dark Walnut stain. Its deep hue is excellent for enhancing the natural grain of the wood and providing a classic rustic aesthetic.
- Glitter Spray Paint: To give your letters that essential holiday sparkle, we highly recommend Rust-Oleum Glitter Spray Paint. We opted for silver, but this versatile paint is also available in vibrant red and classic gold, allowing you to perfectly complement your holiday color scheme.
- Jute Twine (4-ply): This natural, sturdy fiber twine is integral for both assembling the blocks and creating a rustic hanging loop. You can find 4-ply jute twine at Hobby Lobby and other craft supply retailers.
- Hot Glue Gun and Glue Sticks: An absolute must for securely and quickly attaching the chipboard letters to your wooden blocks.
- Foam Brush: Ideal for applying wood stain smoothly and evenly to prevent streaks and ensure consistent coverage.
- Clean Cloths: Essential for wiping away excess wood stain, achieving a clean finish, and for general cleanup.
- Power Drill and Drill Bits: A power drill fitted with a drill bit that is just slightly thicker than your jute twine will be needed to create clean holes through the wooden blocks for assembly.

Step-by-Step Crafting Guide: Building Your Personalized Wooden Block Ornament
Step 1: Staining Your Wooden Blocks and Finial Caps
The first step in transforming your raw materials into rustic beauties is to apply the wood stain. Choose a well-ventilated area, such as outdoors or in a garage, to minimize exposure to fumes and ensure proper drying conditions.
Using a foam brush, apply a single, even coat of Rust-Oleum Dark Walnut stain to all surfaces of your wooden blocks and finial caps. The rich dark walnut color will not only give your ornament a classic, rustic appeal but also beautifully enhance and highlight the natural grain of the wood, adding depth and character.
Allow the stain to penetrate and sit on the wood for approximately 5 minutes. This duration gives the wood sufficient time to absorb the pigment without becoming overly saturated. Following this, take a clean, dry cloth and gently wipe away any excess stain. This technique is crucial for achieving a beautiful, even finish and preventing the wood from appearing too dark or becoming sticky to the touch.
Once wiped, carefully set these stained pieces aside in a clean, dry area with good air circulation to cure completely. Drying times can vary significantly based on factors like humidity and ventilation, so always refer to the product instructions for the most accurate guidelines. This thorough drying is a critical step to prevent smudging and ensure durability later in the process.
Step 2: Adding Sparkle to Your Chipboard Letters
While your stained wooden components are drying, you can turn your attention to bringing some festive sparkle to your chipboard letters. This is where your ornament truly begins to shine!
We chose the stunning Rust-Oleum Glitter Spray Paint in silver for its beautiful shimmer and undeniably festive appeal. This particular paint delivers an exceptional sparkle and is also available in vibrant red and classic gold, providing you with fantastic options to customize your ornament to perfectly match your existing holiday decor or personal aesthetic.
Carefully arrange your chipboard letters on a protected surface—such as cardboard or newspaper—in a well-ventilated area, preferably outdoors. As previously noted, for our “JOY” ornament with letters on all four sides of each cube, we used four of each letter (J, O, Y) to ensure complete coverage and flexibility during assembly.
Apply two thin, even coats of glitter spray paint to each letter. It is crucial to allow ample drying time between coats. This layering technique ensures full, vibrant coverage and maximizes the glitter’s sparkle without causing drips, clumping, or an uneven finish. Ensure the letters are completely dry to the touch and firm before proceeding to the next step.
Step 3: Drilling Holes for Assembly
While your glittery letters continue to dry and cure, you can prepare the wooden blocks for assembly by drilling the necessary holes. This step requires precision and attention to safety.
Select a drill bit that is just slightly larger than the thickness of your 4-ply jute twine. This slight clearance is important; it will allow the twine to pass through the blocks smoothly and easily without excessive friction, fraying, or struggling. If the hole is too tight, threading will be incredibly difficult; if it’s too wide, the blocks may not sit snugly or evenly once assembled.
Using a power drill (we found our 18-Volt Ryobi drill to be very effective), carefully pre-drill a hole through the precise center of each wooden block, from top to bottom. Always prioritize safety when operating power tools: ensure you are wearing appropriate eye protection, and firmly secure your workpiece with a clamp or vice to prevent it from shifting or rotating during drilling. This careful preparation ensures straight, clean holes for seamless assembly. And don’t worry, no granite countertops were harmed in the making of this ornament! 
Step 4: Attaching the Glittery Letters to the Blocks
By now, your glitter-covered letters should be completely dry and ready to be affixed to the stained wooden blocks. Prepare your hot glue gun by ensuring it’s fully heated and ready for use.
Carefully flip each chipboard letter over and apply a small, controlled dab of hot glue to the center of its back. Working quickly before the glue sets, precisely position and press one letter onto each side of your stained wooden cubes. Take a moment to ensure the letters are centered and properly aligned on each face for a neat and professional finish. Repeat this process for all blocks, meticulously spelling out your chosen word (e.g., J-O-Y) on each of the four visible sides of the blocks.
Step 5: Assembling Your Ornament with Jute Twine
Now comes the exciting part: bringing all your prepared components together to form the complete ornament!
Cut a generous length of your 4-ply jute twine—longer than you think you’ll need is always better to allow for knots and a hanging loop. Starting with the last letter of your chosen word (in our example, the ‘Y’ block), carefully thread the twine through the pre-drilled hole in each wooden cube. A helpful trick here is to gently twist the end of the jute as you guide it through the holes; this compacts the fibers and significantly prevents the twine from unraveling and making the process cumbersome. 
Once all your blocks are threaded and stacked in the correct order, ensuring the letters face outwards as desired, tie a secure double knot at the very end of the jute twine, positioned just beneath the last block. This knot will anchor your blocks. Trim any excess twine neatly, leaving just enough to create a clean base.
Step 6: Adding the Decorative Finial Caps
To give your ornament a polished, finished, and truly professional look, it’s time to attach the stained finial caps.
Apply a small, controlled amount of hot glue to the inner rim or the base of one of the stained finial caps. Carefully press this cap onto the bottom of your assembled blocks, ensuring it neatly covers the knot you just tied. This not only conceals the functional knot but also adds a beautiful, decorative element that elevates the overall aesthetic of your ornament. 
For added symmetry and a more finished appearance, you can choose to apply another finial cap to the very top of the ornament as well, securing it above the uppermost block using hot glue. This creates a cohesive and elegant look from both ends.
Step 7: Creating the Hanging Loop
The final, practical touch is to create a sturdy and aesthetically pleasing loop for hanging your beautiful new ornament.
Take the remaining jute twine extending from the top of your assembled blocks. Form a loop of your desired hanging length – consider where you’ll be hanging it to determine the ideal size. Secure this loop with a strong double knot tied tightly at the very top of the uppermost block, or just beneath the top finial cap if you opted to add one. Trim away any excess jute twine that protrudes from the knot, ensuring a neat and tidy finish. And just like that, voilà – your beautiful, handmade wooden block Christmas ornament is complete! That’s IT!
Your Handcrafted Holiday Masterpiece: Display & Inspiration
Now, step back and truly admire your beautiful creation! This personalized wooden block ornament is far more than just a decoration; it’s a testament to your creativity, your dedication to handmade holidays, and a unique expression of festive cheer. Its rustic charm, combined with the subtle sparkle of glitter, will undoubtedly add a unique and heartfelt touch to any festive display in your home.
Creative Variations and Personalization Tips:
This DIY project is incredibly adaptable, offering endless possibilities for customization:
- Words & Phrases: Beyond traditional holiday greetings, consider spelling out family names, significant dates, or even short inspirational words like “BELIEVE” or “HOPE.”
- Color Palette: Experiment with different wood stain shades for varied rustic effects. For a more contemporary or whimsical look, try painting the blocks with acrylic craft paint in holiday colors before adding your glitter letters.
- Additional Embellishments: Elevate your ornament with small decorative elements. Attach miniature bows made from festive ribbon, tiny jingle bells, small wooden beads, or even artificial sprigs of pine or holly to the top or bottom for added flair.
- Thoughtful Gift Tags: When gifting these handmade ornaments, attach a small, personalized gift tag. Include the year the ornament was made and a heartfelt message to make the present even more special and memorable.
- Multi-Purpose Decor: Don’t limit these to just hanging! Arrange several personalized blocks as a charming table centerpiece, line them along a mantelpiece, or string multiple ornaments together to create a unique and festive garland.
Essential Tips for Crafting Success:
To ensure your DIY wooden block Christmas ornament project goes smoothly and yields the best possible results, keep these practical tips in mind:
- Optimize Your Workspace: Always work in a well-ventilated area, especially when applying wood stains and spray paints. Protect your work surfaces with old newspapers, drop cloths, or cardboard to prevent spills and damage.
- Patience with Drying Times: This is perhaps the most crucial tip! Allow ample drying time for each step—stain, glitter paint, and hot glue. Rushing can lead to smudges, sticky surfaces, and an overall less polished finish. Refer to product labels for specific drying recommendations.
- Prioritize Safety First: When using power tools like a drill, always wear appropriate safety glasses to protect your eyes. Ensure your wooden blocks are securely clamped or held stable to prevent accidents during drilling.
- Master Hot Glue Control: Hot glue is wonderful for quick adhesion, but a little goes a long way. Use it sparingly to avoid excessive squeeze-out, which can look messy and detract from the ornament’s clean aesthetic.
- Embrace Batch Crafting: This project is ideal for making multiple ornaments at once! If you plan to give these as gifts or decorate several areas of your home, prepare all your blocks, letters, and caps in batches for a more efficient and enjoyable crafting session.
Conclusion: Embrace the Joy of Handmade Holidays!
We genuinely hope you love this DIY Wooden Block Christmas Ornament project as much as we do! There’s an unparalleled sense of satisfaction that comes from creating something beautiful and meaningful with your own hands, especially during the festive season. This ornament is not merely a pretty addition to your holiday decor; it’s a small, tangible piece of your creativity, your care, and your heartfelt holiday spirit.
Whether you’re crafting it to adorn your own home, to give as a thoughtful, personalized gift, or simply to enjoy the process of making, we wholeheartedly encourage you to give this easy and rewarding project a try. May your holidays be abundantly filled with joy, inspiration, endless creativity, and the warmth that only handmade treasures can bring!
Thanks so much for crafting along with us! ~ Ashley