
Create a Stunning DIY Pallet Sign: The Ultimate Guide to Rustic Mantle Decor
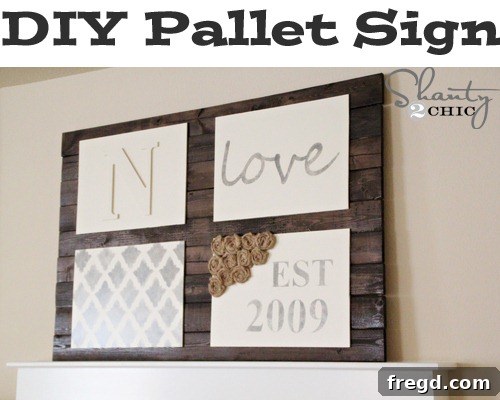
There’s nothing quite like the warmth and personal touch that handmade home decor brings to a space. Whether you’re furnishing a new home or simply looking to refresh your existing surroundings, a custom DIY project can transform an ordinary wall into a captivating focal point. Today, we’re diving into an exciting and incredibly rewarding project: crafting a beautiful, large pallet sign perfect for displaying over a mantle. Inspired by a recent move our little sister’s family made, my creative partner Whitney and I embarked on this DIY adventure to help her infuse her new home with charm and character. The result? A stunning, personalized piece of rustic wall art that looks like it came from a high-end boutique but cost a mere $15 to make!
This comprehensive guide will walk you through every step of creating your own bespoke pallet sign, from selecting materials to adding those exquisite finishing touches. Get ready to unleash your inner artisan and create a truly unique piece that will be cherished for years to come. Not only is this project budget-friendly, but it’s also surprisingly simple, making it accessible for DIY enthusiasts of all skill levels. Let’s get started and turn some humble furring strips into a magnificent statement piece!
Materials & Tools You’ll Need for Your Custom Pallet Wall Art
Before we begin, gathering all your supplies is crucial for a smooth and efficient crafting experience. This project uses readily available materials and common woodworking tools. Here’s a detailed list:
Lumber & Adhesives:
- 6 pieces of 1×4 @ 8’ Furring Strips: These form the main structure of your pallet sign. Furring strips are an economical choice, often available at local hardware stores.
- Gorilla Glue Wood Glue: Essential for a strong and lasting bond between your wooden pieces.
- Gorilla Glue Epoxy: Used for attaching the decorative Purebond scraps, providing an incredibly durable hold.
- 1/4” Purebond Plywood (or similar scrap wood): You’ll need enough to cut four 12×16 inch pieces. If you don’t have scraps, a 2’x4’ sheet can often be purchased online or at hardware stores like Home Depot. Purebond is a great choice for its eco-friendly nature and smooth finish, perfect for painting and stenciling.
Paints & Stains:
- Dark Walnut Wood Stain (e.g., Rust-Oleum Dark Walnut): To give your pallet base that rich, rustic appeal.
- Behr Cozy Cottage Latex Paint: A light, inviting color for your decorative panels and initial. Feel free to choose any color that matches your home decor!
- Gray Acrylic Paint: For stenciling, offering a subtle contrast and distressed look.
Decorative Elements & Stencils:
- 9.5” MDF Letter: Choose an initial that holds personal significance, such as your family’s last name initial. Hobby Lobby often carries these unfinished wood letters and frequently has sales.
- Burlap: For creating flat-rolled rosettes, adding texture and a charming country touch.
- Custom Stencil (e.g., wedding year, meaningful word): A Silhouette machine makes custom stencils easy, but pre-made stencils can be found at any craft store.
Tools:
- Saw (Miter Saw or Circular Saw): For accurately cutting the furring strips and Purebond. Always prioritize safety when using power tools.
- Brad Nailer (e.g., Ryobi Brad Nailer): To secure the main pallet boards while the glue dries, ensuring structural integrity.
- Foam Roller Brushes (2-3): Ideal for smooth, even application of stain and paint.
- Bristle Brush: Specifically for the dry brush stenciling technique.
- Scrap Cloth/Paper Towels: For wiping excess stain and blotting paint for stenciling.
- Hot Glue Gun & Glue Sticks: For attaching the burlap rosettes.
Step-by-Step Tutorial: Crafting Your Rustic DIY Pallet Sign
Now that we have all our materials and tools ready, let’s dive into the creation process. Follow these detailed steps to build your personalized pallet sign.
1. Preparing the Wooden Base Boards
The foundation of our pallet sign is made from simple 1×4 furring strips, which are not only affordable but also lend themselves beautifully to a rustic aesthetic. Start by taking your six 8-foot furring strips. You’ll need to cut these into specific lengths to form the main display surface and the supporting back braces. Using a miter saw or a circular saw for precision, cut nine pieces to 47 inches each. These will form the horizontal planks of your pallet sign. Next, cut two pieces to 31 inches each. These shorter pieces will serve as the vertical support braces on the back, holding the horizontal planks together securely. Always measure twice and cut once, and wear appropriate safety gear when operating power tools.
2. Assembling the Pallet Base Structure
Once your boards are cut, it’s time to assemble the main structure of your pallet sign. Lay the nine 47-inch boards side-by-side on a flat, clean surface. Ensure that the ends are perfectly aligned and that the “bad” or less attractive side of the wood is facing up – this will become the back of your sign. The goal is to create a seamless surface on what will be the front. Now, take your Gorilla Glue Wood Glue. Apply a generous, even amount along the length of each of the two 31-inch boards. These shorter boards will be laid perpendicular to the nine 47-inch planks, serving as strong cross braces. Position them about 8-10 inches from each end of the 47-inch boards, ensuring they span across all nine planks evenly. Press them down firmly to ensure good contact with the wood glue.
While the wood glue provides a robust bond, a brad nailer offers immediate security, holding the boards in place as the glue fully cures. With your brad nailer, carefully drive brad nails through the 31-inch cross boards into each of the 47-inch planks. This creates a strong, lasting assembly for your DIY pallet sign. Aim for two brad nails per plank for optimal stability. Allow the glue to dry completely according to the manufacturer’s instructions before moving on to the next steps. This ensures a durable and stable foundation for your rustic wall art.
3. Preparing the Decorative Purebond Panels
While your main pallet structure is drying, you can begin preparing the smaller decorative panels that will be attached to the front. For this project, we used 1/4-inch Purebond plywood, known for its smooth surface and excellent paint adhesion. If you don’t have Purebond scraps lying around, you can easily purchase a 2’x4’ sheet online or at your local hardware store. Using your saw, cut four pieces of the Purebond plywood to 12×16 inches each. These panels will provide distinct areas for personalization with initials, dates, and other decorative elements, adding layers of interest to your pallet wall art. Ensure your cuts are clean and precise for a professional finish.
4. Staining the Pallet Sign Base for a Rustic Look
Once the wood glue on your pallet base is completely dry and the structure is solid, it’s time to apply the stain. A rich, dark walnut stain (like Rust-Oleum Dark Walnut) is perfect for achieving that coveted rustic farmhouse look. The choice of stain significantly impacts the final aesthetic of your DIY wood sign. To apply the stain, a foam roller brush is your best friend. It allows for incredibly fast and even application, minimizing streaks. Apply one generous coat over the entire front and edges of your pallet sign. Don’t worry about perfection at this stage; the next step is key to a beautiful finish. After about 5 minutes, or once the stain has started to penetrate but isn’t fully dry, use a clean, dry scrap cloth to wipe off any excess stain. This technique enhances the wood grain, creating depth and a naturally distressed appearance. Allow the stained pallet to dry thoroughly, ideally overnight, in a well-ventilated area.
5. Painting the Decorative Panels
While the stain on your pallet base is drying, you can move on to painting your four 12×16 inch Purebond panels. Using a clean foam roller brush, apply two coats of Behr Cozy Cottage latex paint to each panel. This soft, inviting color will provide a beautiful contrast to the dark walnut stain of the main pallet, making your personalized elements pop. Ensure you apply thin, even coats, allowing each coat to dry completely before applying the next. This prevents tackiness and ensures a smooth, professional finish. The combination of the dark, stained wood and the light, painted panels will create a visually appealing contrast that is characteristic of modern farmhouse and rustic home decor styles.
6. Personalizing with an Initial Letter
A personalized initial adds a wonderful touch to any home decor piece, making it truly unique. We chose a 9.5-inch MDF letter (the initial of my sister’s last name) from Hobby Lobby. These unfinished wood letters are often found in the craft section and are frequently on sale, so keep an eye out for discounts! Just like the Purebond panels, this MDF letter also received two coats of the same Behr Cozy Cottage latex paint. This consistency in color ties the decorative elements together, creating a cohesive and polished look for your custom wood sign. Allow the paint on the letter to dry thoroughly before proceeding.
7. Attaching the Initial Panel
With all your painted elements dry, it’s time to begin assembling the decorative pieces. Take one of your painted 12×16 inch Purebond panels. Carefully center and position the painted MDF letter onto this panel. For a strong, permanent bond that will stand the test of time, use Gorilla Glue Epoxy. Apply a thin, even layer of epoxy to the back of the letter and firmly press it onto the Purebond panel. Ensure proper alignment before the epoxy sets. Allow the epoxy to cure according to the package directions, which usually takes a few hours, to create a secure attachment for your personalized mantle decor.
8. Creating Stenciled Elements: The Dry Brush Technique
This step is where your pallet sign truly comes alive with custom details. For another of your painted Purebond scraps, we’ll add a significant date, such as a wedding year. We used a Silhouette cutting machine to create a custom stencil, which offers endless possibilities for personalized designs. If you don’t have a Silhouette, pre-made stencils for numbers and letters are widely available at any craft store. The magic here lies in the dry brush technique, which gives the stenciled text a beautiful, distressed, and faded effect, perfectly complementing the rustic theme.
To dry brush, simply dab a bristle brush into a small amount of gray acrylic paint. The key is not to have too much paint on your brush. Blot almost all of the paint away on a scrap plate or paper towel until the brush feels nearly dry. Then, gently dab the brush all over your stencil. Instead of painting with strokes, you’re pressing the brush directly down onto the stencil in an up-and-down motion. This technique prevents paint from bleeding under the stencil and creates a soft, weathered appearance, as if the sign has aged gracefully. The gray acrylic paint provides a subtle contrast against the Cozy Cottage background, enhancing the vintage appeal of your DIY wood art.
9. Adding Burlap Rosettes for Texture and Charm
To further enhance the texture and rustic charm of this panel, we added a cluster of burlap flat-rolled rosettes. These fabric flowers are surprisingly easy to make and add a soft, organic element to the wood. You can find a detailed tutorial for creating these flat-rolled rosettes here. Once your rosettes are complete, arrange them artfully on the same Purebond panel next to your stenciled date. Use a hot glue gun to securely attach them to the board. The burlap rosettes provide a lovely three-dimensional element, adding depth and a touch of farmhouse elegance to your mantle decor.
10. Stenciling Additional Phrases and Patterns
Now, let’s decorate the remaining two Purebond scraps. For the third panel, we followed the exact same dry brush stenciling technique to paint a word like “love.” This simple, heartfelt message beautifully complements the personalized initial and date. For the fourth and final panel, unleash your creativity! You can dry brush a fun, intricate stencil pattern, a family motto, or a simple design that resonates with your personal style. The beauty of this DIY pallet sign is its complete customizability. Once all your stenciling is complete and dry, these panels are ready for final assembly.
11. Final Assembly and the Big Reveal!
With all the individual components complete and dry, it’s time for the exciting final assembly. Carefully arrange your four decorated Purebond panels onto the stained main pallet sign. Take your time to decide on the perfect placement for each panel, ensuring they are evenly spaced and visually balanced. Once you’re satisfied with the arrangement, use Gorilla Glue Epoxy to permanently attach each panel to the pallet sign. Apply a thin, even layer of epoxy to the back of each Purebond panel and firmly press them into place. Apply pressure evenly across each panel to ensure maximum adhesion. Allow the epoxy to dry and cure for the remainder of the afternoon, or as per the manufacturer’s instructions, to ensure a rock-solid bond.
The anticipation builds as your masterpiece dries! We couldn’t wait to take the finished pallet sign to my sister’s house to surprise her. The joy of gifting a handmade item, especially one crafted with so much love and attention to detail, is truly unparalleled. She absolutely adored it, and honestly, now I want one for my own house!
The Perfect Mantle Decor and Beyond
The beauty of this DIY pallet sign lies not only in its rustic charm but also in its versatility. While it makes a breathtaking statement piece over a mantle, it can also be a captivating addition to a feature wall in a living room, dining room, or even a master bedroom. Its handmade quality and personalized elements make it a conversation starter, reflecting the unique personality of the home. Imagine this custom wood art adorned with seasonal garlands or surrounded by cherished family photos. The possibilities for integration into your existing home decor are endless, allowing you to continually refresh its look to match the seasons or your evolving style.
Why Choose DIY Pallet Art for Your Home?
Opting for DIY pallet ideas for your home decor projects offers numerous benefits beyond just saving money. Firstly, it allows for unparalleled customization. You get to choose every color, every word, every pattern, ensuring the final piece perfectly matches your personal aesthetic and tells your unique story. Secondly, there’s immense satisfaction in creating something with your own hands. The process itself can be a fulfilling creative outlet, and the pride you feel when displaying your finished work is priceless. Thirdly, using materials like furring strips and scrap plywood makes it an environmentally conscious choice, repurposing wood into beautiful, functional art. This project also serves as a wonderful gift idea for weddings, housewarmings, or anniversaries, offering a thoughtful and personal touch that mass-produced items simply can’t replicate. It’s more than just a piece of decor; it’s a labor of love that adds character and warmth to any space.
Conclusion: Your Handcrafted Pallet Sign Awaits!
Creating this large DIY pallet sign was not just a project; it was an act of love and a fantastic way to add unique character to a new home. From the initial cuts of the furring strips to the final touches of stenciling and embellishment, every step contributed to a stunning piece of rustic wall art that is both meaningful and stylish. The affordability, coupled with the immense satisfaction of a handmade item, makes this project a must-try for anyone looking to elevate their home decor. We hope this detailed tutorial inspires you to embark on your own DIY journey and craft a beautiful, personalized pallet sign that you or a loved one will adore. Get creative, have fun, and enjoy the process of making something truly special for your home. Thanks so much for stopping by and happy crafting!
~Ashley