
Hey there, fellow DIY enthusiasts and creative minds!
Crafting Joy: An Easy & Affordable DIY Memo Board for Your Kids’ Room
Every parent knows the feeling: your children see something inspiring and immediately want one too! That’s exactly what happened with my girls after I crafted a stylish memo board for their brother a few months back. They absolutely loved how functional and charming it was, and I particularly appreciated that it kept stray thumbtacks and tiny magnets out of reach from curious little hands. It was clear that a personalized memo board for their room was next on my DIY agenda.
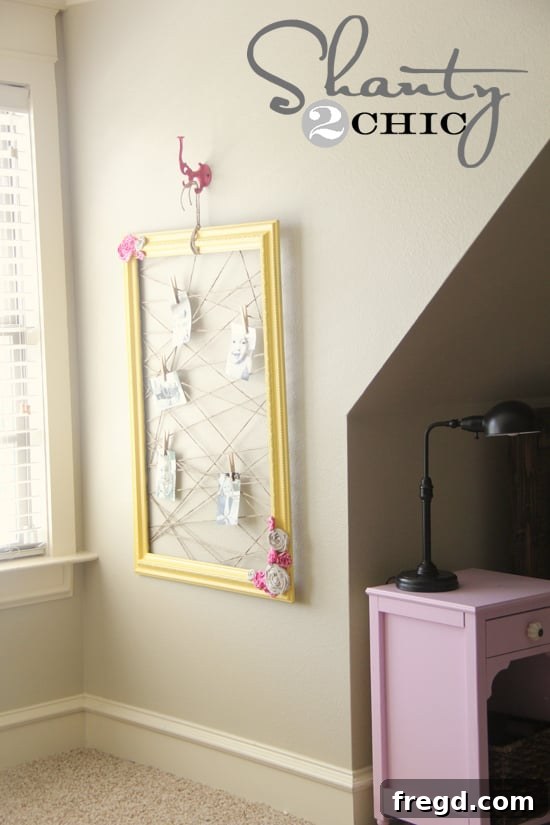
With a few tweaks and a fresh, feminine twist, I set out to create a memo board that would perfectly suit my daughters’ vibrant personalities and add a delightful touch to their space. The result? A colorful, practical, and incredibly charming piece that they adore!
The best part about this project is how incredibly simple and quick it is to make. I managed to complete the entire thing during a single naptime today! If you’re looking for an impactful yet easy DIY decor project that won’t break the bank, you’ve come to the right place. This memo board is perfect for displaying cherished photos, important notes, school artwork, or even small achievement badges without clutter or fuss.
Why Choose a DIY Memo Board? Safety, Style, and Savings!
In a world full of mass-produced items, a handmade memo board offers a unique blend of personal touch and practical functionality. Beyond the obvious joy of creating something with your own hands, a DIY memo board brings several distinct advantages:
Firstly, **safety is paramount**, especially when decorating spaces for children. Traditional cork boards often rely on sharp thumbtacks, which can easily become a hazard if they fall to the floor. Similarly, magnetic boards, while convenient, can pose a choking risk with small magnets. Our twine-based memo board design cleverly bypasses these concerns by using small wooden clothespins, ensuring a safe environment for even the youngest family members. This peace of mind is invaluable, allowing kids to interact with their display board without worry.
Secondly, the **design possibilities are limitless**, allowing for complete personalization. Store-bought memo boards often come in limited styles and colors, making it hard to find one that perfectly matches your home decor or your child’s personality. By opting for a DIY approach, you can select the exact colors, textures, and embellishments that resonate with you and your family. Whether you prefer vibrant hues for a child’s room, subtle tones for a sophisticated office, or rustic elements for a farmhouse aesthetic, a DIY memo board can be tailored to fit any vision.
Finally, **cost-effectiveness** is a significant draw. This project truly embodies the spirit of upcycling and smart crafting. By repurposing an old frame, you significantly reduce material costs. Even if you purchase a new, inexpensive frame, the overall expense remains minimal compared to buying a custom-designed or high-end memo board. It’s a fantastic way to create a high-value, charming piece of decor for very little investment, proving that beautiful home accents don’t have to come with a hefty price tag.
Gathering Your Supplies: The Hunt for the Perfect Frame and More
Every great DIY project starts with gathering the right materials. For this memo board, the star of the show is undoubtedly the frame. You’ll need:
- **An Empty Frame:** This is your canvas! I’m notorious for holding onto old frames, and one has literally been sitting in my garage for years, waiting for its moment to shine. If you don’t have one lying around, don’t fret! Excellent sources for affordable frames include clearance sections at craft stores like Hobby Lobby, Michael’s, or Joann’s. Thrift stores and second-hand shops like Goodwill are also treasure troves for unique and budget-friendly finds. Look for a sturdy frame made of wood or a durable composite that can withstand a fresh coat of paint and the tension of the twine. The size is entirely up to you and the space you intend to fill.
- **Spray Paint:** Choose a color that will complement your room’s decor. I’m a big fan of Rust-Oleum Painter’s Touch for its excellent coverage and wide array of colors. For this project, I picked “Summer Squash” for the frame – a perfectly cheerful yellow!
- **Twine:** This will form the grid for your memos and photos. I used a thick, natural twine from Hobby Lobby, which I absolutely love for its robust feel and rustic charm. Its thickness ensures durability and a nice visual presence.
- **Staple Gun & Staples:** An absolute must-have for securely attaching the twine.
- **Hot Glue Gun & Glue Sticks:** Essential for attaching embellishments like the fabric rosettes and securing any loose twine ends.
- **Decorative Hook (Optional):** If you want to add a cute hanging element, a small hook can be a lovely touch. I found mine at Hobby Lobby.
- **Wood Clothespins:** These are for clipping your photos, notes, and artwork onto the twine. Small, natural wood clothespins add to the rustic, handmade appeal.
- **Fabric Scraps (Optional):** For making decorative rosettes or other fabric embellishments.
Here is mine before its transformation. This old frame was begging for a new life!
Step 1: Revitalizing Your Frame with a Splash of Color
The first step in our memo board journey is to give your chosen frame a vibrant makeover. If you’re using an old or previously painted frame, a quick wipe-down with a damp cloth to remove any dust or grime is recommended. For frames with a glossy finish, a light sanding can help the new paint adhere better, though it’s often not strictly necessary with good quality spray paint.
Once your frame is clean and dry, it’s time to paint! Take it to a well-ventilated area, preferably outdoors, and lay it on a drop cloth or old newspaper to protect your surfaces. Apply thin, even coats of your chosen spray paint, allowing each coat to dry according to the manufacturer’s instructions before applying the next. This prevents drips and ensures a smooth, professional-looking finish. For this project, I chose Rust-Oleum Painter’s Touch in “Summer Squash,” a wonderfully bright and cheerful yellow that instantly brought a sunny disposition to the old frame. This color choice was perfect for creating a lively backdrop in a child’s room, full of warmth and playful energy. You might need 2-3 coats to achieve full coverage, especially if you’re painting a dark frame a lighter color.
Step 2: Adding Charming Rosette Embellishments
While your freshly painted frame is drying, you can begin working on the decorative elements. For my memo board, I opted for handmade fabric rosettes. If there’s one thing I’ve learned about DIY decor, it’s that a rosette can instantly elevate almost any empty space or project – it’s simply “how I roll!” These soft, textured flowers add a touch of whimsical elegance and a lovely handmade feel to the memo board. They are surprisingly easy to make and allow for a burst of color and dimension.
You can find numerous tutorials online for creating fabric rosettes using various materials and techniques. If you’re curious about my specific method, you can refer to my tutorial on these HERE. You’ll typically need some fabric scraps (cotton or felt work wonderfully), a pair of scissors, and a hot glue gun. The beauty of rosettes is that they don’t have to be perfect; their charm lies in their organic, ruffled appearance. Experiment with different fabric patterns and colors to create a unique cluster that complements your frame’s new paint job.
Step 3: Weaving the Twine for Your Memo Display
Once your frame is completely dry and cured, it’s time to add the functional element: the twine grid. This is where the magic happens, transforming a simple frame into a versatile display area. I used a thick, durable twine from Hobby Lobby, which I highly recommend for its visual appeal and strength. It holds its tension beautifully and provides a sturdy base for clipping items.
Flip your frame over so the back is facing up. Starting from one corner, use your staple gun to firmly attach the end of the twine to the back of the frame. Then, carefully stretch the twine across the frame, stapling it to the opposite side. Continue this process, creating parallel lines of twine. I chose to do mine in one continuous piece, working my way down the frame, making horizontal lines. There’s no need for precise measuring here; a “good ol’ eyeball” estimate works perfectly for a charming, slightly organic look. The key is to keep the twine taut as you staple to prevent sagging. You want it firm enough to hold items without drooping, but not so tight that it warps the frame.
You can opt for a simple horizontal pattern, or get creative with a grid pattern (by adding vertical lines as well), or even a diagonal crisscross design for a more intricate look. The staple gun makes this step incredibly fast and secure. Trim any excess twine at the end and secure the final piece with another staple.
Essential Tools for DIY Success: The Staple Gun & Hot Glue Gun
Throughout this project, two tools consistently prove their worth: the staple gun and the hot glue gun. For anyone venturing into DIY crafts or home decor, I truly believe these are indispensable. A good staple gun is surprisingly affordable, often found for under $20-$30 at hardware stores like Lowe’s. It’s fantastic for upholstery, attaching fabric, and, as you’ve seen, securing twine. It’s a powerful tool that offers quick, reliable fastening and allows for professional-looking results even for beginners.
The hot glue gun, on the other hand, is the ultimate crafting companion. From securing small embellishments to quickly assembling delicate pieces, its versatility is unmatched. Together, a staple gun and a hot glue gun unlock a world of creative possibilities. Trust me, once you have them, you’ll wonder how you ever crafted without them!
Here’s a look at the back of my frame, illustrating how the twine is securely stapled:
Step 4: The Finishing Touches – Rosettes and a Decorative Hook
With the twine securely in place, it’s time to add those delightful finishing touches that truly make the memo board unique. Using your hot glue gun, carefully attach your handmade fabric rosettes to the front of the frame. You can arrange them in a cluster, space them out, or place them in corners – let your creativity guide you! These rosettes instantly soften the edges of the frame and add a beautiful handmade charm that’s hard to replicate.
I also found a charming little hook at Hobby Lobby that I decided to incorporate. To tie it into the overall design, I gave it a fresh coat of Rust-Oleum Painter’s Touch in “Berry Pink.” This lovely shade of pink provides a perfect contrast to the “Summer Squash” yellow of the frame, adding another pop of color and a touch of sweet, feminine flair. Choosing complementary or contrasting colors for different elements adds depth and interest to your project.
Berry Pink… so cute and perfectly complements the yellow frame!
Bringing Your Memo Board to Life: Displaying Precious Memories
The final step is to hang your beautiful new memo board and fill it with precious memories and important reminders. I hung the decorative hook on the wall first, and then simply wrapped some matching twine around the top of the frame to secure it to the hook. This creates an inviting, somewhat rustic hanging solution that perfectly matches the overall aesthetic. For displaying pictures, notes, and artwork, I used small wooden clothespins. They’re simple, inexpensive, and perfectly suited for clipping items to the twine without damaging them. Plus, they enhance the charming, homemade look.
Thanks to the free frame I already had, this entire project cost me next to nothing in terms of materials! And the time investment was minimal, making it an incredibly rewarding weekend craft. My girls absolutely adore it! Of course, in a few days, it will undoubtedly be covered with their own treasures – drawings, invitations, and little notes. But for now, I’ve added a few shots of the kids to share its immediate charm with you.
Unleash Your Creativity: Customization Ideas and Beyond
The beauty of this DIY memo board project lies in its endless customization possibilities. While I created a bright and cheerful version for my girls, you can easily adapt the design to suit any room or aesthetic. Consider these ideas to inspire your next creation:
- **Themed Rooms:** For a boy’s room, swap the rosettes for small wooden stars, painted toy cars, or even felt superhero emblems. Choose blues, greens, or primary colors for the frame. For a more sophisticated teen’s room or a home office, opt for a sleek metallic frame, black or white twine, and minimalist clips.
- **Different Embellishments:** Instead of fabric rosettes, you could use silk flowers, rustic buttons, small wooden cutouts, or even artificial greenery for a botanical feel. Stencils can also add intricate patterns to the frame itself.
- **Twine Alternatives:** While twine offers a lovely rustic look, you could use colorful ribbon, thin elastic cords, or even fishing line for a nearly invisible effect, depending on the look you’re going for. Experiment with different spacing and patterns for the twine grid.
- **Frame Styles:** The style of your original frame makes a huge difference. A vintage, ornate frame painted white can look beautifully shabby chic, while a sleek, modern frame can offer a contemporary feel.
- **Multi-Functional:** Beyond just photos, this board is perfect for displaying artwork, important appointment cards, grocery lists, inspirational quotes, or even small, lightweight souvenirs. It’s a fantastic tool for visual organization and adding personality to a space.
This project is more than just a decor piece; it’s an opportunity to express creativity, repurpose materials, and create a functional item that brings joy and organization. The satisfaction of stepping back and admiring something you’ve made with your own hands, especially something so useful and beloved by your family, is truly priceless.
Conclusion: A Heartfelt Addition to Any Room
I sincerely hope you like this DIY memo board as much as my girls do! It’s a fun, engaging, and highly customizable addition to any room that requires very little time and even less money – a true win-win for any crafter. It’s a testament to how simple household items and a bit of creativity can transform a space and serve a wonderful purpose.
Whether you’re looking to organize your kids’ masterpieces, display cherished family photos, or simply add a personalized touch to your home, this DIY memo board offers a charming and practical solution. It’s safe, stylish, and incredibly satisfying to create. So go ahead, unleash your inner artist, and bring this delightful project to life!
I would absolutely love for you to Pin my memo frame below and share the love and inspiration with your friends and followers. Your support means the world! 😉
Thanks so much for stopping by and taking the time to explore this fun DIY project. Have a wonderful and creative night!