
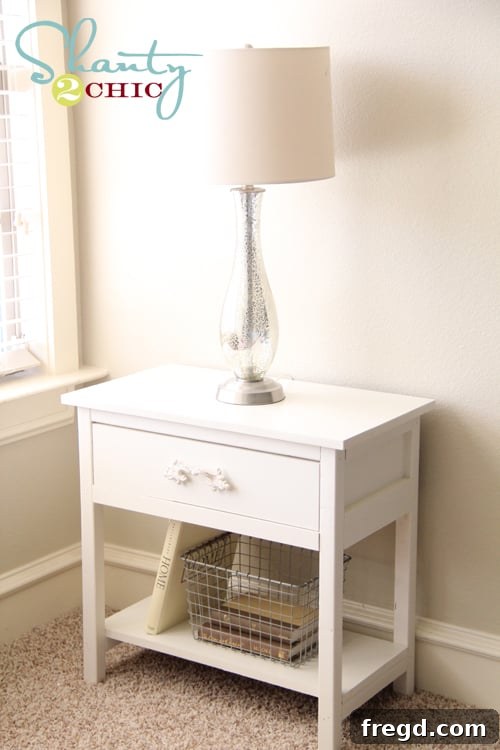
DIY Farmhouse Nightstand: Build a Charming Side Table for Under $9 Using Scrap Wood
Are you looking to add a touch of rustic charm to your bedroom without breaking the bank? What if I told you that you could build a stunning piece of farmhouse furniture for under $9, primarily using materials you might already have cluttering your garage?
As a passionate DIYer, my garage often looks like a wood graveyard. Seriously, if you saw my scrap wood pile, you might never venture back! But sometimes, necessity sparks the greatest creativity. My daughters recently expressed a need for new nightstands for their bedroom, presenting the perfect opportunity to dive into that overflowing pile and give some of those forgotten pieces a new purpose.
The result? A beautiful, sturdy farmhouse nightstand that not only perfectly complements their room but also cost me less than $9 to create. This project is a testament to what you can achieve with a bit of ingenuity, some basic tools, and a fantastic plan.
The Inspiration: Ana White’s Farmhouse Bedside Table Plan
For this build, I leaned on a tried-and-true resource: Ana White’s Farmhouse Bedside Table Plan. Ana White is a treasure trove for anyone interested in DIY furniture, offering clear, detailed, and often beginner-friendly plans. Her Farmhouse Bedside Table design was exactly what I needed – simple, elegant, and perfectly suited for modification with scrap materials. The beauty of her plans is their adaptability, allowing you to personalize the dimensions and finishes to match your specific needs and available resources.
One of the most satisfying aspects of this project was its efficiency. I managed to complete the entire build, from cutting the wood to final assembly, during a single nap time! Yes, you read that right. This speaks volumes about the simplicity of the plan and the direct approach I took, focusing on core construction before moving to the finishing touches. This project is genuinely accessible for weekend warriors or anyone looking for a quick, impactful DIY.
Gathering Your Materials: The Budget-Friendly Approach
The total cost for this project came in at an astonishingly low under $9. How? By maximizing my existing scrap wood inventory and making just a few essential purchases. This is the cornerstone of budget-friendly DIY: seeing potential in what others might discard.
What I Used:
- Scrap MDF: My main material came from leftover Medium Density Fiberboard (MDF) panels. These were remnants from two large storage systems I had previously built for the playroom and nursery. MDF is an excellent material for furniture builds due to its smooth surface, consistent density, and affordability. It’s easy to cut and paint, making it perfect for achieving that clean farmhouse look.
- Furring Strips (4 x 2x2s): My only new purchase for the structural integrity of the table were four 2×2 furring strips. These cost under $2 a piece, totaling less than $8 for the essential framework. Furring strips, while typically used for framing and leveling, are perfectly suitable for light-duty furniture construction when properly joined and finished.
- Wood Glue: A strong wood adhesive is crucial for durable furniture. I used a high-quality wood glue for all joints to ensure maximum stability and longevity.
- Nails: Complementing the wood glue, nails were used to reinforce the joints, providing immediate hold and long-term strength. For this project, standard finishing nails were sufficient.
- Paint & Hardware: Details on these will follow, but they were also chosen with budget and aesthetic in mind.
The Build Process: Simple Steps to a Stunning Table
Even with scrap materials, following a good plan makes all the difference. Here’s a general outline of how this farmhouse nightstand came to life, demonstrating how straightforward woodworking can be:
- Cutting the Pieces: I started by carefully measuring and cutting the MDF scraps according to the Ana White plan. This involved pieces for the top, sides, shelves, and back panel. Precision here is key for a professional-looking finish, so measure twice, cut once! For the furring strips, I cut them to size for the legs and internal supports, ensuring they were perfectly square for a stable foundation.
- Assembling the Frame: The 2×2 furring strips formed the sturdy backbone of the nightstand. I assembled the basic rectangular frame using wood glue and nails, ensuring all angles were square using a speed square or framing square. Clamping the pieces while the glue set significantly increased the strength of the joints. This provides the foundational stability for the entire piece.
- Attaching the Panels: Once the frame was solid, I began attaching the pre-cut MDF panels. The sides and shelves were glued and nailed into place, creating the box structure of the nightstand. Working methodically, one piece at a time, ensures a snug fit and a seamless look. Remember to pre-drill pilot holes if needed to prevent splitting, especially when working close to edges.
- Adding the Top: The final structural piece was the MDF tabletop. This was secured firmly to the top of the frame using wood glue and nails, creating a flat and durable surface that will withstand daily use. Ensure the top is flush with all sides for a clean finish.
- Sanding and Preparation: After assembly, a thorough sanding was performed to smooth any rough edges, fill any small gaps with wood filler, and prepare the MDF for painting. This step ensures a flawless finish and helps the paint adhere better, creating a professional-looking result. I started with a coarser grit (e.g., 120) for initial shaping and then moved to a finer grit (e.g., 220) for a silky-smooth surface.
Adding Character: The Hardware and Finishing Touches
A piece of furniture truly comes alive with its hardware and finish. For this farmhouse nightstand, I wanted a touch of vintage charm without overdoing it. The drawer pull played a crucial role in defining its character and complementing the overall aesthetic.
The Perfect Pull: A Hobby Lobby Find
Finding the right hardware can be just as exciting as the build itself, transforming a functional item into a decorative element. I discovered the perfect pull at Hobby Lobby. For those eagle-eyed readers who can’t quite decipher the tag in the photo, it was originally priced at $3.99, and I managed to snag it for half off – what a steal! This small detail brought significant character to the piece, instantly elevating its farmhouse appeal. Its classic design perfectly balanced the simplicity of the table with a touch of antique flair, proving that even a single hardware piece can make a big impact.
Distressing the Hardware for a Vintage Look
To further integrate the pull into the rustic farmhouse aesthetic, I decided to give it a slightly distressed finish. I applied one coat of spray paint that, by sheer coincidence, happened to perfectly match the “Off White” paint I planned to use for the table itself. This ensured color cohesion even with the distressed effect, making the pull appear as though it had always been part of the piece. After the spray paint dried completely, I lightly scratched it up with 220-grit sandpaper, focusing on edges and raised areas where natural wear would occur. This subtle distressing technique created a worn, aged look that I felt was the perfect touch, adding depth and authenticity without being overly dramatic.
Painting the Table: A Classic Off-White Finish
For the main body of the nightstand, I opted for a classic, clean farmhouse finish. I applied two coats of Olympic satin paint in a shade aptly named “Off White.” This color provides a bright, fresh look that is characteristic of modern farmhouse style, allowing the texture and form of the furniture to speak for itself. Satin paint offers a subtle sheen that is easy to clean and durable for furniture. While distressing furniture is often a hallmark of farmhouse design, I decided to leave the table itself undressed. The unique character of the salvaged wood (MDF in this case) combined with the distressed pull provided just enough “shanty” charm for this particular piece, creating a balanced aesthetic that wasn’t overly rustic or busy.
The Grand Reveal: A Charming Addition to Any Room
Once all the paint was dry and the hardware was attached, it was time for the grand reveal! And I have to admit, I couldn’t resist the urge to style it with my own favorite lamp for a moment, rather than immediately placing the girls’ lamp on it. This table truly has a captivating charm, and I might just have to “hijack” it for my own room. What do you think? It’s proof that a simple DIY project can yield a piece so lovely, you’ll want it for yourself!
This farmhouse nightstand isn’t just a functional piece; it’s a statement of handcrafted beauty. Its clean lines, the subtle texture of the painted MDF, and the perfectly chosen distressed pull all come together to create a timeless look. Imagine it next to a bed, holding a favorite book and a warm cup of tea, or perhaps gracing an entryway as a charming accent table. Its versatility is as impressive as its humble origins.
Not bad for a pile of scrap wood and less than $9, right?
The Power of DIY: Sustainability and Satisfaction
Ultimately, I’ll let the girls keep this one for their room, as it was built with them in mind. However, I’m already contemplating building two more – perhaps for other bedrooms or even a living room accent! The satisfaction of creating something beautiful and functional from scratch, especially from materials that would otherwise go to waste, is truly unparalleled. It’s a rewarding feeling to transform forgotten pieces into cherished furniture.
DIY woodworking projects like this farmhouse nightstand offer numerous benefits that extend beyond just cost savings:
- Cost Savings: Significantly reduce furniture expenses by utilizing salvaged materials and building yourself.
- Customization: Tailor dimensions, colors, and finishes to your exact taste, ensuring a perfect fit for your space and decor style.
- Sustainability: Give new life to scrap wood, reducing waste and contributing to a more eco-friendly lifestyle.
- Skill Development: Learn valuable woodworking, joinery, and finishing techniques that can be applied to countless future projects.
- Personal Satisfaction: Enjoy the immense pride and accomplishment that comes from creating something beautiful and functional with your own hands.
- Unique Pieces: Each DIY piece tells a story and possesses a unique character that mass-produced items often lack.
If you’re inspired to start your own DIY journey, remember that every master craftsman started with their first project. Don’t be afraid to dive in! Make sure to explore resources like Ana White’s plans, gather your basic tools, and unleash your creativity. There’s a whole community of DIY enthusiasts ready to support you.
And speaking of tools, if you’re just starting out or looking to upgrade your collection, consider entering our Little Pink Tools Giveaway HERE. Having the right tools makes all the difference, allowing you to build your own “goodies” and, of course, look cute in the process! Investing in quality tools is an investment in your DIY future.
More DIY Inspiration for the Girls’ Room
This nightstand isn’t the only project that’s transformed my girls’ room. Here are a few other handmade additions that have brought character and functionality to their space, demonstrating a consistent theme of repurposing and personalizing:
Lamp Revamp
A simple yet effective makeover can breathe new life into an old lamp. This project demonstrates how a fresh coat of paint and a little creativity can turn a dated item into a stylish decor piece, perfectly complementing the farmhouse aesthetic of the room. It’s an easy way to update your lighting without purchasing new fixtures.
Storage Beds
Maximizing space in a shared bedroom is always a priority. These custom-built storage beds offer ample space for toys, books, and clothes, keeping the room tidy and functional while maintaining a charming, handcrafted look. They are a testament to efficient design and practical woodworking, perfect for organizing children’s rooms.
Dresser Revamp
Why buy new when you can transform? This dresser revamp project showcases how an old, overlooked piece of furniture can be given a complete facelift. With fresh paint, new hardware, and a touch of creativity, it seamlessly blends into the room’s decor, proving that sometimes all a piece needs is a little love and a new vision. A dresser makeover is a fantastic beginner-friendly project with highly visible results.
Ready to Start Your Own DIY Adventure?
I hope this journey through building a farmhouse nightstand from scrap wood has inspired you to look at your own “junk pile” with fresh eyes. The possibilities are endless, and the rewards – from saving money to the immense satisfaction of creating with your own hands – are truly priceless. Remember, every piece of furniture you build is not just a functional item, but a testament to your creativity and resourcefulness. Happy building!
Thanks for stopping by!!!
~Whitney