
Unlock Rustic Charm: Build Your Own DIY Christmas Tree Crate (Under $10!)
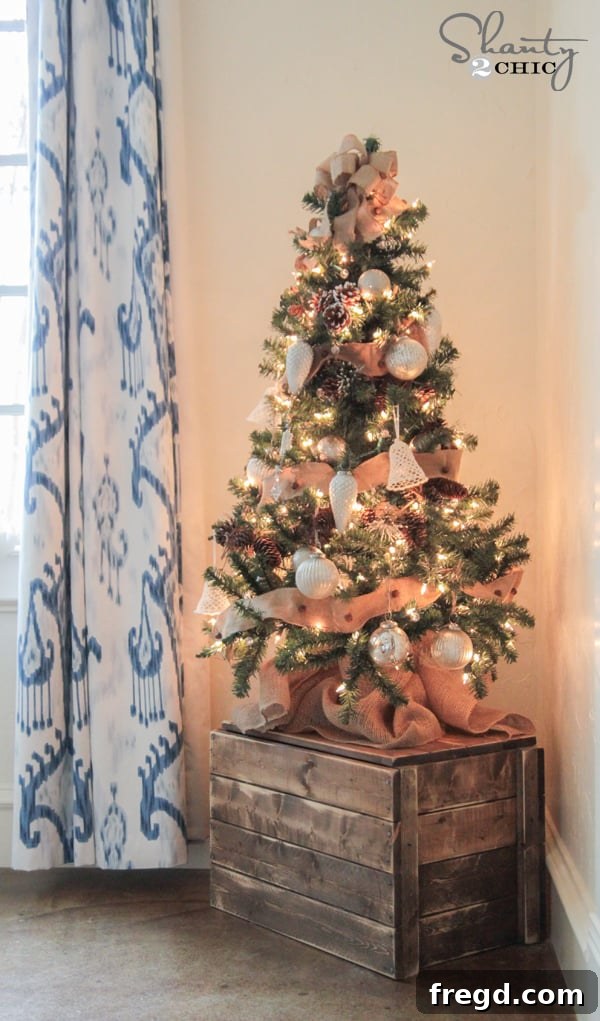
Welcome to Day 8 of our cherished 12 Days of Christmas series! As the holiday season sparkles around us, we’re thrilled to bring you another inspiring project designed to add a touch of handmade warmth to your home. Today, we’re diving into a brilliantly simple yet utterly charming DIY project that will elevate your mini Christmas tree display to new heights. Prepare to be amazed by the versatility and affordability of our DIY Christmas Tree Crate!
Forget generic tree skirts or flimsy plastic stands. This festive season, give your beloved mini Christmas tree the rustic, farmhouse-inspired home it deserves. Our DIY Christmas Tree Crate is not only incredibly easy to construct, even for beginner woodworkers, but it also boasts an impressive under-$10 material cost. Imagine the satisfaction of crafting a unique, stylish piece of holiday decor that truly reflects your personal touch – all while keeping your budget intact.
Why Choose a DIY Christmas Tree Crate?
In a world saturated with mass-produced holiday decorations, a handmade piece brings unparalleled character and soul to your home. A DIY wooden tree crate offers numerous advantages:
- Cost-Effectiveness: As you’ll discover, the material cost for this project is remarkably low, making it a budget-friendly option for high-impact holiday decor.
- Unique Aesthetic: Achieve that coveted rustic, farmhouse, or industrial-chic look that beautifully complements any interior style. Unlike a traditional tree skirt, a crate provides a sturdy, structured base that frames your tree perfectly.
- Customization: From the choice of stain to optional decorative accents, you have complete control over the final appearance, ensuring it matches your existing decor flawlessly.
- Durability: Constructed from solid wood, this crate is built to last for many holiday seasons to come, far outliving flimsy alternatives.
- Versatility Beyond Christmas: This isn’t just a seasonal item! Its functional design means you can repurpose it as a stylish storage solution, a decorative planter, or an accent piece throughout the year.
- Beginner-Friendly: With straightforward cuts and simple assembly, this project is perfect for those new to woodworking, offering a rewarding and confidence-boosting experience.
Gather Your Materials and Tools
One of the most appealing aspects of this DIY Christmas tree stand is its simplicity and affordability. You won’t need an elaborate workshop or expensive materials. Here’s what you’ll need to get started:
Materials:
- 4 – 1×4″ furring strips
- 1 – 1×2″ furring strip
- Wood glue (e.g., Gorilla Wood Glue)
- Brad nails (1.25″ recommended)
- Optional: Black upholstery tacks (for decorative nail head effect)
- Wood Stain (e.g., Varathane Ultimate Wood Stain in Dark Walnut)
- Sandpaper (80-grit recommended for distressing)
Tools:
- Miter saw or circular saw (for precise cuts)
- Measuring tape and pencil
- Brad nailer (e.g., Ryobi AirStrike brad nailer)
- Safety glasses and hearing protection
- Orbital sander or corner cat sander (e.g., Ryobi Corner Cat)
- Clamps (optional, but helpful for holding pieces while glue dries)
- Rag or brush for applying stain
The best part? Your total wood cost for this project will be under $10! This makes it one of the most economical ways to add a significant style statement to your holiday decor. We’ve laid out the entire building process for you here, but for added convenience and precision, you can also download the free printable plans by clicking the link or the button below.
Click Here to Download Free Plans!
The Cut List: Precision for a Perfect Crate
Accuracy in your cuts is key to a sturdy and professional-looking crate. Always double-check your measurements before making each cut. Here are the dimensions you’ll need:
1×4″ Furring Strip Cuts:
- 8 pieces at 22 inches (These will form the long sides of your crate.)
- 8 pieces at 13 inches (These will form the short sides of your crate.)
- 4 pieces at 20.5 inches (These will create the sturdy bottom of your crate.)
1×2″ Furring Strip Cuts:
- 4 pieces at 13 3/4 inches (These shorter pieces will be used for the interior supports on the short sides.)
Once all your cuts are precisely made, you’re ready to move on to assembly!
Step-by-Step Assembly Guide
This project comes together quickly, thanks to the combination of strong wood glue and efficient brad nailing. Remember to work on a clean, flat surface.
1. Assemble the Short Sides
Begin by constructing the two smaller end panels of your crate. Lay out two of your 1×4″ short side pieces (13″ long) parallel to each other. These will be the top and bottom rails of your short side. Next, take two of your 1×2″ furring strips (13 3/4″ long) and position them vertically between the 1x4s, approximately 3/4 inch in from each end. This creates a sturdy frame. Apply a generous bead of Gorilla Wood Glue to the ends of the 1×2 pieces where they meet the 1x4s. Secure them in place using your Ryobi AirStrike brad nailer, driving brad nails through the 1x4s into the ends of the 1×2 supports. Repeat this process to create a second identical short side panel.
The image above shows the layout before attaching. You can see how the 1×2 pieces provide structural integrity, preventing the 1x4s from bowing.
Here you can see the initial attachment. The wood glue provides long-term strength, while the brad nails offer immediate hold, allowing you to proceed with the next steps without waiting for the glue to fully cure.
2. Attach the Long Sides
Now it’s time to connect your two assembled short sides with the longer 1×4″ pieces (22″ long) to form the main box structure. Stand one of your short side panels upright. Apply a generous amount of Gorilla Wood Glue along the edges of the vertical 1×2 supports where the long 1x4s will meet them. Position a long 1×4 piece (22″) flush with the top edge of the short side panel, ensuring it’s square. Use your brad nailer to secure the long 1×4 to the vertical 1×2 supports of the short side. Repeat this for the bottom long 1×4 piece.
The strategic application of wood glue ensures a robust bond between the wooden components, reinforcing the crate’s structure against daily wear and tear.
Once one long side is attached, carefully flip the assembly and repeat the process for the second long side, connecting it to the other short side panel. This will fully enclose the box. Ensure all corners are square before the glue sets, using clamps if needed for added stability during this step.
With both long sides in place, your crate should now resemble a sturdy, open-top box. The next step is to add the bottom.
3. Adding the Bottom Slats
To complete the basic box, you’ll install the four 1×4″ pieces cut at 20.5 inches for the bottom. Flip your crate upside down. Apply wood glue along the inside bottom edges of the long 1x4s. Place each of the 20.5-inch bottom slats across the width of the crate, spacing them evenly. Secure each slat with 1.25″ brad nails, driving them through the bottom slats into the side pieces of the crate. This creates a solid base for your mini Christmas tree or any other items you choose to store.
And just like that, the main construction of your rustic Christmas tree crate is complete! It’s a testament to how simple tools and materials can yield impressive results.
Adding the “Shanty-Chic” Embellishments
While functional, we wanted to infuse this crate with a bit more character – that signature “shanty-chic” charm. This step is purely decorative but makes a significant difference in achieving a more authentic, aged appearance.
Decorative Upholstery Tacks
To give the crate a salvaged, industrial feel, we added black upholstery tacks around the entire box. These tacks are designed to mimic the look of old, hand-driven nail heads. They serve absolutely no structural purpose; their only job is to enhance the aesthetic, and frankly, they do it beautifully! You can find these charming little details in the hardware aisle of most home improvement stores. Carefully space them out along the edges of your crate for a cohesive, vintage-inspired look.
Apply these tacks to all sides of the crate for a consistent look.
The subtle pop of black against the wood adds depth and character.
Don’t forget to add a few tacks to the bottom edges as well, especially if your crate will be visible from multiple angles.
Finishing Touches: Stain and Distressing
The final steps involve transforming the raw wood into a beautifully aged piece that looks like it’s been cherished for generations.
Staining for Depth and Warmth
To achieve a rich, classic aesthetic, we applied a coat of Varathane Ultimate Wood Stain in Dark Walnut. This particular stain is a favorite for its deep, warm tones that beautifully highlight the natural grain of the wood. You can easily find it at your local Home Depot or other hardware stores. Apply the stain evenly with a rag or brush, following the grain of the wood. Allow it to penetrate for a few minutes before wiping off any excess to achieve your desired shade. Ensure the crate is completely dry before moving on to the next step, as proper drying is crucial for the distressing process.
Distressing for an Aged, Authentic Look
Once the stain is thoroughly dry, it’s time to add that perfectly imperfect, “I didn’t make this in my garage” charm. Using a Ryobi Corner Cat sander (or any orbital sander) with 80-grit sandpaper, gently sand various edges and corners of the crate. Focus on areas that would naturally show wear and tear over time. This technique will lightly remove some of the stain, revealing the lighter wood beneath and creating a beautiful, distressed effect. You can also use the sander to slightly round the sharp edges, softening the overall appearance and giving it a more seasoned, authentic feel. This step truly gives your crate a professional, bespoke finish.
Your Versatile, Budget-Friendly Masterpiece!
And there you have it – your very own DIY Christmas Tree Crate, handcrafted with love and creativity! This project not only fits perfectly into any holiday decor scheme but also offers incredible versatility. Beyond displaying your mini Christmas tree, this sturdy wood crate can be repurposed throughout the year. Use it as a stylish storage solution for blankets, magazines, or children’s toys. It makes a charming planter for indoor greenery, adding a rustic touch to any room. Imagine it as a chic accent piece in an entryway or living room, holding seasonal decor or books.
The best part? We achieved this stylish, multi-functional piece of decor for under $10 in wood! That incredible value, combined with the satisfaction of creating something beautiful with your own hands, makes this project truly special. It’s a testament to how simple materials and a little ingenuity can result in stunning, personalized home accents.
Ready to showcase your mini Christmas tree in style? This DIY crate adds just the right amount of rustic charm without overpowering your holiday display. Its clean lines and distressed finish provide the perfect backdrop for twinkling lights and festive ornaments.
We hope you’ve enjoyed this fun and functional DIY project for our 12 Days of Christmas series. Don’t forget to download the free plans if you haven’t already, and share your finished creations with us!
Explore More Holiday Inspiration from Our Friends!
The holiday spirit continues to shine bright across the DIY community! Be sure to check out the other fantastic Day 8 projects shared by our talented friends. Click the buttons below to discover more creative ideas and tutorials to make your festive season even more special!