
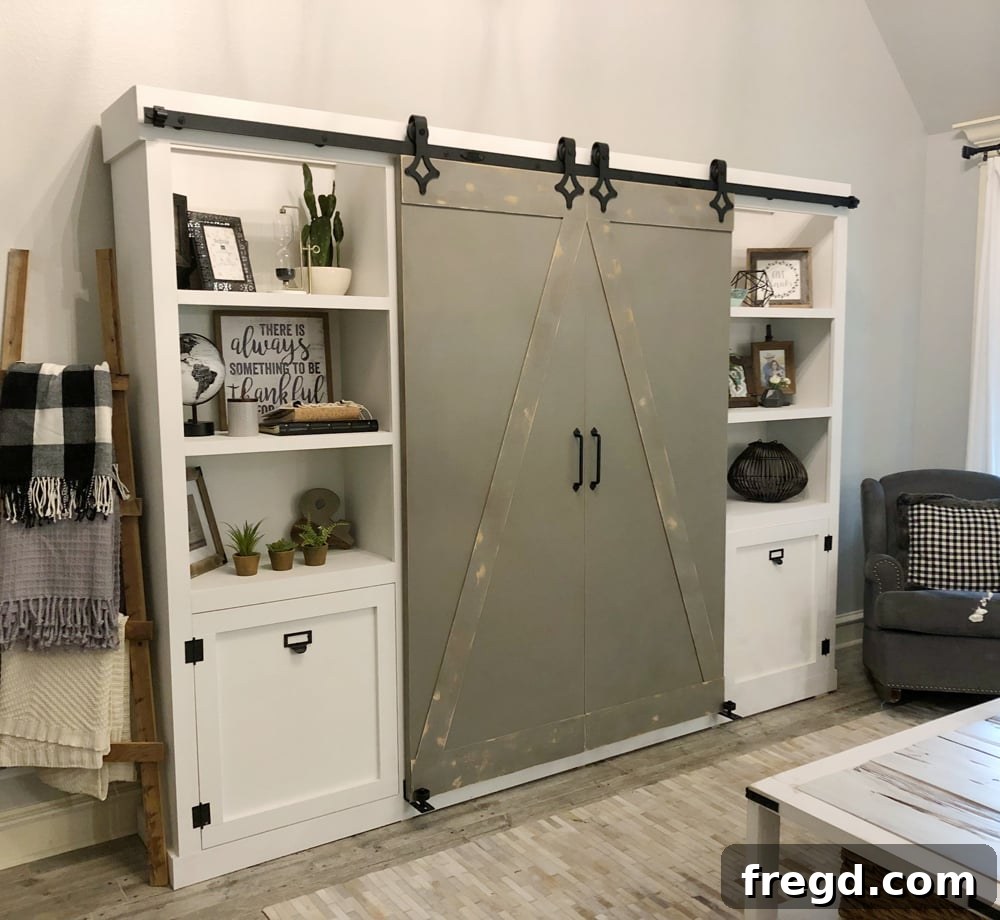
DIY Barn Door Media Cabinet: Elevate Your Home with Custom Storage
We are absolutely thrilled to share this exciting project with you today: our custom-built DIY Barn Door Media Cabinet! This elegant and highly functional piece was brought to life in collaboration with PureBond Plywood, a material we’ve come to love and trust for its quality and sustainability. If you’re looking to reclaim your living room, add significant storage, and infuse a touch of rustic charm into your home, then this project is perfect for you.
Before we dive into the detailed instructions for constructing this impressive DIY Barn Door Media Cabinet, make sure to check out our comprehensive video tutorial. It provides a visual guide that complements our written steps, making the building process even smoother. You can watch the YouTube video tutorial HERE or below!
Why Build a DIY Barn Door Media Cabinet?
Just look at how beautifully this piece turned out! We are incredibly proud of the added storage it provides, instantly decluttering our living room. Plus, we finally have our fireplace back as a focal point, free from the usual media equipment mess. A custom media cabinet not only organizes your electronics and media but also adds significant aesthetic value to your space, making it feel more cohesive and inviting. It’s a statement piece that combines practicality with farmhouse-inspired elegance.
To help you on your building journey, we’ve made the detailed plans readily available. You can easily download and print the FREE PLAN HERE! Having a clear plan is the first step towards a successful DIY project, ensuring you have all measurements and cuts outlined before you begin.
Choosing the Right Material: Why PureBond Plywood?
The idea of constructing a sophisticated DIY Barn Door Media Cabinet primarily from plywood might initially seem unconventional, and we admit, we had similar reservations ourselves! That was until we discovered the remarkable qualities of PureBond Plywood. This material has completely revolutionized our approach to woodworking projects, proving that plywood can be both beautiful and exceptionally robust.
Convenience is key for any DIYer, and finding quality materials shouldn’t be a challenge. That’s why we appreciate that PureBond Plywood is widely available at any Home Depot store. This accessibility makes it a practical choice for anyone eager to start their next project without a tedious search for supplies.
What truly solidified our decision to use PureBond for this media cabinet, and indeed for many future builds, were its numerous compelling benefits:
- Formaldehyde-Free Glue: One of the most significant advantages is its use of a formaldehyde-free adhesive. It’s unsettling to consider the harmful chemicals we might have been exposed to in the past with conventional plywood. PureBond offers peace of mind, ensuring a healthier environment for your home and family.
- Made in America: We are proud to support American craftsmanship! PureBond Plywood is manufactured right here in the USA, a testament to quality production and local industry. Whoop!
- Sustainable Sourcing: Environmental responsibility is increasingly important. PureBond is made with wood sourced from sustainable forests, ensuring that your beautiful furniture piece also contributes to responsible ecological practices.
- Exceptional Workability: For both seasoned woodworkers and beginners, PureBond Plywood is incredibly easy to work with. It cuts cleanly, accepts finishes beautifully, and holds fasteners securely, making the building process far more enjoyable and less frustrating.
- Stunning Aesthetic Appeal: Perhaps the biggest selling point for us – it’s simply gorgeous! PureBond Plywood provides the authentic look and feel of real hardwood, but at a mere fraction of the cost. Home Depot typically stocks popular options like birch and oak, but you can also custom order a variety of other species, including hickory and maple, and have them conveniently delivered to your local store. This flexibility allows for truly customized finishes that match any home decor style.
After experiencing the myriad benefits of PureBond Plywood, we can confidently say we’ll never revert to other materials. It’s a superior, healthier, and more budget-friendly choice that perfectly aligns with our DIY ethos and helps us maintain our “shanty budgets.”
DIY Barn Door Media Cabinet: The Building Process
Embarking on a custom furniture project like this is incredibly rewarding. Let’s get started on building your very own barn door media cabinet!
Step 1: Constructing the Bookcases
You will begin by building two identical bookcases that will flank the central media console. Start by cutting your tall side pieces from the plywood. For efficiency, we recommend having Home Depot rip your plywood sheets down to 15 inches wide, which will yield three boards per full plywood sheet. Each bookcase will require two of these tall side panels.
Next, cut and attach your shelf boards. Ensure all shelves are cut to the exact same length for consistency. Drill 3/4-inch pocket holes into both ends of each shelf board. Using a strong wood glue and 1.25-inch pocket hole screws, secure these shelves to the tall side boards. You have the flexibility to follow our specific spacing or adjust it to perfectly fit your unique storage requirements. For a cleaner finish, try to orient the pocket holes so they face downwards or towards the back, where they will be less visible. Since we opted to paint this cabinet, we filled all pocket holes with wood filler for a seamless surface.
Now, it’s time to attach the crucial support boards: the wall support and the hardware support. The 2×4 board serves as the front hardware support and will be critical for mounting the barn door track later on. Attach this board using wood glue and robust 2-inch wood or Spax screws. Position this board 1.5 inches down from the very top edge of the tall side pieces, ensuring it’s perfectly level.
The wall support board, a 1×3 piece, is designed to help securely brace the entire console unit to your wall once fully assembled, preventing any tipping. Create 3/4-inch pocket holes on each end of this support board. Attach it to the top of the back end of the bookcase, ensuring it sits flush with the very top of the bookcase frame. This provides a strong anchor point for wall mounting.
Step 2: Assembling the Middle Console
With your two bookcases ready, our focus shifts to the heart of the unit: the middle console, which will proudly host your television and other media components. Begin by attaching both side pieces of the console to the top panel. Apply wood glue generously and secure them with 1.25-inch pocket hole screws, creating a strong initial frame.
Next, install the middle divider for the console. This piece will require 3/4-inch pocket holes on both ends. Carefully position it in the exact center of the top console board and secure it using wood glue and 1.25-inch pocket hole screws through the pre-drilled pocket holes. This divider provides structural integrity and creates distinct compartments.
Now, attach the base of the console. Similar to the shelves, this piece will also have 3/4-inch pocket holes on each end. When attaching it to the sides of the console, remember to face these pocket holes downwards to keep them hidden. Use wood glue and 1.25-inch pocket hole screws for a secure connection.
Finally, install the interior dividers within the console. These dividers help create organized compartments for media devices, games, or decorative items. Attach each divider to the console sides using wood glue and 1.25-inch pocket hole screws through the 3/4-inch pocket holes. Feel free to customize their placement to perfectly accommodate your baskets, media components, or any other storage needs!
Step 3: Unifying the Structure and Adding Top Supports
At this crucial point, before proceeding further, it is highly recommended to move all three completed pieces—the two bookcases and the central console—into the exact space where you intend to set up the final unit. This prevents potential difficulties with moving a large, fully assembled console later. Once in place, begin attaching all three pieces together. Secure each bookcase to the center console by driving 1.25-inch wood screws through the inside walls of the bookcases and into the console’s sides, creating a sturdy, unified structure.
Now, attach the top hardware support board and the wall support board that span across the entire unit. These boards are similar in function to the ones used on the individual bookcases, but they will run across the top of the entire console, connecting all three sections and providing essential structural integrity. The back support board is a 1×3 piece; attach it using wood glue and 1.25-inch pocket hole screws through 3/4-inch pocket holes. Ensure that these pocket holes face the back of the console to remain out of sight.
The front hardware support board will run across the front, connecting the top of both bookshelves. This is a crucial piece for your barn door hardware. This particular board is unique in that you will create 1.5-inch pocket holes on its ends. Attach it to the bookshelves using wood glue and robust 2.5-inch pocket hole screws, ensuring a very secure connection for the sliding door mechanism.
Step 4: Trim Work and Custom Doors
It’s trim time! This is where your console truly begins to take on its finished, polished look. You will trim out the entire piece, adding decorative and functional borders. These trim boards are all attached using a combination of wood glue and 1.25-inch brad or finish nails driven into the console frame. We’ve provided images below showing the order we trimmed our unit, which can serve as a helpful guide. Remember, for the best fit and a professional finish, it is always advisable to measure each cut precisely as you go, rather than pre-cutting all the trim pieces.
And of course, we can’t forget the signature barn doors! For this part, we employed one of our favorite DIY hacks. Instead of building solid, heavy barn doors from scratch, we utilized inexpensive hollow core doors and cleverly added trim to them to achieve the rustic barn door aesthetic. This method saves both time and money without sacrificing style. For a complete guide, including detailed plans and a video tutorial on how to execute this clever hack, please refer to our website.
Optional: Bookcase Doors
Should you decide to add doors to your console’s bookcases for enclosed storage, the process is straightforward. First, construct each door frame using wood glue and 1.25-inch pocket hole screws through 3/4-inch pocket holes. Once the frames are sturdy, staple or nail 1/4-inch plywood to the back of each door frame. This creates a solid and attractive enclosed storage space. For specific hardware recommendations for these doors, please visit our website.
Middle Console Shelf
Adding a shelf above the TV area in the middle console provides additional display or storage space. Attach the plywood shelf board to each bookcase using wood glue and 1.25-inch pocket hole screws through 3/4-inch pocket holes. Then, finish the front edge of this shelf by attaching a 1×2 trim piece with wood glue and 1.25-inch brad nails for a clean, integrated look.
Plywood Backing
You have a wonderful degree of flexibility when it comes to the backing of your media console. Consider your aesthetic preferences and functional needs: do you prefer certain sections to have the wall exposed, or do you desire a painted back that seamlessly matches the console’s finish? For our project, we chose to back the bookcases, creating a solid, enclosed feel, but left the central TV console area open for easier wire management and to maintain a lighter visual. This choice is entirely up to you and your design vision! Whatever you decide, the provided dimensions here should serve as an excellent guide. We used 1/4-inch PureBond hardwood plywood for the backing and secured it to the console frame using 5/8-inch staples, ensuring a neat and professional finish.
DIY Barn Door Media Cabinet: The Finishing Touches
You’re almost there! With the construction complete, it’s time to secure your beautiful new media cabinet and add the final cosmetic details.
To ensure your console is completely stable and safe, especially in a home with children or pets, it is crucial to attach it securely to the wall. Use long 3-inch wood or Spax screws, driving them through the top support boards and directly into the wall studs. This will prevent any possibility of tipping, keeping your family and your console safe.
For the aesthetic finish, we painted our entire console with Sherwin-Williams Pure White paint, providing a crisp, clean, and timeless look that brightens any room. The barn doors were painted with THIS GRAY CHALK PAINT, which offers a lovely contrast and adds to the rustic charm.
For the essential barn door hardware, we utilized THIS HARDWARE, which perfectly complements the design. Remember, for this specific console design, you will need to order the 9.6-foot length of hardware to ensure proper coverage and functionality across the entire unit.
To complete the look and maximize organization within the TV console compartments, we sourced THESE BASKETS from Ikea. They fit perfectly and offer a stylish way to hide clutter.
And there you have it! Look how incredibly cute and functional it turned out. This DIY Barn Door Media Cabinet is not just a piece of furniture; it’s a testament to what you can achieve with a little effort and the right materials. We hope this guide inspires you to create your own custom storage solution and enjoy the satisfaction of building something beautiful for your home.