
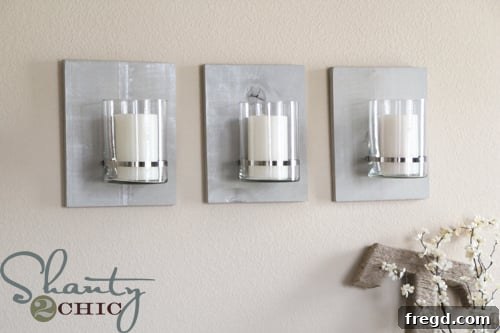
Do you have that one large, empty wall in your home that just screams for attention, longing for a touch of character and charm? We’ve all been there – staring at a vast, uninspired space, wondering how to transform it without breaking the bank or dedicating weeks to a complex project. If you’re searching for an easy, quick, and incredibly budget-friendly way to infuse your living space with stylish flair, you’ve come to the right place. I faced a similar dilemma in my dining room, and I’m thrilled to share a super simple DIY project that turned a blank canvas into a stunning feature wall: custom industrial-chic wall sconces. These unique pieces not only add visual interest but also provide a wonderful opportunity to showcase your favorite candles or fresh botanical arrangements. Get ready to elevate your home decor with this rewarding and impactful DIY transformation!
Unlock Your Home’s Potential with DIY Industrial-Chic Decor
The allure of industrial-chic decor lies in its blend of raw, utilitarian elements with modern sophistication, creating spaces that feel both grounded and refined. This style is perfect for those who appreciate design with character and a story, often incorporating materials like distressed wood, metal, and glass. Our DIY wall sconces perfectly embody this aesthetic, offering a handmade touch that mass-produced decor simply can’t replicate. Beyond the aesthetic appeal, opting for DIY projects like this allows for unparalleled customization. You can choose the exact dimensions, stain color, vase style, and metal finish to perfectly match your existing home decor or to create a striking focal point. It’s an opportunity to infuse your personality into your surroundings, creating pieces that are not only beautiful but also deeply personal.
Why Choose DIY for Your Wall Decor?
Embarking on a DIY home decor project offers numerous benefits. Firstly, the cost savings can be significant. High-quality, unique wall sconces can command a hefty price tag in retail stores. By sourcing materials yourself and investing a little time, you can achieve a designer look for a fraction of the cost. Secondly, there’s an immense sense of satisfaction that comes from creating something beautiful with your own hands. Transforming raw materials into a functional and aesthetically pleasing piece of art is incredibly rewarding. Lastly, DIY empowers you to address specific design challenges in your home. That awkward blank wall or underutilized space suddenly becomes an exciting canvas for your creativity. This project is specifically designed to be accessible to DIY enthusiasts of all skill levels, making it a fantastic entry point for those new to woodworking or home decor projects.
Gather Your Materials: Essential Supplies for Your Wall Sconces
One of the most appealing aspects of this project is the simplicity of its material list. You won’t need an overwhelming array of specialized items, making it easy to gather everything you need in a single trip to your local hardware or craft store. The beauty of industrial-chic design is its ability to make everyday objects look extraordinary. For these sconces, we’re relying on readily available and affordable components to achieve a high-end look.
Wood Boards: The Foundation of Your Sconces
I began this project with a 1×12 piece of wood, which I cut down into three individual pieces, each measuring 14 inches in length. A 1×12 board provides a substantial surface area, giving the sconces a robust and rustic presence on your wall. If you don’t own a saw or feel comfortable making cuts yourself, don’t worry! Most local hardware stores offer cutting services, often for a small fee or even free with your lumber purchase. Simply ask them to cut your 1×12 into three 14-inch sections. The specific type of wood isn’t critical, but common pine or fir boards are excellent, affordable choices that readily accept stain. Consider the thickness and width for the desired visual impact – a 1×12 offers a good balance of presence and proportionality for most walls.
Selecting the Perfect Vases: A Touch of Elegance
Next up are the vases, which will hold your decorative elements and soften the industrial edge of the metal clamps. I was lucky enough to find three beautiful vases at Wal-Mart for just $4.97 each, proving that stylish finds don’t have to break the bank. The key here is to choose vases that you absolutely love and that complement your personal aesthetic. Look for shapes, textures, and colors that resonate with your home decor vision. Glass vases are a classic choice, offering transparency that allows light to pass through, especially if you plan to use candles. Ceramic or metal vases could also work if you’re aiming for a different texture or a more opaque look. The beauty of this project is its flexibility – you can find suitable vases almost anywhere, from discount stores and thrift shops to craft stores and online retailers. Prioritize finding vases that have a relatively straight, cylindrical body where the hose clamp will attach, ensuring a secure fit.
Hose Clamps: The Industrial-Chic Hardware
Finally, you’ll need three hose clamps – these are the star of the “industrial” part of our “industrial-chic” design. These versatile pieces of hardware are readily available at any local hardware store. The most crucial tip for this step is to purchase your vases BEFORE you buy the hose clamps. This allows you to take a vase with you to the store and physically test different clamp sizes to ensure a perfect fit. You want a clamp that snugly encircles the widest part of your vase where it will be secured. For reference, my vases were 6.5 inches in diameter, so I selected hose clamps sized 5.5-6.5 inches. This range provides enough flexibility to tighten the clamp securely without it being too loose or too small to fit around the vase. Don’t underestimate the importance of this step; a correctly sized clamp is vital for both aesthetics and the security of your finished sconce.
The Construction Process: Bringing Your Sconces to Life
With all your materials gathered, it’s time to assemble your industrial-chic wall sconces. This phase involves a few simple steps, each contributing to the final look and durability of your new home decor. Pay close attention to the details, especially when securing the components, to ensure your sconces are not only beautiful but also safely mounted.
Step 1: Preparing and Staining the Wood Boards
Before attaching any hardware, the wood boards need some attention. Start by lightly sanding your cut wood pieces to smooth any rough edges or surfaces. This step isn’t just for aesthetics; it also helps the stain adhere more evenly. Once sanded and wiped clean of dust, apply one coat of Rust-Oleum Sunbleached stain to each board. This particular stain is a fantastic choice for achieving that sought-after weathered, worn wood look, instantly adding character and a rustic touch to your industrial-chic design. One of the many advantages of Rust-Oleum stains is their quick-drying formula, which significantly speeds up the project timeline. Furthermore, they are known for having a less harsh odor compared to many other wood stains, making the staining process more pleasant. Apply the stain according to the manufacturer’s instructions, typically wiping it on with a cloth and then wiping off any excess. Allow ample drying time before moving to the next step, ensuring a durable and beautiful finish.
Step 2: Attaching the Wall Mounting Hardware
Before proceeding with the hose clamps, it’s advisable to attach the wall mounting hardware to the back of your stained wood boards. There are various types of picture hangers or keyhole hangers available; choose one that is appropriate for the weight of your finished sconce (wood board + vase). Position the hanger centrally at the top back of each board, ensuring it will allow the sconce to hang straight and flush against the wall. Use small screws to secure the hangers firmly in place. Pre-drilling pilot holes with a small drill bit can prevent the wood from splitting, especially with softer woods like pine. This step ensures that once your sconces are fully assembled, they are ready to be securely hung on your wall without any last-minute adjustments to the mounting system.
Step 3: Securing the Hose Clamps to the Boards
This is where the industrial magic happens. The hose clamps need to be securely fastened to the front of your wood boards. To make this process easier and more precise, first, mark the desired placement for your hose clamps. I opted to place mine approximately 4 inches from the bottom edge of each board, which provides a balanced look and ensures enough space for various vase sizes. Next, use a hammer and a small nail to create pilot holes where your screws will go. This technique is similar to how other DIYers, like Whitney, have prepared wood for projects such as the Mason Jar Key Hook. For larger, heavier vases like mine, I strongly recommend securing the hose clamps with two screws for maximum stability. Since larger hose clamps often feature thicker metal, spreading the spaces for the screws might be a bit challenging initially. After creating the pilot holes with the nail, I found it incredibly efficient to twist the metal apart slightly with needle-nose pliers. This made the subsequent step of screwing in the fasteners much quicker and easier. Finally, follow up by driving screws through the prepared holes in the hose clamp and into the wood board, ensuring the clamps are firmly attached and ready to hold your vases.
Step 4: Wall Installation and Vase Placement
Before hanging your sconces, ensure you use appropriate wall anchors. Since these sconces will hold vases, potentially filled with water or heavy decorative items, securing them firmly to the wall is paramount for safety and longevity. Locate the studs in your wall, if possible, or use heavy-duty wall anchors designed for the weight of your sconce. Once the boards are securely mounted to the wall with anchors, the final step is to insert your chosen vase. Carefully slide each vase through its corresponding hose clamp. With the vase in place, use a screwdriver to tighten the hose clamp until it firmly grips the vase. Do not overtighten, but ensure it is snug enough that the vase cannot wobble or slip. Give it a gentle tug to confirm its stability. The snug fit of the hose clamp around the vase is what gives these sconces their robust, industrial aesthetic and their dependable functionality.
Styling Your New Industrial-Chic Sconces
Now for the most exciting part: bringing your new decor to life with your personal touch! Once the sconces are securely installed on your wall and the vases are locked into place, you can begin to style them. The simplest and most classic option is to place a beautiful candle inside each vase. Flameless LED candles offer a safe and convenient alternative, providing a warm glow without the worry of an open flame. Alternatively, fresh flowers can instantly add a pop of color and natural elegance, transforming your dining room or living space into a more vibrant and inviting area. Consider seasonal flowers to easily update your decor throughout the year. For a low-maintenance option, high-quality faux botanicals or dried floral arrangements also work wonderfully. The beauty of these sconces is their versatility; you can effortlessly change the contents of the vases to match your mood, the season, or a special occasion.
Durability and Long-Term Enjoyment
You might be wondering about the stability of these DIY sconces, especially with vases inside. Rest assured, with proper installation, they are incredibly secure. I’ve had mine up for over a week, and they haven’t budged an inch, even when deliberately tested. The combination of well-secured wood boards, robust hose clamps, and correctly sized vases creates a surprisingly stable unit. This means you can enjoy your beautiful new wall decor with complete peace of mind, knowing your vases and their contents are safe and sound.
Transform Your Space: From Blank Wall to Beautiful Feature
Gone are the days of a giant, blank wall! These industrial-chic wall sconces effectively fill that void, transforming an otherwise unremarkable space into a captivating focal point. Whether you install them in your dining room, living room, entryway, or even a spacious hallway, they add an immediate sense of curated style and warmth. The rustic wood combined with the sleek metal and elegant glass creates a harmonious balance that complements a wide range of interior design themes, from modern farmhouses to urban lofts. This project truly showcases how simple materials, thoughtfully combined, can achieve a sophisticated and impactful decor statement. Embrace the opportunity to add depth, texture, and light to your home with this easy and rewarding DIY project.
Cost Breakdown: An Unbeatable Value for DIY Wall Decor
One of the most compelling reasons to undertake this DIY project is the incredible value it offers. For a set of three stylish and robust wall sconces, the total cost is remarkably low, especially when compared to similar items available in retail stores. Here’s a detailed look at the approximate cost:
- Hose Clamps: Approximately $1.50 each, totaling around $4.50 for three.
- Vases: My vases cost $4.97 each, bringing the total to about $14.91 for three. This cost will vary depending on your choice of vase, but affordable options are plentiful.
- Wood Boards: For this project, I was fortunate to use scrap wood I already had, making this component free! If you need to purchase a 1×12 board, it typically costs around $8 at a hardware store. Since you only need one board for three sconces, this remains highly economical.
Even if you factor in purchasing a new 1×12 board, your total investment for all three industrial-chic wall sconces would be approximately $30. This is an incredible “bang for your buck,” offering a high-impact home decor solution at an exceptionally low price point. Imagine the satisfaction of knowing you’ve created such a stylish and functional piece of decor for so little!
Embrace Your Inner DIYer and Transform Your Home
This industrial-chic wall sconce project is more than just a craft; it’s an invitation to customize your home, save money, and experience the immense satisfaction of DIY. It’s a testament to how simple materials and a little creativity can yield truly impressive results, turning an overlooked blank space into a captivating feature. We hope this detailed guide has inspired you to pick up some tools and start your own home transformation. Whether you’re looking to enhance your dining room, living area, or any other space, these sconces offer a versatile and elegant solution. If you found this tutorial helpful and inspiring, please consider sharing it with your friends and fellow DIY enthusiasts. Pin it using the button below to help others discover this fantastic project! Thank you so much for following along. Happy building! ~Ashley