
DIY Dream Bedroom: Building the Chestwick Queen Platform Bed on a Budget
There’s nothing quite like the thrill of a new DIY project, especially when it solves a real need for someone you love! Lately, my home workshop has been buzzing with activity, and I’m absolutely delighted to share my latest creation. My youngest sister had been searching for a new bed for quite some time, but like many of us, she’s navigating life on a “shanty budget.” This meant finding an affordable, stylish, and durable solution was paramount.
Knowing her taste and our shared appreciation for well-designed furniture, I knew exactly where to turn for inspiration. We both adore the sophisticated, clean lines often found at high-end retailers like Pottery Barn. We quickly pinpointed a beautiful platform bed that perfectly captured the aesthetic we were after. The only catch? That familiar, daunting price tag. But where there’s a will (and a Kreg Jig), there’s a DIY way! That’s when I reached out to the queen of DIY plans, Ana White, and discovered the perfect project:
The Chestwick Platform Queen Bed!
This design truly captured everything we loved about the expensive Pottery Barn version – its elegant simplicity, robust structure, and timeless appeal – without the prohibitive cost. It was a match made in DIY heaven, and I couldn’t wait to get started on bringing this vision to life for my sister. The satisfaction of crafting something beautiful and functional with my own hands, especially when it saves a significant amount of money, is truly unmatched.
And yes, even after all the sawdust and hard work, I still absolutely love the design!
Essential Tools for a Sturdy Build: The Kreg Jig Advantage
Embarking on a furniture-building project, especially one as substantial as a queen-sized bed, requires reliable tools. For this particular build, my trusted Kreg Jig® was an absolute game-changer. If you’re a budding DIY enthusiast or even an experienced builder who hasn’t yet invested in one, I cannot recommend it highly enough. This tool simplifies joinery, allowing you to create incredibly strong and precise connections with ease. It truly made the entire construction process remarkably smooth and efficient.
The beauty of the Kreg Jig lies in its pocket-hole system, which creates discreet, angled holes for screws, resulting in incredibly sturdy joints that are far superior to traditional fastening methods for many applications. This bed, despite being a DIY project, boasts incredible stability and durability, largely thanks to the strength provided by the pocket-hole joinery. For anyone on the fence about purchasing their own Kreg Jig, let me assure you, it is by far my favorite and most valuable tool. It has saved me countless hours of labor and a significant amount of money that would have otherwise been spent on more complex or weaker joinery techniques. Whether you’re building cabinets, tables, or a bed frame like this one, the Kreg Jig is an investment you will not regret. It’s a fantastic addition to any workshop, and I believe anyone with an interest in woodworking, from hobbyists to seasoned crafters, will appreciate its capabilities.
The Foundation: Assembling the Platform Bed Frame
Once all the cuts were made according to Ana White’s detailed plans, the assembly process began. The beauty of pocket-hole joinery truly shone through as the main frame components started coming together. It’s incredibly satisfying to watch a pile of lumber transform into the sturdy skeleton of a bed. Beyond the mechanical fasteners, I always advocate for using a high-quality wood glue for added strength and longevity. For this project, I relied on Gorilla Wood Glue on all corners and joints. Wood glue, when properly applied, creates a bond that is often stronger than the wood itself, ensuring that your furniture will withstand years of use without creaking or wobbling. It’s a simple step that significantly enhances the durability of any woodworking project.
Applying glue to every joint before securing with screws adds an extra layer of structural integrity. This combination creates a bond that ensures the bed will remain steadfast and robust, a critical factor for something as frequently used as a bed. The process of assembling the frame is methodical; taking your time to ensure all pieces are square and flush before tightening screws makes a huge difference in the final product’s appearance and stability. The detailed plans provided by Ana White walk you through each step, making it manageable even for those with less experience. It’s a rewarding stage where the bed truly starts to take shape.
Reinforcing for Longevity: The Middle Brace
A crucial element for any queen or king-sized platform bed is proper central support. Without it, the mattress can sag over time, leading to discomfort and premature wear. The Chestwick Platform Bed design thoughtfully incorporates a robust middle brace, which is essential for providing even weight distribution and preventing bowing of the slats or mattress foundation. This critical component was also attached with my trusty Kreg Jig®, ensuring a rock-solid connection that seamlessly integrates into the overall structure. The stability it provides is truly remarkable, promising years of comfortable and supportive sleep.
This brace runs down the center of the bed, connecting the head and foot rails, and is designed to support the mattress foundation or slats that will sit on top. By attaching it with pocket holes, the fasteners are hidden and the joint is incredibly strong, preventing any weak points in the bed’s load-bearing structure. It’s details like this, often unseen but fundamentally important, that differentiate a well-built piece of DIY furniture from a flimsy one. Taking the time to properly install this brace provides peace of mind, knowing the bed will hold up to daily use without issue. It’s a testament to good design and careful construction, ensuring the bed is as functional as it is beautiful.
Crafting a Professional Finish: Sanding and Details
Achieving that polished, professional look – the kind that makes people wonder if you really built it in your garage – often comes down to the details. One of the most crucial steps in elevating a DIY project from “homemade” to “handmade with expertise” is meticulous sanding. I always make sure to sand all edges and surfaces thoroughly. This not only removes splinters and rough spots but also creates a smoother, more refined feel and allows the stain to penetrate evenly. It’s this careful attention to detail that gives the piece its finished, high-quality appearance, making it feel less like a construction project and more like a carefully crafted piece of furniture.
I typically start with a medium-grit sandpaper (around 120-150 grit) to remove any major imperfections or milling marks, then progress to a finer grit (220 grit) for a silky-smooth finish. Don’t rush this stage; thorough sanding ensures that your chosen stain and sealant will apply beautifully, enhancing the wood grain and providing a durable surface. It’s a therapeutic process that significantly impacts the final aesthetic and tactile quality of the bed. This step is about refining the raw materials into something truly beautiful, ensuring every touch point is smooth and inviting.
Adding Character: Choosing the Perfect Bed Feet
While the overall structure and finish contribute significantly to a bed’s appeal, sometimes the smallest details can make the biggest impact. For this Chestwick Platform Bed, the choice of feet was crucial in achieving that high-end, bespoke look. I was thrilled to discover the perfect set of decorative feet at Lowe’s, and at under $6 a piece, they were an absolute steal! In my opinion, these feet truly became the focal point, adding a touch of elegance and sophistication that transformed the bed from a mere frame into a stylish piece of bedroom furniture. They perfectly complemented the clean lines of the platform design, providing a subtle yet powerful visual statement. Finding these little gems on a budget truly reinforces the idea that you don’t need to spend a fortune to achieve a luxurious feel in your home decor.
The Grand Finale: Staining and Sealing for Durability and Beauty
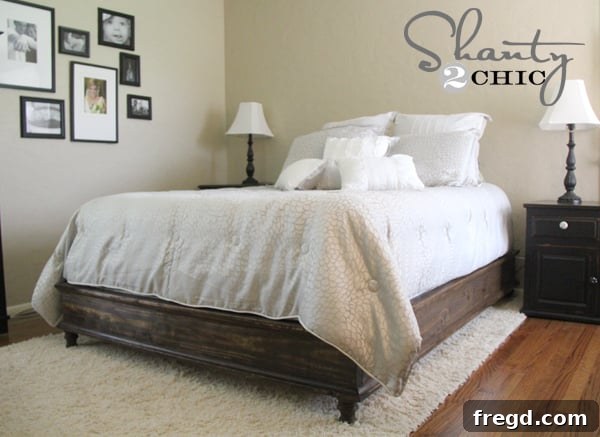
With the construction complete and all surfaces smoothly sanded, it was time for the final and arguably most transformative step: applying the finish. The right stain and protective coat can drastically alter the appearance of wood, bringing out its natural beauty and protecting it for years to come. For this project, I chose to finish the entire bed with Rust-Oleum Premium Wood Stain in Dark Walnut. This rich, deep hue immediately lent an air of sophistication and warmth to the wood, enhancing the grain patterns and giving the bed a classic, elegant appearance that beautifully mimics the high-end furniture we admired.
After allowing the stain to cure thoroughly, I applied a protective coat of Rust-Oleum Ultimate Polyurethane with Soft Touch. This product is fantastic because it provides superior durability and protection against scratches and daily wear, while also leaving a wonderfully smooth, soft-touch finish. It’s not sticky or overly glossy, which perfectly suited the refined aesthetic of the bed. Both of these excellent products are readily available at Lowe’s, making it convenient to achieve professional-level results in your own home workshop. The combination of the dark walnut stain and the soft-touch polyurethane creates a finish that is not only beautiful to look at but also incredibly pleasant to touch and durable enough to withstand the rigors of everyday life. This final step truly brought the entire project together, turning raw lumber into a stunning piece of furniture.
The Finished Product: A Stunning DIY Queen Platform Bed
What do you think of the final result? I am absolutely thrilled with how the Chestwick Platform Queen Bed turned out! It’s everything we hoped for: stylish, incredibly sturdy, and perfectly suited to my sister’s bedroom, all while staying well within our budget. The dark walnut stain truly gives it a rich, luxurious feel, and those decorative feet provide just the right touch of detail to elevate its overall design. It’s a testament to the power of DIY – achieving that high-end look without the high-end price tag. Seeing it fully assembled and finished, I almost wanted to keep it for myself! My sister is incredibly lucky that I already have a king-sized bed, or this beautiful creation might have found a permanent home in my own house!
Practical Considerations: Moving and Assembly Tips
One of the practical aspects to consider when building large furniture pieces is how you’ll get them into their final destination. For this queen-sized platform bed, we were fortunate to be able to assemble the entire frame in my workshop and move it in one piece. Due to its queen dimensions, we could carefully turn it on its side and maneuver it through the door frames without issue. This is a huge time-saver if your entryways permit!
However, if you anticipate having smaller doorways, tight hallways, or staircases, I recommend a slightly different approach. In such cases, you can pre-assemble all the main components – the head and footboards, side rails, and central supports – without applying glue to the final corner joints. Then, you can easily take the larger sections apart for transport. Once you’ve moved all the pieces into the designated room, you can reassemble them, applying glue at this final stage for a permanent hold. Just be mindful that once you use glue in these critical joints, the connection will be very strong and difficult to undo without damaging the wood. So, if you foresee needing to move the bed again in the near future (perhaps to a new home), you might opt to assemble with only screws in some sections or be prepared for a more involved disassembly process. Planning ahead for transport can save a lot of headaches on moving day!
What’s Next? A Custom Headboard Project!
As complete and beautiful as this platform bed is, it’s missing just one thing to truly make it a cohesive bedroom centerpiece: a headboard! Oh, but you just wait! My creative gears have been turning, and we’ve already envisioned a absolutely gorgeous headboard design that will perfectly complement the elegant lines and dark finish of this bed. I am incredibly excited about this upcoming project and can’t wait to share the details with you very soon. It’s going to add that final touch of personalization and comfort, transforming the bed into an even more inviting and stylish focal point for my sister’s room.
Join the DIY Journey!
I hope this detailed look into building the Chestwick Platform Queen Bed has inspired you to tackle your own DIY furniture projects! The satisfaction of creating something functional and beautiful, especially when it saves money and adds personal flair to a home, is truly rewarding. It would absolutely make my day if you would pin this project and share it with your friends and fellow DIY enthusiasts!
Thank you so much for stopping by and following along with this build. Don’t forget to head over and get the full set of easy-to-follow plans over HERE at Ana’s site. She does an incredible job of making complex projects accessible to everyone. If you have any questions at all about the build, the tools, or the finishing process, please don’t hesitate to ask! I’m always happy to help.
Happy building!
~Whitney
Project Update: Introducing the DIY Upholstered Headboard!
**Update!** I’m thrilled to announce that I have successfully finished the matching headboard for this beautiful Chestwick Platform Bed! It turned out even better than I imagined, adding that perfect touch of custom comfort and style. Click the picture below to dive into the full post and see exactly how I built this DIY upholstered queen headboard. Enjoy!