
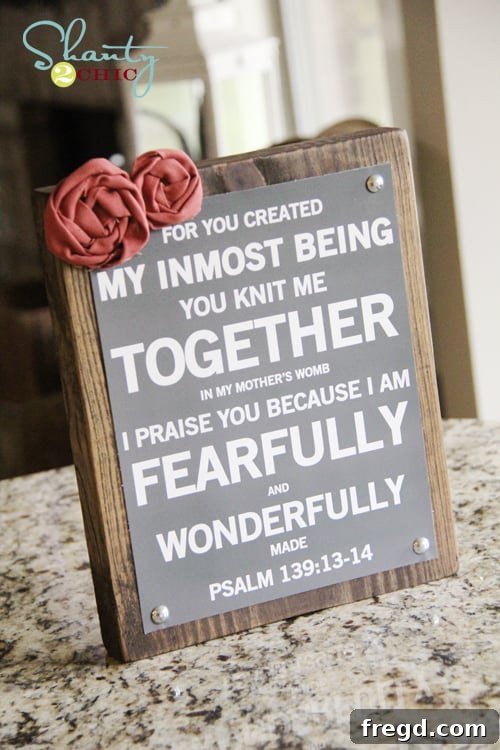
Craft Your Own Inspiring Psalm 139 Wood Block Art & Get a Free Printable!
Hello, dear friends and fellow DIY enthusiasts! I am absolutely thrilled to finally share a project that has been on my heart and mind for a very long time. There’s a particular Bible verse that holds immense personal significance for me – Psalm 139 – and I’ve always envisioned a beautiful, tangible way to display this powerful reminder within our home. It’s a passage that speaks volumes about God’s intricate design and unwavering presence in our lives, offering comfort and perspective daily. This project brings that cherished sentiment to life, adding a touch of rustic charm and profound meaning to any space.
Finding unique and affordable ways to infuse our living spaces with faith-inspired decor is a passion of mine, and this piece truly embodies that spirit. I believe our homes should be reflections of our hearts, and for me, that includes reminders of faith and hope. This DIY wood block art project is not only simple to create but also incredibly rewarding, allowing you to personalize your space with a scripture that resonates deeply with you.
Your Exclusive Free Psalm 139 Printable Art
To kickstart your own inspiring decor journey, I’ve designed a special printable featuring Psalm 139, and I’m delighted to offer it to you completely free! This high-quality, 8×10 inch art print is versatile enough for various applications. You can easily frame it as a standalone piece for instant wall art, or, as I’ll demonstrate below, use it as the focal point for a more elaborate DIY creation. Currently, I’m preparing a framed version for my son’s room, adding a comforting and inspiring message to his personal space. I’ll also walk you through the steps for creating a more unique, textured wood block version that now graces my living room, proving just how adaptable this printable can be for any room in your house.
This printable is designed with clean lines and a classic aesthetic, ensuring it complements a wide range of interior styles, from modern farmhouse to traditional. It’s perfect for adding a touch of spiritual elegance to a nursery, a calming presence to a bedroom, or an uplifting message in a family gathering area. The simplicity of its design makes it easy to integrate into existing decor, allowing the profound words of Psalm 139 to truly shine through. Imagine this beautiful scripture, prominently displayed, serving as a daily source of encouragement and a reminder of divine love and creation.
You can download and print my Psalm 139 Art for free right now by clicking the link below!
Download Your Free Psalm 139 Printable Here!
DIY Project: Craft Your Own Rustic Wood Block Scripture Art
Let’s dive into the creative process! Making this rustic wood block art is a wonderfully fulfilling project that requires minimal tools and supplies, making it accessible even for beginner crafters. The beauty of this piece lies in its handmade charm and the personal touch you’ll add every step of the way. Follow these simple instructions to create a lasting piece of decor that will inspire you and your loved ones for years to come.
Step 1: Prepare Your Wood Block
Our journey begins with a sturdy piece of wood. I opted for a 2x10x8 piece of lumber, which I sourced from my local Lowe’s. This dimension offers a substantial feel and a perfect backdrop for the 8×10 print. For this project, I cut my wood block to an 11-inch length, allowing for a slight border around the 8×10 printable once attached. If you don’t have access to woodworking tools or prefer a hassle-free start, many home improvement stores like Lowe’s offer cutting services, so you can have them prepare your piece to the exact dimensions you need. Always double-check your measurements to ensure a perfect fit for your chosen printable.
Once your wood is cut, the next crucial step is sanding. While the natural, raw wood look can be charming, a little preparation goes a long way in achieving a polished, professional finish and ensuring your stain adheres beautifully. I like to pay particular attention to sanding the edges, gently rounding them off to create a softer, more distressed, and inviting aesthetic. This subtle detail helps to give the block a worn, antique feel, as if it has been lovingly handled for years. Use medium-grit sandpaper (around 120-150 grit) initially to smooth any rough spots or splinters, then follow up with a finer grit (220 grit) for a silken touch. This two-step sanding process ensures a smooth surface that’s pleasant to touch and ready for the next stage of finishing.
As you can see, gently softening those sharp edges makes a significant difference in the overall look and feel of the finished piece. It’s these small details that elevate a simple craft project into something truly special and artisan-like. Don’t skip this step – your hands (and eyes!) will thank you for it.
Step 2: Stain the Wood for a Rich Finish
With your wood block smoothly sanded, it’s time to add character and depth with a beautiful stain. This step is where the rustic elegance truly begins to take shape. I have a particular favorite, and I wholeheartedly recommend it for this project: Rust-Oleum Premium Wood Stain in Dark Walnut. This stain delivers a rich, deep brown hue that beautifully enhances the natural grain of the wood, providing a sophisticated backdrop for your Psalm 139 printable.
Applying the stain is straightforward. Using a clean rag or a foam brush, apply the stain evenly across all surfaces of the wood block. Work in the direction of the wood grain to ensure a consistent finish. Allow the stain to penetrate for a few minutes, then wipe off any excess with a clean cloth. The longer you let the stain sit before wiping, the deeper and richer the color will be. You can apply multiple coats if you desire an even darker shade, allowing each coat to dry completely before applying the next. Always refer to the product instructions for specific drying times and application tips.
The Dark Walnut stain creates a timeless, heirloom quality look that perfectly complements the spiritual nature of the scripture. However, feel free to experiment with other stain colors if they better suit your home’s decor. A lighter oak or a gray wash could also create stunning, unique effects. Once stained, allow your wood block to dry thoroughly, ideally overnight, to ensure the stain is fully cured before moving on to the next step. This patience will prevent any smudging or damage to your beautiful new finish.
Step 3: Prepare and Attach Your Psalm 139 Printable
Now for arguably the easiest and most exciting part – bringing your scripture to life on the stained wood! First, ensure you’ve downloaded and printed the free Psalm 139 printable from the link provided above. While any good quality paper will work, I highly recommend printing on photo paper for the best results. Photo paper, whether matte or glossy, offers superior ink absorption and vibrant color reproduction, making the text crisp and the overall image pop against the dark wood. Just make sure your printer settings are adjusted for “photo paper” or “best quality” to achieve optimal clarity and detail for your 8×10 print.
Once printed, you’ll notice the printable likely comes with a white border. Carefully trim these edges using a paper trimmer or sharp scissors to achieve a clean, professional look. Precision here will ensure your art sits perfectly centered on your wood block. With your printable perfectly trimmed, it’s time to attach it to the stained wood block. My preferred method for a rustic and secure attachment involves decorative furniture tacks.
These aren’t your average pushpins; furniture tacks are typically small, ornamental metal pins with a decorative head, available in various finishes like antique brass, bronze, or pewter. They add a charming, industrial-chic detail to the piece. You can easily find them at craft stores like Hobby Lobby, home improvement centers like Lowe’s, or even online retailers. To attach, simply position your trimmed printable onto the center of your wood block. Then, using a small hammer, gently tap the furniture tacks around the edges of the paper, securing it firmly to the wood. Space them evenly for a balanced aesthetic, typically one in each corner and perhaps a few more along the longer sides, depending on the look you desire. This method not only holds the paper securely but also adds another layer of textural interest to your finished artwork. Alternatively, for a smoother finish, you could use a spray adhesive or Mod Podge, though the tacks lend a distinct rustic charm.
Step 4: Personalize with Beautiful Embellishments
To add an extra touch of charm and personalize my Psalm 139 art, I decided to embellish it with some delightful fabric flowers. I crafted mine using a lovely coral-colored fabric I discovered at Joann’s, which added a vibrant yet soft contrast to the dark wood and scripture. These fabric rosettes are surprisingly simple to make, and they infuse the piece with a handcrafted, whimsical feel. If you’re interested in learning how to create these charming rosettes yourself, I have a detailed tutorial available on how I make my flat-folded rosettes for various projects. You can find it right here:
Learn to make beautiful fabric rosettes: DIY Fabric Rosettes Tutorial!
Once your rosettes are ready, simply use a hot glue gun to attach them to a corner of your wood block art. The placement is entirely up to your creative vision; I chose a corner to create a balanced focal point. The hot glue provides a quick and secure bond, making this step incredibly easy. If fabric flowers aren’t quite your style, consider other embellishments like a twine bow, a small faux floral sprig, vintage buttons, or even a stencil detail with paint. The possibilities are endless, allowing you to truly make this piece your own and match it to your home’s unique style. This final touch truly transforms the project from a simple block with a print into a unique piece of handcrafted decor.
The Finished Masterpiece: Inspiring Home Decor
And that’s it! Your stunning, personalized Psalm 139 wood block art is complete! This project truly allows for creative expression while bringing a meaningful scripture into your daily life. The combination of rustic wood, the elegant scripture, and the charming embellishments creates a piece that is both visually appealing and spiritually uplifting. It’s a wonderful way to declare your faith and add a layer of warmth and character to any room. I couldn’t be happier with how this project turned out, and I hope you feel the same sense of accomplishment and joy when you complete yours!
What do you think of this inspiring piece? I love how the dark stain contrasts beautifully with the crisp white printable, making the scripture truly stand out. The fabric rosettes add a soft, feminine touch, but the design is easily adaptable for a more masculine or minimalist aesthetic by simply choosing different or no embellishments.
Beyond the Wood Block: Simple Framing & Thoughtful Gifting Ideas
For those of you who might not be feeling particularly crafty, or if you’re looking for an even quicker decor solution, remember that this beautiful Psalm 139 printable can be effortlessly framed! Simply download, print your 8×10 art, and pop it into any standard 8×10 frame. It’s an instant way to add meaningful scripture art to your walls without any DIY woodworking. This simplicity makes it a fantastic option for various rooms and purposes.
As I mentioned earlier, I’ll be framing one for my son’s room, and I’m also considering one for our new baby’s nursery! The gentle message of Psalm 139, speaking to God’s careful creation and knowledge of each individual, makes it an exceptionally perfect addition to a child’s space. It’s a wonderful reminder of their unique and precious design. This versatile printable also makes for an incredibly thoughtful and heartfelt baby shower gift, a housewarming present, or a gift for a friend who appreciates faith-inspired decor. Imagine gifting a personalized piece of art that carries such a profound and comforting message – it truly shows you care!
Share the Inspiration!
I hope you’ve enjoyed this DIY project and are inspired to create your own Psalm 139 wood block art or simply frame the printable. Incorporating meaningful scripture into our homes can bring so much peace and beauty. If you love this project, I would absolutely LOVE for you to PIN IT like crazy on Pinterest! Sharing helps others discover this free printable and simple tutorial. Thank you so much for stopping by and spending some time with me today. I hope you have a fantastic and inspiring long weekend, filled with creativity and joy! Whoop!