
Craft Your Own Pottery Barn Inspired Trunk Coffee Table: A Step-by-Step DIY Guide
Hello, fellow DIY enthusiasts and woodworking adventurers! We are absolutely thrilled to share our latest furniture building triumph with you today. This project is particularly special as it’s a collaboration with the incredibly talented Miss Ana White, a true legend in the world of DIY plans. The inspiration for this stunning piece came from a reader who reached out, captivated by a beautiful chest carried by Pottery Barn, yet daunted by its hefty price tag. We completely understood the dilemma – falling in love with a piece but not its cost is a common frustration for home decorators.
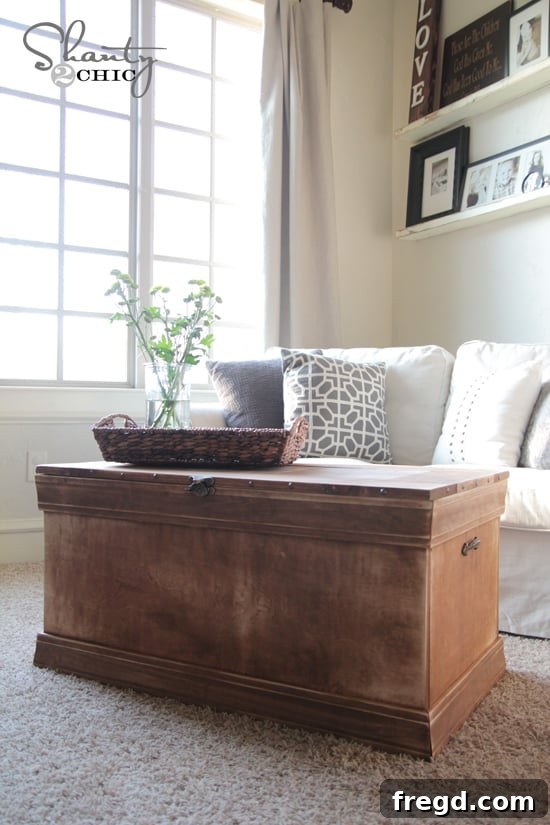
So, we put our heads together, rolled up our sleeves, and designed an equally gorgeous, functional, and budget-friendly alternative that you can build right in your own workshop. The result? A fantastic DIY storage trunk that doubles as a coffee table, mirroring the high-end look without the luxury price point. We’re beyond excited to unveil what we came up with!
Isn’t it absolutely beautiful? What might surprise you even more is how straightforward this project is. We’ve designed it to be an ideal build for beginners, so if you’ve been contemplating diving into woodworking but felt a bit intimidated, this “Becca Trunk” project is the perfect place to start. It truly showcases that with the right plans and materials, creating custom, high-quality furniture is well within your reach.
In this comprehensive guide, we’ll walk you through some essential tips and insights from our build process. Remember, for the detailed, step-by-step instructions and cutting lists, you can always get the full set of free plans over at Ana White’s site. Consider this your friendly companion guide to help you envision and execute your own magnificent storage trunk. Let’s get started on bringing this elegant piece into your home!
The Allure of a DIY Storage Trunk: Functionality Meets Style
A beautifully crafted storage trunk offers more than just aesthetic appeal; it brings unparalleled functionality to any living space. Imagine a stylish coffee table that not only serves as a central gathering point but also discreetly stores blankets, magazines, games, or even children’s toys, keeping your living room clutter-free. This DIY “Becca Trunk” embodies that perfect blend of form and utility, making it a valuable addition to your home decor. By building it yourself, you gain the unique satisfaction of customizing every detail, from the choice of wood and finish to the perfect hardware, ensuring it flawlessly complements your existing interior design.
Whether you’re aiming for a rustic farmhouse look, a classic traditional feel, or something more industrial, this versatile design can be adapted to suit your personal style. It’s an investment in both your home’s beauty and its organization, proving that practical pieces can indeed be stunning centerpieces. Plus, the joy and pride of saying, “I made that myself!” are truly priceless.
Essential Plans & Premium Materials: Building Blocks for Success
Every successful woodworking project begins with meticulous planning and the selection of quality materials. For this DIY trunk table, the plans call for 1/2 sheets of both 3/4″ and 1/4″ plywood. While plywood might not be the first material that comes to mind when you picture fine furniture, advancements in plywood manufacturing have made it an incredibly viable, economical, and beautiful option for custom builds. We strongly advocate for using PureBond Plywood whenever we get the chance, and for good reason!
Why We Choose PureBond Plywood for Superior Results
When we initially considered building beautiful furniture with plywood, we admit, it sounded a bit unconventional. Like many, our perception of plywood was perhaps limited to utilitarian applications. However, that all changed the moment we discovered PureBond Plywood. This material has completely revolutionized our approach to woodworking projects, offering an array of benefits that make it an obvious choice for stunning and sustainable furniture pieces like this DIY trunk table.
One of the most compelling reasons that immediately sold us on PureBond is its commitment to health and safety. Unlike many conventional plywood products, PureBond uses a revolutionary soy-based, formaldehyde-free glue. This is a crucial detail because traditional wood glues often release harmful volatile organic compounds (VOCs) into your indoor air, a concern we were relieved to eliminate. Knowing that our furniture contributes to a healthier home environment, free from the lingering effects of harsh chemicals, provides immense peace of mind. It’s scary to think about the chemicals we might have been breathing in from other materials until now, and PureBond offers a welcome, safer alternative for your family and pets.
Beyond the health benefits, PureBond Plywood boasts several other impressive qualities:
- Made in AMERICA: Whoop! Supporting local industries and ensuring high-quality manufacturing standards are always priorities for us. This resonates deeply with our values.
- Sustainable Sourcing: PureBond is crafted using wood from sustainably managed forests, which means you’re choosing an environmentally responsible material. This commitment to ecological practices aligns perfectly with our desire to build consciously.
- Exceptional Workability: This plywood is incredibly user-friendly. It cuts cleanly, sands smoothly, and holds screws and glue exceptionally well, making the building process more enjoyable and leading to professional-looking results, even for beginner woodworkers.
- Unrivaled Beauty and Value: Perhaps the biggest selling point for us is its stunning aesthetic. PureBond Plywood offers the gorgeous look and feel of real hardwood veneers for a fraction of the cost. You get premium aesthetics without breaking your budget. Home Depot typically stocks beautiful birch and oak options, but the versatility doesn’t stop there. You can also custom order a wide variety of species like hickory, maple, and many more, having them conveniently delivered to your local store. This flexibility is truly invaluable for matching specific design visions.
After experiencing the extensive benefits of PureBond Plywood, there’s simply no going back for us. It’s not just a material; it’s a commitment to quality, health, and sustainability that fits perfectly within our “shanty budgets” and design aspirations. We’ve even shared some videos on working with PureBond in previous projects, showcasing its ease of use and beautiful finish. You can see them here!
Mastering Joinery with the Kreg Jig K3: A Game Changer for DIYers
Every successful woodworking project relies on strong, reliable joinery, and for this DIY trunk, we employed our favorite secret weapon: the Kreg Jig. I was particularly excited to finally put my new Kreg Jig K3 model to the test for this build. It had been sitting in its box for a while, largely because I was so content with my trusty K4 model. However, curiosity got the better of me, and I decided to give the K3 a try. Let me tell you, it instantly became my new favorite!
For those unfamiliar, a Kreg Jig is a pocket hole system that allows you to create incredibly strong joints quickly and easily, making it perfect for both novice and experienced woodworkers. It essentially drills angled holes into one piece of wood, which then connects to another piece with self-tapping screws, creating a hidden, robust joint. While the K3 performs the same fundamental task as its predecessor, the K4, it introduces a few key differences that significantly enhance the user experience. My absolute favorite new feature is its front clamp capability!
This might sound like a small detail, but it’s a total game-changer. With the K3, you no longer have to awkwardly reach around your workpiece to unclamp your wood after drilling. Instead, you can release the clamp conveniently from the front. This ergonomic improvement makes the process smoother, faster, and much less cumbersome, especially when working with larger or multiple pieces. It’s a simple innovation that delivers a huge improvement in workflow – we absolutely love it! Throughout this entire trunk build, I utilized 3/4″ pocket holes paired with 1 1/4″ pocket hole screws, a combination that provides exceptional strength and stability for plywood constructions.
Building the Foundation: Constructing Your DIY Trunk Base
With our premium PureBond Plywood cut to size (according to Ana White’s plans) and our Kreg Jig ready, it was time to assemble the main box structure of the trunk. This is where the magic of pocket hole joinery truly shines, allowing for robust and clean connections. The process involves drilling pocket holes into the edges of your plywood pieces and then securing them together with screws and wood glue. Ensure your measurements are precise and your cuts are square, as this foundational step dictates the overall integrity and appearance of your finished trunk.
Here is a close-up shot of an inside corner of the box, illustrating exactly how we brought the main structure together. By carefully aligning the edges and driving the pocket hole screws, you create a very strong, stable box that will serve as the base for your beautiful new piece of furniture.
Adding Character with Trim & Secure Adhesion
Once the main box of the trunk was assembled, the next step was to add the trim, which significantly enhances the aesthetic appeal and gives the trunk that desirable finished look. For this, we relied on a combination of strong adhesive and precise fastening. I meticulously attached all the trim pieces using a generous amount of Gorilla Wood Glue, which provides an incredibly strong bond, complemented by finish nails driven with my trusty Ryobi Finish Nailer. This combination ensures that the trim is securely fastened and will withstand the test of time, creating crisp, professional-looking edges. The process is remarkably simple and yields impressive results.
A quick tip for those who might not yet own a power miter saw: don’t let that deter you! You can absolutely achieve precise, angled cuts for your trim pieces with a more traditional, budget-friendly tool. Consider investing in a simple miter box and hand saw. This classic combination is effective, easy to use, and gets the job done beautifully, proving that you don’t need a fully equipped workshop to create stunning DIY projects. It’s all about having the right technique and a bit of patience.
Crafting the Perfect Trunk Lid: Simplicity and Strength
Now, let’s move on to the top of the trunk – a component that is not only crucial for functionality but also contributes significantly to the overall aesthetic. You might be surprised by how easy this part is to construct, especially when you leverage the efficiency and strength of the Kreg Jig system. Essentially, you’ll be using pocket hole joinery to bring the entire lid together seamlessly.
Begin with your center pieces. These form the core of your trunk lid and will determine its main surface area. As you can see in the image below, I’ve strategically placed my 3/4″ pocket holes along the edges of these boards. When joining multiple pieces to create a wider panel, ensuring consistent pocket hole placement is key to a flat and strong lid. Dry-fit your pieces first to ensure a perfect alignment before applying glue and driving screws.
Your final step in constructing the lid is to add the side pieces. These not only complete the panel but also provide a finished edge and additional structural integrity. The placement of pocket holes for these side pieces is critical to ensure a secure and flush connection. Take your time to clamp everything properly before driving the screws to prevent any movement. This method results in a robust and visually appealing lid, ready for its finishing touches.
Easy peasy, right? With the main structure and lid now assembled, you’re well on your way to a stunning Pottery Barn-inspired trunk!
Finishing Touches: Stain, Distress, and Hardware for Character
Now for the truly transformative part of this DIY project – bringing out the character and charm of your trunk through thoughtful finishing. This is where you can truly personalize your piece and achieve that coveted high-end, custom look.
Achieving a Timeless Look with Wood Stain
To give this trunk a rich, warm, and inviting appearance that perfectly complements its rustic yet refined aesthetic, I chose one of my very favorite colors: Rust-Oleum Ultimate Wood Stain in Early American. This particular stain provides a beautiful, classic brown tone with subtle reddish undertones, creating a timeless appeal that enhances the natural grain of the PureBond Plywood. Applying stain is a straightforward process, but taking your time ensures an even and professional finish. Always test your stain on a scrap piece of wood first to ensure you achieve the desired color depth before applying it to your entire project. Two thin coats are often better than one thick coat, allowing for more control over the final hue.
The Art of Distressing for Rustic Charm
To achieve that sought-after distressed look – giving the trunk an aged, well-loved character as if it has a story to tell – we employed another one of our favorite tools: the Ryobi’s Corner Cat Finish Sander. I simply cannot speak highly enough about this little sander. It’s an absolute powerhouse despite its compact size, offering the perfect balance of lightweight maneuverability and efficient sanding capability. Plus, it’s incredibly affordable, making it a fantastic addition to any DIYer’s toolkit.
The key to successful distressing is to strategically sand down the edges, corners, and any raised areas that would naturally show wear over time. This technique reveals glimpses of the lighter wood underneath the stain, creating a beautiful contrast and an authentic, timeworn appearance. Simply sand the entire piece until you achieve your desired level of distressing. Remember, it’s all about personal preference, so you can go as subtle or as dramatic as you like to truly make the piece your own.
Selecting Hardware to Elevate Your Design
The final elements that tie the entire design together and amplify the Pottery Barn-inspired aesthetic are the hardware pieces. These small details can make a monumental difference in the overall look and feel of your DIY trunk. For this project, I carefully selected hardware that would enhance its rustic yet sophisticated charm.
I found the decorative nail heads at Lowe’s, which are fantastic for adding an antique, industrial touch along the edges and panels of the trunk. These nail heads are incredibly easy to install and instantly elevate the perceived value and historical feel of the piece. Also from Lowe’s, I sourced the cute latch for the top, which not only adds a functional closure but also contributes to the authentic trunk aesthetic. These elements work in harmony to create a cohesive and captivating design.
To complete the look, I sourced the stylish side handles from Hobby Lobby. At just $3 a piece, these handles offer incredible value, providing a high-end look without the premium price tag. They not only make it easier to move the trunk but also add another layer of authentic charm, reminiscent of vintage travel chests. When selecting hardware, consider both its visual impact and its functionality to ensure it truly enhances your DIY creation.
Your Masterpiece Revealed: Inspiring Gallery
And there you have it! From raw materials to a captivating centerpiece, your DIY Pottery Barn-inspired trunk coffee table is complete. Take a moment to admire your handiwork and the beautiful transformation. This project truly demonstrates how dedication and the right tools can lead to stunning, high-quality furniture that not only looks fantastic but also serves a practical purpose in your home. We’re so proud of this piece and hope these additional photos inspire you to embark on your own building journey.
Ready to Build? Access Your Free Plans!
Whew, that was quite the journey, wasn’t it? We hope this detailed guide has inspired and empowered you to tackle your own DIY furniture projects. Remember, all the specific measurements, cuts, and comprehensive instructions you’ll need to build your very own “Becca Trunk” are available for free! Simply head over to Ana White’s site to get the full set of free plans. She provides everything you need to confidently construct this beautiful storage coffee table.
Thank you so much for stopping by and taking the time to explore this exciting build with us. We truly appreciate your engagement and enthusiasm for DIY. Please don’t hesitate to reach out if you have any questions at all about the process, materials, or tools mentioned. We’re always here to help guide you through your projects!
Share Your Creations!
We would absolutely LOVE for you to pin this trunk project and share it with your friends, family, and fellow DIYers! Spreading the word about accessible and affordable custom furniture helps inspire even more people to create beautiful homes. Happy building, and have a wonderful day!
~Whitney