
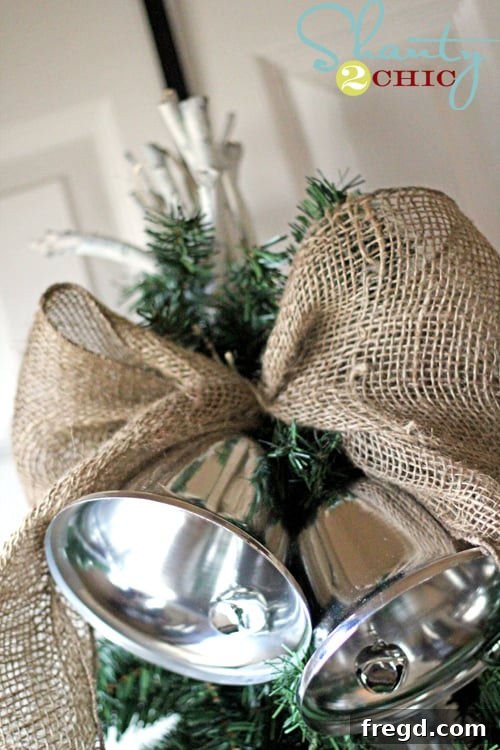
The holiday season is a time for warmth, joy, and beautifully decorated homes. Few things capture the essence of festive charm quite like a well-crafted Christmas swag gracing your front door or mantelpiece. Recently, while flipping through the pages of a beloved Pottery Barn Christmas catalog, I instantly fell in love with their enchanting Silver Bells Swag. Its rustic elegance and timeless appeal were simply irresistible. However, the hefty $69 price tag, coupled with its almost immediate unavailability, quickly dampened my holiday spirit. But instead of letting that deter me, I saw it as an exciting challenge: why not create my own?
The allure of Pottery Barn’s aesthetic is undeniable, but their prices can often be a barrier. That’s where the magic of DIY comes in! Crafting your own decorations not only saves a significant amount of money but also infuses your home with a unique, personal touch that mass-produced items simply can’t replicate. This project became a mission to achieve that coveted high-end look without breaking the bank, transforming my frustration into festive creativity. I’m thrilled to share how I crafted my very own stunning Silver Bells Swag, capturing all the charm of the Pottery Barn original for a mere fraction of the cost—under $15!
If you’re looking to add a touch of handcrafted elegance to your holiday decor this year, or simply wish to tackle a rewarding DIY project that yields impressive results, then you’ve come to the right place. This step-by-step tutorial will guide you through creating a beautiful, budget-friendly Christmas swag that radiates farmhouse charm and festive spirit. Get ready to transform simple materials into a dazzling holiday statement piece that will have your guests asking, “Where did you buy that?!”
Gathering Your Festive Materials: The Budget-Friendly Approach
One of the most satisfying aspects of this DIY project is how affordable the supplies are, especially if you know where to look and when to buy. Holiday sales are your best friend! Here’s a detailed breakdown of what you’ll need to create your own gorgeous silver bells swag, all without emptying your wallet:
-
Natural Branches: $Free
The foundation of our swag comes straight from nature! Look for sturdy, interesting branches in your yard or local park (ensure you have permission if not on your property). The varying lengths and textures of real branches add an authentic, rustic feel that artificial options often lack. Aim for branches that are relatively straight but have smaller offshoots, giving your swag a fuller appearance. Gather a good handful, as you’ll be bundling them together. -
Bushel of Artificial Garland: Michael’s $2.50
I found this incredible deal during a 50% off Christmas items sale at Michael’s. This garland adds the necessary evergreen fullness to your swag. Choose a garland with a realistic look, preferably one that has a bit of texture to it. Don’t worry if it’s a bit long; we’ll be cutting it into strips. Keep an eye out for post-holiday sales or use coupons at craft stores to snag this essential element at a fantastic price. -
Burlap Garland/Ribbon: Michael’s $2.00
Burlap instantly brings a rustic, farmhouse-chic vibe, perfectly complementing the Pottery Barn aesthetic. A roll of burlap garland or wide burlap ribbon will be used to create the central bow, adding texture and warmth to the design. Again, check craft stores for sales or look for natural jute webbing as an alternative. -
Large Silver Bells: Hobby Lobby $5.00 each
These are the stars of the show! The large silver bells are what truly give this swag its iconic “Silver Bells” name and Pottery Barn inspiration. I purchased two of these beauties at Hobby Lobby, also benefiting from a 50% off Christmas items sale. Look for bells that have a nice, weighty feel and a slightly distressed or antique silver finish for that authentic rustic appeal. Two large bells provide a balanced and impactful focal point. -
Medium Jingle Bells: Michael’s $1.50
A small bag of medium-sized jingle bells adds delightful texture and a subtle jingling sound. These will be scattered throughout the garland, providing continuity and extra sparkle. Silver or antique brass bells would work wonderfully. You might even find a multi-pack of assorted sizes for variety. -
Rust-Oleum Heirloom White Spray Paint: ~$5-$7
This specific shade is perfect for achieving a soft, weathered, almost frosted look on your branches, reminiscent of a winter wonderland. A single can should be sufficient for multiple coats. Ensure you have good ventilation when using spray paint. -
Additional Supplies: Twist ties, thin jute twine, hot glue gun and glue sticks, sharp scissors or wire cutters.
Crafting Your Pottery Barn-Inspired Silver Bells Swag: A Step-by-Step Guide
Now that you have all your materials, let’s dive into the creative process. This project is surprisingly simple and comes together quickly, primarily relying on hot glue for assembly. You’ll be amazed at how easily you can achieve such a polished look!
Step 1: Preparing Your Natural Branches
Begin by giving your foraged branches a beautiful, frosty finish. Lay your branches out on a protected surface in a well-ventilated area, preferably outdoors. Apply about two light, even coats of Rust-Oleum Heirloom White spray paint. Allow each coat to dry thoroughly before applying the next. This step transforms ordinary branches into elegant, winter-white elements, providing a stunning contrast to the green garland.
Step 2: Assembling the Branch Base
Once your painted branches are completely dry, it’s time to create the base structure of your swag. Carefully trim the branches to your desired length. For a typical door swag, aim for lengths that will create an appealing cascading shape, perhaps 24-36 inches at the longest point, tapering down. Gather about three branches together at a time, forming small, manageable bunches. Use twist ties to securely hold each individual bunch together at the top. This provides a stable foundation and allows you to arrange the branches aesthetically before permanently securing them.
Step 3: Unifying the Branch Bundles
With your individual branch bunches prepared, the next step is to combine them into a cohesive swag shape. Arrange your bunches to form the overall desired silhouette of your swag. Once you’re happy with the arrangement, take a thin piece of jute twine and firmly attach all of the bunches together at the top. Wrap the twine multiple times and tie it securely to ensure your swag maintains its shape. This creates a central hanging point and strengthens the structure.
Step 4: Integrating the Evergreen Garland
Unfold your artificial garland and carefully cut it into four equal strips. These strips will provide the lush, evergreen backdrop for your silver bells. The flexibility of using strips allows for easier placement and a more natural, flowing look compared to using one long piece.
Now, artfully arrange these garland strips on top of your white-painted branches. Don’t be afraid to cut them down further as needed to fit the contours and length of your swag. The goal is to create a harmonious blend of the rustic branches and the vibrant green garland, allowing both elements to peek through. Take your time to position them for the most visually appealing effect.
Once you are satisfied with the placement of your garland strips, use thin pieces of jute string to firmly attach them to the underlying branches. Tie knots securely but discreetly, ensuring the garland is well-integrated and won’t shift. This step ensures the durability of your swag, especially if it will be exposed to outdoor elements.
Step 5: Embellishing with Jingle Bells
Now for the truly fun part – adding the jingle bells that bring this swag to life! Heat up your hot glue gun and prepare for some delightful embellishment.
Apply a tiny dab of hot glue to the back or top of each medium jingle bell. Be careful not to use too much, as a little goes a long way. The goal is to secure them without creating visible glue residue.
Thoughtfully arrange and press the bells onto the garland, distributing them evenly to create a sparkling effect. You can group them in twos or threes, or scatter them individually. This adds a whimsical touch and depth to your evergreen base.
Next, carefully tie each of your large silver bells to the existing twine at the top of your swag. Ensure they hang at an appealing length, usually just below the main body of the swag. After tying, I recommend applying a small bead of hot glue where the bells meet each other to keep them from clanking excessively or being blown around by the wind. This also helps maintain their position and creates a more cohesive cluster.
Step 6: Crafting the Rustic Burlap Bow
A beautiful burlap bow is the perfect finishing touch, adding a rustic focal point to your elegant swag. Here’s how to create a simple yet striking bow:
Take one end of your burlap garland or ribbon and fold it over to create a single loop. This will be one side of your bow. Adjust the size of the loop to your preference, keeping in mind the overall size of your swag.
To cinch up the loop and form the center of the bow, use a small piece of thin jute string. Wrap it tightly around the folded burlap and tie a knot. This creates a neat, gathered look.
Repeat the same steps on the other side of your burlap ribbon to create a matching loop, forming the classic bow shape. Once both loops are formed and cinched, your burlap bow is complete! Finally, hot glue the finished bow securely above the large silver bells, ensuring it sits prominently at the top of your swag. Reinforce its attachment with a bit more jute twine tied from the top of the swag for extra stability.
Your DIY Masterpiece is Complete!
And just like that, your beautiful, custom-made Silver Bells Swag is ready to adorn your home! This entire project, primarily relying on the trusty hot glue gun, took approximately an hour to piece together. It’s incredibly satisfying to create something so elegant and festive with your own hands, especially when it saves you so much money compared to retail options. I am absolutely in love with the outcome, and I’m sure you will be too! This DIY Christmas swag is not just a decoration; it’s a testament to creativity, resourcefulness, and the joy of personalizing your holiday decor.
Tips for Customization and Longevity:
- Vary Your Bells: Experiment with different finishes for your bells – antique brass, distressed copper, or even colorful jingle bells can create a unique look.
- Add Greenery: Incorporate real evergreen clippings from pine, cedar, or spruce for a wonderful natural scent and even more texture. Just remember they won’t last as long as artificial options.
- Ribbon Alternatives: Instead of burlap, consider plaid ribbon for a cozy cabin feel, velvet for classic elegance, or a simple striped pattern for a modern twist.
- Secure for Outdoors: If placing your swag outdoors, ensure all elements are very securely attached with both glue and twine, as wind and weather can be harsh. Consider a sealant spray for your painted branches to protect them.
- Storage: To make your beautiful swag last for many seasons, store it carefully in a sturdy box, protecting the bells and branches from getting crushed.
I hope this tutorial inspires you to embrace your inner crafter this holiday season! Creating your own decorations is a wonderful way to save money, add a personal touch to your home, and enjoy the true spirit of the holidays. If you have any questions or simply want to share your own DIY success stories, please feel free to leave a comment on our Facebook page. We love hearing from our community and will get back to you as soon as possible!
Thank you so much for stopping by and happy crafting!
~Ashley